Duet setup - instructions in progress
-
Eaglezsoar

- ULTIMATE 3D JEDI
- Posts: 7185
- Joined: Sun Apr 01, 2012 5:26 pm
Re: Duet setup - instructions in progress
Come on guys discuss this some more, I am learning a lot with all the postings going on.
“ Do Not Regret Growing Older. It is a Privilege Denied to Many. ”
Re: Duet setup - instructions in progress
I'm not sure what you mean exactly by "need to be explicit". I wasn't aware there was a vague way of picking "Relative" or "Absolute" in Kisslicer.mhackney wrote:You can use either but you just need to be explicit. I use Relative because I've developed a lot of post processing scripts to do special things and they work with Relative extrusion.
I do know that with Absolute set, it tried spinning the extruder like a top. Relative makes it behave very nicely! I'm still getting skips on my test cubes, but I suspect that's related to temperature as I've got the drive set to 1.5A. (I'm printing with a .35 nozzle right now and I know that's a contributing factor to the skipping, especially at the speed I'm printing at.) What would need to be changed in the config.g file to permit Absolute to work?
Here's a few observations of the adventure so far...
The "default" thermistor configuration is pretty spot-on with the stock SeeMeCNC hot end. I get a 2 to 3 degree difference between the stated temp and what my thermocouple tells me. My sampling point is the 90 degree corner made by the vertical nut flat on the nozzle and the horizontal flat face of the heater block. The temperature control is very tight - even with the PEEK fan running, I've not seen it over-shoot more than a few degrees before settling down.
I've done ZERO calibration on Blue MAX. The only things I've set were the diagonal rod to 269 (Blue Max has the TL arms, stock carriages) and the delta/horizontal radius to 135, which is ballpark-ish for the v1 & stock arms. I wanted to see how really good the "magical" auto calibration was.
I didn't even bother trying to calibrate the extruder - it's at the 92.5 default for the EZStruder.
My first successful print was a 25x25x6mm test cube. I didn't record the orientation on the build plate. I sliced it using Kisslicer with a .20mm layer height and a 20% octagon infill. I replaced the normal G28 in my start g-code with a G32 in order to kick off the auto-cal before the print begins. (Mhackney is right - there's no reason not to run auto-cal before each print - the amount of time it takes is trivial.)
The test part measures out at 24.96 x 25.23 x 5.94. That's pretty damn impressive for a printer that's had ZERO manual calibration done!
Just to see if it would change, I printed a 50x50x6mm test part and remembered to label the axes before I popped it off the build plate.
Measured along X/Y it's 49.73mm and along Z to X/Y it's 50.00 on the nose. Thickness varies between 5.89 and 5.93, depending on where I measure it. I toyed with the extrusion temp to get it to quit skipping during the print, so that may have had an effect on the end result.
The next print I'm running is Mhackney's Duet Flat Mount. I'd printed it once on Blue MAX as calibrated by OpenDACT some months ago and the mounting holes are off - the scale is wrong for the part by enough that I could really only use two diagonal holes, and even then one screw goes in at an inward-facing angle. We'll see how it goes with the Duet auto-cal.
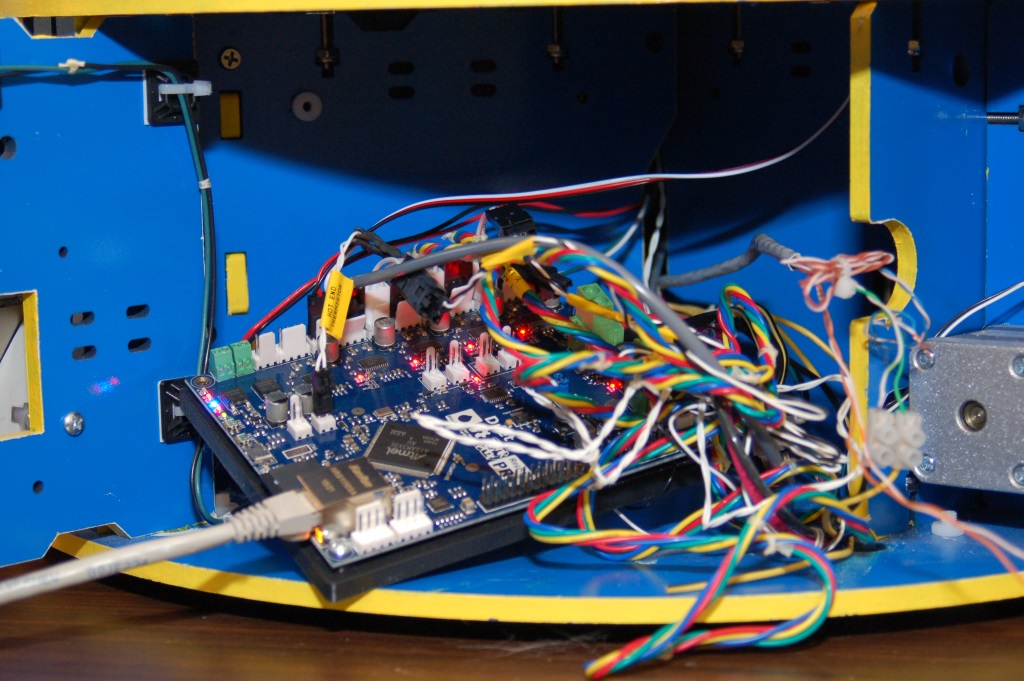
Keep in mind that this is a minimum-effort configuration - I don't even have the layer fan hooked up and the PEEK fan is hard-wired right now. It's UGLY. (http://www.geneb.org/images/duet-rats-nest.jpg" onclick="window.open(this.href);return false;)
So my conclusions are this - the auto-calibration is near enough "magical" to not make any difference.
Second, you can have my Duet when you pry it from my cold, dead, hands.
My ferrules & crimp tool won't show up until tomorrow, so I won't be able to really get into the refit until then. There's also been some discussion of making a branch of the dc42 firmware that will drive the LCD displays that come with the Rostock MAXen, so that would be nice to have.
If you're on the fence on buying a Duet and you've either already got FSRs installed or have some other Z-probe, BUY. THIS. BOARD. You won't regret the upgrade.
g.
Delta Power!
Defeat the Cartesian Agenda!
http://www.f15sim.com - 80-0007, The only one of its kind.
http://geneb.simpits.org - Technical and Simulator Projects
Defeat the Cartesian Agenda!
http://www.f15sim.com - 80-0007, The only one of its kind.
http://geneb.simpits.org - Technical and Simulator Projects
-
IMBoring25
- Printmaster!
- Posts: 616
- Joined: Wed Mar 18, 2015 1:11 am
Re: Duet setup - instructions in progress
M82 sets extruder to absolute. M83 sets it to relative. You can put it in your config.g or your start gcode. I do both, just in case.
Re: Duet setup - instructions in progress
Yep, that's where I stepped in it. The default in config.g is M83, which explains why the extruder lost its little mind when fed absolutes.
tnx.
g.
tnx.
g.
Delta Power!
Defeat the Cartesian Agenda!
http://www.f15sim.com - 80-0007, The only one of its kind.
http://geneb.simpits.org - Technical and Simulator Projects
Defeat the Cartesian Agenda!
http://www.f15sim.com - 80-0007, The only one of its kind.
http://geneb.simpits.org - Technical and Simulator Projects

Re: Duet setup - instructions in progress
Been there, done that!
On the good news front, I've now successfully created (and documented) a build environment for RepRapFirmware on Mac OS X that should also apply to Linux and Windows and I can successfully build David's latest firmware. I'll test the process on Linux and Windows later this week and tweak if necessary. What a royal PIA though. Only pure stubbornness and a failure is not an option attitude forced me through this.
On the good news front, I've now successfully created (and documented) a build environment for RepRapFirmware on Mac OS X that should also apply to Linux and Windows and I can successfully build David's latest firmware. I'll test the process on Linux and Windows later this week and tweak if necessary. What a royal PIA though. Only pure stubbornness and a failure is not an option attitude forced me through this.
Sublime Layers - my blog on Musings and Experiments in 3D Printing Technology and Art
Start Here:
A Strategy for Successful (and Great) Prints
Strategies for Resolving Print Artifacts
The Eclectic Angler
-
Windshadow

- Printmaster!
- Posts: 526
- Joined: Mon Nov 30, 2015 6:35 pm
- Location: Mid Coast Maine
Re: Duet setup - instructions in progress
I am not on the fence you have convinced megeneb wrote:
If you're on the fence on buying a Duet and you've either already got FSRs installed or have some other Z-probe, BUY. THIS. BOARD. You won't regret the upgrade.
g.
But this is winter heating season in Maine and when I woke up this morning at about 6:30 it was -15f outside and the temp in my house was 45f in my bed room.... a fast decent to the basement found the furnace was not firing I hit the reset switch and the burner motor came on but no fire just a stink of raw fuel oil I tried reset once more and the same thing and a total reek of fuel oil.... called the folks that service my furnace with whom I have a $150 a year "Defender" service policy and got fires going in all 6 of my fireplaces to preserve the pipes from another freeze up. the service found a totally dead igniter box and heat was restored by 10am whew... the point is that i need to keep extra cash in the grouch bag in the winter.
so I will be doing this but I see that a new rev of the Duet is due this spring and perhaps by then the SeeMeCNC probe will also will be ready as will your fool proof installation instructions for this fool to do the upgrade
Re: Duet setup - instructions in progress
That's what I meant by being explicit.geneb wrote:Yep, that's where I stepped in it. The default in config.g is M83, which explains why the extruder lost its little mind when fed absolutes.
tnx.
g.
Sublime Layers - my blog on Musings and Experiments in 3D Printing Technology and Art
Start Here:
A Strategy for Successful (and Great) Prints
Strategies for Resolving Print Artifacts
The Eclectic Angler
Re: Duet setup - instructions in progress
Quick question. The upper endstops, are they a common ground? i.e. can I use four wires to get to the top or do I need six? Also where do you plug the three pin connector from the FSR board?
Re: Duet setup - instructions in progress
The JohnSL plugs into the extruder "E" endstop connector as shown in the first photo in this thread.
I think they can be common ground but most just run a twisted pair up to each endstop. What'd the motivation to do it differently?
I think they can be common ground but most just run a twisted pair up to each endstop. What'd the motivation to do it differently?
Sublime Layers - my blog on Musings and Experiments in 3D Printing Technology and Art
Start Here:
A Strategy for Successful (and Great) Prints
Strategies for Resolving Print Artifacts
The Eclectic Angler
Re: Duet setup - instructions in progress
mhackney wrote:I think they can be common ground but most just run a twisted pair up to each endstop. What'd the motivation to do it differently?
Just trying to reduce the number of wires up top or open up positions for upgrades.

Re: Duet setup - instructions in progress
+1 for powerpoles. I use them on lots of stuff on my printer.dbarrans wrote:http://www.powerwerx.com/anderson-powerpoles/
-
Eaglezsoar
- ULTIMATE 3D JEDI
- Posts: 7185
- Joined: Sun Apr 01, 2012 5:26 pm
Re: Duet setup - instructions in progress
It is tough to be retired and keep money in the grouch bag isn't it? Also there and it is tough. I am glad that it worked out for you.Windshadow wrote:I am not on the fence you have convinced megeneb wrote:
If you're on the fence on buying a Duet and you've either already got FSRs installed or have some other Z-probe, BUY. THIS. BOARD. You won't regret the upgrade.
g.
But this is winter heating season in Maine and when I woke up this morning at about 6:30 it was -15f outside and the temp in my house was 45f in my bed room.... a fast decent to the basement found the furnace was not firing I hit the reset switch and the burner motor came on but no fire just a stink of raw fuel oil I tried reset once more and the same thing and a total reek of fuel oil.... called the folks that service my furnace with whom I have a $150 a year "Defender" service policy and got fires going in all 6 of my fireplaces to preserve the pipes from another freeze up. the service found a totally dead igniter box and heat was restored by 10am whew... the point is that i need to keep extra cash in the grouch bag in the winter.
so I will be doing this but I see that a new rev of the Duet is due this spring and perhaps by then the SeeMeCNC probe will also will be ready as will your fool proof installation instructions for this fool to do the upgrade
“ Do Not Regret Growing Older. It is a Privilege Denied to Many. ”
Re: Duet setup - instructions in progress
Got any grandkids you can sell for science experiments? 
g.
g.
Delta Power!
Defeat the Cartesian Agenda!
http://www.f15sim.com - 80-0007, The only one of its kind.
http://geneb.simpits.org - Technical and Simulator Projects
Defeat the Cartesian Agenda!
http://www.f15sim.com - 80-0007, The only one of its kind.
http://geneb.simpits.org - Technical and Simulator Projects
-
Eaglezsoar
- ULTIMATE 3D JEDI
- Posts: 7185
- Joined: Sun Apr 01, 2012 5:26 pm
Re: Duet setup - instructions in progress
Dr Mengela?geneb wrote:Got any grandkids you can sell for science experiments?
g.
“ Do Not Regret Growing Older. It is a Privilege Denied to Many. ”

Re: Duet setup - instructions in progress
This sounds like a must do upgrade for me, but when it comes to electronic components and programming I fall way short.
Can i just replace the rambo with the duet and keep the stock lcd and micro switchs?
Other thing i dont understand is you flash the duet with the dc42 repitier, but then your other files go on the sd card or something?? Im still researching and trying to figure it out, and its giving me a headache!
Can i just replace the rambo with the duet and keep the stock lcd and micro switchs?
Other thing i dont understand is you flash the duet with the dc42 repitier, but then your other files go on the sd card or something?? Im still researching and trying to figure it out, and its giving me a headache!
http://www.youtube.com/user/aonemarine" onclick="window.open(this.href);return false;
Lost pla castings? see me
Lost pla castings? see me
-
IMBoring25
- Printmaster!
- Posts: 616
- Joined: Wed Mar 18, 2015 1:11 am
Re: Duet setup - instructions in progress
I don't know about the stock LCD, but you really don't need an LCD with the Duet because the web interface is great.
Generally speaking, you only need to reflash the Duet for version upgrades or to do exotic things not supported by the baseline firmware. Most of the firmware configuration is handled by a g-code (config.g) file that is run off the MicroSD card on startup. The card also stores the back end for the web interface and any job-related gcode files you want to store there to run.
Generally speaking, you only need to reflash the Duet for version upgrades or to do exotic things not supported by the baseline firmware. Most of the firmware configuration is handled by a g-code (config.g) file that is run off the MicroSD card on startup. The card also stores the back end for the web interface and any job-related gcode files you want to store there to run.
Re: Duet setup - instructions in progress
I am trying to update the RepRapFirmware. Downloaded all the files mhackney posted (bossac application, firmware.bin, and the flash duet.sh), updated my port information.
Attached is the error received.
What am I doing wrong?
Thanks.
Attached is the error received.
What am I doing wrong?
Thanks.
- Attachments
-
My 3D-Printing learning curve is asymptotic to a Delta's X, Y and Z-axes
Re: Duet setup - instructions in progress
3D-Print - don't do it that way. The shell script has a problem so run bossac from the command line as per my original blog post here: http://sublimelayers.blogspot.com/2015/ ... -os-x.html" onclick="window.open(this.href);return false;
Sorry for the confusion. I need to sort out the problem in the script. Here is the actual command you run in a Terminal window (assuming bossac and the firmware .bin file are in the same folder and you 'cd' to that location:
/Applications/Arduino.app/Contents/Resources/Java/hardware/tools/bossac --port=tty.YOUR_PORT_# -U true -e -w -v -b RepRapFirmware-1.09o-dc42.bin -R
Replace the parts in bold with your specific port and firmware.
Sublime Layers - my blog on Musings and Experiments in 3D Printing Technology and Art
Start Here:
A Strategy for Successful (and Great) Prints
Strategies for Resolving Print Artifacts
The Eclectic Angler
Re: Duet setup - instructions in progress
You can swap the RAMBo for a Duet and use everything except the LCD display. The Duet does not support that. You can either not use a display (the built in web interface is very nice or you can use MatterControl or some other control app) or use the PanelDue display which was made for Duet and very very nice touch screen in color.
Sublime Layers - my blog on Musings and Experiments in 3D Printing Technology and Art
Start Here:
A Strategy for Successful (and Great) Prints
Strategies for Resolving Print Artifacts
The Eclectic Angler
-
IMBoring25
- Printmaster!
- Posts: 616
- Joined: Wed Mar 18, 2015 1:11 am
Re: Duet setup - instructions in progress
I'm not sure what arguments and/or permissions that shell script might need. The instructions I've been using to flash mine came from the RepRapPro site, where they call bossac directly, the Mac command being:
The arguments are -e[rase], -w[rite], -v[erify], -b[oot] and the path to the firmware image you want to flash.
Code: Select all
/Applications/Arduino.app/Contents/Resources/Java/hardware/tools/bossac -e -w -v -b RepRapFirmware-XXX-DD-MM-YYYY.binRe: Duet setup - instructions in progress
Thank you!!
Used your command as detailed. Now I don't have the correct port.
What do you mean by "do an 'ls' in /dev to find see the ports before the Duet is connected."
Used your command as detailed. Now I don't have the correct port.
What do you mean by "do an 'ls' in /dev to find see the ports before the Duet is connected."
My 3D-Printing learning curve is asymptotic to a Delta's X, Y and Z-axes
Re: Duet setup - instructions in progress
I found Davids write up on the net, very informative. https://miscsolutions.wordpress.com/201 ... -hardware/" onclick="window.open(this.href);return false;
Now I just have to sort thru it all and figure out....well everything Cant I just copy my current configuration from the eeprom and save it to the sd card for the duet?? I reallly wish I could keep the lcd, I like the simplicity and prefer the printer to be stand alone..
Now I just have to sort thru it all and figure out....well everything
http://www.youtube.com/user/aonemarine" onclick="window.open(this.href);return false;
Lost pla castings? see me
Lost pla castings? see me
-
IMBoring25
- Printmaster!
- Posts: 616
- Joined: Wed Mar 18, 2015 1:11 am
Re: Duet setup - instructions in progress
I would use the configuration that's in your current EEPROM to put the values into the sample config.g for deltas. That should be a good place to start. Use the g-code reference to help interpret things and find what else you want to configure.
If you plug it into the same network as your home wireless connection, you could technically use a cell phone or tablet connected to the web interface as a sort of LCD.
If you plug it into the same network as your home wireless connection, you could technically use a cell phone or tablet connected to the web interface as a sort of LCD.
Re: Duet setup - instructions in progress
Thanks to everyone and their help........ Was able to commission the Duet and the PanelDue.
After updating the firmware for the Duet, I in similar fashion updated the PanelDue as follows.......... I used the following from the Terminal Screen:
...............................
Last login: Mon Feb 29 20:10:53 on ttys000
iMac:~ online2005$ cd desktop
iMac:desktop online2005$ cd duet
iMac:duet online2005$ ls
PanelDue-7.0-1.13.bin RepRapFirmware-dev
RepRapFirmware-1.09r-dc42.bin bossac
iMac:duet online2005$ ./bossac -e -w -v -b PanelDue-7.0-1.13.bin
Device found on cu.usbmodem1461
Atmel SMART device 0x289a0760 found
Erase flash
done in 0.004 seconds
Write 121504 bytes to flash (475 pages)
[==============================] 100% (475/475 pages)
done in 8.941 seconds
Verify 121504 bytes of flash
[==============================] 100% (475/475 pages)
Verify successful
done in 6.946 seconds
Set boot flash true
iMac:duet online2005$
- Attachments
-
My 3D-Printing learning curve is asymptotic to a Delta's X, Y and Z-axes
Re: Duet setup - instructions in progress
Finally connected the Duet and PanelDue to the new build of mine. Following the instruction in this thread made it quite simple. Thank you Mhackney for such a great write up. Few questions linger. When I Home the axis either through PanelDue home button or through G28 command it moves VERY slowly. Is there a way to adjust the homing speed to have it home faster?
Also in the sample config.g file Mhackney has
Thanks
Also in the sample config.g file Mhackney has
Is X -0.22° Y -0.16° Z 0.00 specific corrections to your printer?M665 R182.55 L288.0 B105 H255.83 X -0.22° Y -0.16° Z 0.00
Thanks