
Okay, my Max v2 arrived Friday, but I didn't touch it until Saturday afternoon because I was finishing putting a clutch into my sons car.
So here is where it stands after about 10 hours of work:
Hmmm. not sure how to inline the images. I attached it.
I have some pictures for Gene's manual that show a couple things he missed. I have them on my dropbox but am unsure how to share them, I have done it before, but it seems different now
You might see that the CC eyes are backwards on my cheapskates, that's because I had already mounted all the hardware to the other piece but from the wrong side.
So instead of pulling out the T-nuts and the u-joint, I just flipped the CC eyes panel and they work fine.
I also chose white because I thought it would be easier to see and work with. Although my Onyx snowflake base is in black, just the opposite of CGbobio's black unit with a white snowflake.
Tonight I was interrupted twice by Frodo Baggins (the killer cat) when he brought me the first two Meadow Voles of spring.
Tonkabot's Max V2 Build
Tonkabot's Max V2 Build
- Attachments
-
Re: Tonkabot's Max V2 Build
It looks great! You can use the Img button above the text editor box and paste a link between the img and /img. I haven't used images on dropbox but I'm sure you can copy a link directly to the image if not, you can post the image on an image hosting site like imgur.com and copy the link from there.
Re: Tonkabot's Max V2 Build
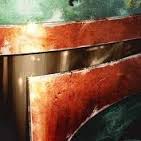
Okay, here is one of those photos. This is full size - it probably needs to be scaled down.
How big should the photos I post here be?
[img]https://www.dropbox.com/s/hwsjzqvg7z1d6n9/_6001409.JPG[/img] <--- this one doesn't work using the 'img' button
This one uses the 'URL' button and works, and dropbox does something smart so you don't download the full res photo unless you want it.
https://www.dropbox.com/s/hwsjzqvg7z1d6n9/_6001409.JPG
Re: Tonkabot's Max V2 Build
What *SPECIFICALLY* was missed?
g.
g.
Delta Power!
Defeat the Cartesian Agenda!
http://www.f15sim.com - 80-0007, The only one of its kind.
http://geneb.simpits.org - Technical and Simulator Projects
Defeat the Cartesian Agenda!
http://www.f15sim.com - 80-0007, The only one of its kind.
http://geneb.simpits.org - Technical and Simulator Projects
Re: Tonkabot's Max V2 Build
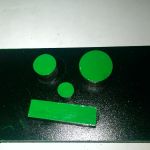
In the supports that go between the base bottom and top there are some flat head screws that are not screwed in all the way on purpose so the smoked plastic can grab on them.
your manual says to install them that way, and then the pictures in the manual don't have them. I took pictures of the same angles that include the missing screw.
This would be a new Fig. 4-11
https://www.dropbox.com/s/ty2gz0yckdclgmv/_6001406.JPG
This would be Fig. 4-12
https://www.dropbox.com/s/chrqk6vqgnebhqq/_6001407.JPG
This would be Fig. 4-13
https://www.dropbox.com/s/chrqk6vqgnebhqq/_6001407.JPG
And then this one with the current top pieces instead of the old ones This would replace Fig. 7-1
https://www.dropbox.com/s/hwsjzqvg7z1d6n9/_6001409.JPG
Also, there is a spot where you talk about using the #4 pan head 3/8 inch machine screw [I think that's what you called it],
but the provided screws are a self-threading type (which work much better than a machine screw would)
Last edited by Tonkabot on Mon Mar 31, 2014 1:04 pm, edited 1 time in total.
Re: Tonkabot's Max V2 Build
Here is the photo attached. This would replace fig. 4-11 in the manual
- Attachments
-
Re: Tonkabot's Max V2 Build
Actually for the screw naming, up on page 15 where it is going through the packing list, the are correctly called
#4, 3/8” Phillips Pan Head Sheet Metal screws.
Then later on page 43 they are called #4, 3/8” Stainless Steel Pan Head Machine Screws (3)
I am pretty sure those are the same part, and they are sheet metal screws not machine screws.
I think they are referred in a few other spots as a machine screw.
#4, 3/8” Phillips Pan Head Sheet Metal screws.
Then later on page 43 they are called #4, 3/8” Stainless Steel Pan Head Machine Screws (3)
I am pretty sure those are the same part, and they are sheet metal screws not machine screws.
I think they are referred in a few other spots as a machine screw.
Re: Tonkabot's Max V2 Build
Thanks Tonkabot. I'll dig into that on Wednesday.
Now you know why I put "Pay attention to the text, not just the pictures" bit in the introduction.
g.
Now you know why I put "Pay attention to the text, not just the pictures" bit in the introduction.
g.
Delta Power!
Defeat the Cartesian Agenda!
http://www.f15sim.com - 80-0007, The only one of its kind.
http://geneb.simpits.org - Technical and Simulator Projects
Defeat the Cartesian Agenda!
http://www.f15sim.com - 80-0007, The only one of its kind.
http://geneb.simpits.org - Technical and Simulator Projects
Re: Tonkabot's Max V2 Build
It also occurs to me that all these manual nit-picks should probably be in the manual nit-pick thread, and not here.
Gene, would you rather I leave all the manual related comments there instead of here?
Another note - when fishing the wires through the rails I found that with the 4 22ga and 4 26 ga that it was easy enough to just twist them together at the end and solder them,
and then they went through with no problems. This was after attempting for 10 minutes using the described method of twist and shove.
For the 3 pairs of endstop wires, I had no luck at all. After 15 minutes or more, SWMBO brought be a needle and thread, and I used some dental floss tied to a needle which drops through
nicely, then tied the floss to the wire and pulled it through with no trouble at all - 5 seconds max.
I also like someones idea of removing all the unused wires from the power supply. Are the yellow and blacks (plus one green) all that we actually use?
(speaking of yellow, there were only 5 yellows that were more than 13 inches long, the fifth was only about 12 inches long)
SWMBO = She Who Must Be Obeyed
-
Eaglezsoar

- ULTIMATE 3D JEDI
- Posts: 7159
- Joined: Sun Apr 01, 2012 5:26 pm
Re: Tonkabot's Max V2 Build
The yellow and black plus the green are all that you need. Some users leave a red wire in case they want to run a 5V fan in the future but it is not required.
Re: Tonkabot's Max V2 Build
Looks like you've made a fine mess of that kitchen table. I think it's impossible to have a clean area when building one of these things.
Re: Tonkabot's Max V2 Build
I was thinking that a large percentage of these things get put together on the kitchen table. The office is already full, and the basement shop is already cluttered.Tinyhead wrote:Looks like you've made a fine mess of that kitchen table. I think it's impossible to have a clean area when building one of these things.
Re: Tonkabot's Max V2 Build
I built mine on the kitchen table chair , next my desk.
Re: Tonkabot's Max V2 Build
I decided to go with bolded text that clarified that the 1/2" screws should be present, but were not in the photos.
tnx!
g.
tnx!
g.
Delta Power!
Defeat the Cartesian Agenda!
http://www.f15sim.com - 80-0007, The only one of its kind.
http://geneb.simpits.org - Technical and Simulator Projects
Defeat the Cartesian Agenda!
http://www.f15sim.com - 80-0007, The only one of its kind.
http://geneb.simpits.org - Technical and Simulator Projects
Re: Tonkabot's Max V2 Build
I remember someone saying a picture is worth a thousand words, and some 'geneb' guy saying that if a picture was worth a thousand words, a video was worth at least a million...geneb wrote:I decided to go with bolded text that clarified that the 1/2" screws should be present, but were not in the photos.
tnx!
g.
is it that hard to substitute pictures in the manual?
I'm not complaining, I have already built past that point. But I did spend extra time looking for the supports in Fig. 7-1 that have a new shape, and someone else mentioned they mounted the base supports
shown in fig 4-11,4-12, and 4-13 either backwards or left the screw out [like the current picture shows] and had to disassemble it to fix.
And a few of us have 'friends' that messed up their cheapskates because the manual is less than perfectly clear. Although in my case I followed the manual and then mounted my u-joint supports on the wrong side anyway.
I know volunteer help is under appreciated, I think most of the manual is great!
-
Eaglezsoar
- ULTIMATE 3D JEDI
- Posts: 7159
- Joined: Sun Apr 01, 2012 5:26 pm
Re: Tonkabot's Max V2 Build
I think ALL of the manual is great! Are there errors, yes indeed and there always will be. The important thing to do is to point them out in a polite manner as you have done so that they can be fixed.Tonkabot wrote:I remember someone saying a picture is worth a thousand words, and some 'geneb' guy saying that if a picture was worth a thousand words, a video was worth at least a million...geneb wrote:I decided to go with bolded text that clarified that the 1/2" screws should be present, but were not in the photos.
tnx!
g.
is it that hard to substitute pictures in the manual?
I'm not complaining, I have already built past that point. But I did spend extra time looking for the supports in Fig. 7-1 that have a new shape, and someone else mentioned they mounted the base supports
shown in fig 4-11,4-12, and 4-13 either backwards or left the screw out [like the current picture shows] and had to disassemble it to fix.
And a few of us have 'friends' that messed up their cheapskates because the manual is less than perfectly clear. Although in my case I followed the manual and then mounted my u-joint supports on the wrong side anyway.
I know volunteer help is under appreciated, I think most of the manual is great!
These manuals are about the finest I have seen and I have seen a lot of technical manuals. With the polite help of the user community these manuals will become as error free as possible but they
will never be perfect because some people would complain about a comma in the wrong place.
Re: Tonkabot's Max V2 Build
The photos are difficult to switch out once they've been formatted and it screws up the layout of the following pages until it gets fixed. A photo replacement has to be _really_ critical for me to want to go through that. The effort IS appreciated though.
As I said before, the installation orientation of the Cheapskates was explicitly spelled out a few weeks ago. I also updated the section that described the top supports and showed what the "new" shape looked like at the same time.
There's really no excuse for leaving those screws out because I cover their installation a few pages prior and the orientation instruction is highlighted in yellow. I could understand if you're only going by the photos, but that's the reason for the admonishment to read the whole text - the photos don't tell the whole story.
Note that while it *sounds* like I'm busting your chops, I'm really not - asshole is my default state and I'm not a very good diplomat. ("Diplomatic" is the art of saying "Nice doggy!" while you're looking for a big stick...)
Don't take me too seriously as I sure as hell don't. *laughs*
g.
As I said before, the installation orientation of the Cheapskates was explicitly spelled out a few weeks ago. I also updated the section that described the top supports and showed what the "new" shape looked like at the same time.
There's really no excuse for leaving those screws out because I cover their installation a few pages prior and the orientation instruction is highlighted in yellow. I could understand if you're only going by the photos, but that's the reason for the admonishment to read the whole text - the photos don't tell the whole story.
Note that while it *sounds* like I'm busting your chops, I'm really not - asshole is my default state and I'm not a very good diplomat.
Don't take me too seriously as I sure as hell don't. *laughs*
g.
Delta Power!
Defeat the Cartesian Agenda!
http://www.f15sim.com - 80-0007, The only one of its kind.
http://geneb.simpits.org - Technical and Simulator Projects
Defeat the Cartesian Agenda!
http://www.f15sim.com - 80-0007, The only one of its kind.
http://geneb.simpits.org - Technical and Simulator Projects
Re: Tonkabot's Max V2 Build
That's fine. I am not complaining , just trying to help. In fact I know that my fancy photos with 24.3 Million pixels are a pain because they are nearly always TOO BIG. I need to write a shell command that will resize them easily, right now I have to go into the gimp and rescale them if I want them to be some specific size, a command line tool like 'resize 800 600 DSC1234.JPG' that outputs a DSC1234_800x600.JPG is what I need, and I am sure it exists out there. Then we just make the new images the exact height and width of the old image, and it should drop into the manual with no reformatting issues.geneb wrote:The photos are difficult to switch out once they've been formatted and it screws up the layout of the following pages until it gets fixed. A photo replacement has to be _really_ critical for me to want to go through that.
As I said before, the installation orientation of the Cheapskates was explicitly spelled out a few weeks ago. I also updated the section that described the top supports and showed what the "new" shape looked like at the same time.
There's really no excuse for leaving those screws out because I cover their installation a few pages prior and the orientation instruction is highlighted in yellow. I could understand if you're only going by the photos, but that's the reason for the admonishment to read the whole text - the photos don't tell the whole story.
Note that while it *sounds* like I'm busting your chops, I'm really not - asshole is my default state and I'm not a very good diplomat.
Don't take me too seriously as I sure as hell don't. *laughs*
g.
Without such a command it probably takes me many seconds (like 30 or so, way more than I am patient for) just to resize to a specific size. I'll make myself such a command tonight.
-
barry99705

- Printmaster!
- Posts: 707
- Joined: Sun Aug 11, 2013 6:10 pm
- Location: west ohio
Re: Tonkabot's Max V2 Build
That's easy! You need to install imagemagic, works in all the common operating systems. Then look here.Tonkabot wrote:That's fine. I am not complaining , just trying to help. In fact I know that my fancy photos with 24.3 Million pixels are a pain because they are nearly always TOO BIG. I need to write a shell command that will resize them easily, right now I have to go into the gimp and rescale them if I want them to be some specific size, a command line tool like 'resize 800 600 DSC1234.JPG' that outputs a DSC1234_800x600.JPG is what I need, and I am sure it exists out there. Then we just make the new images the exact height and width of the old image, and it should drop into the manual with no reformatting issues.geneb wrote:The photos are difficult to switch out once they've been formatted and it screws up the layout of the following pages until it gets fixed. A photo replacement has to be _really_ critical for me to want to go through that.
As I said before, the installation orientation of the Cheapskates was explicitly spelled out a few weeks ago. I also updated the section that described the top supports and showed what the "new" shape looked like at the same time.
There's really no excuse for leaving those screws out because I cover their installation a few pages prior and the orientation instruction is highlighted in yellow. I could understand if you're only going by the photos, but that's the reason for the admonishment to read the whole text - the photos don't tell the whole story.
Note that while it *sounds* like I'm busting your chops, I'm really not - asshole is my default state and I'm not a very good diplomat.
Don't take me too seriously as I sure as hell don't. *laughs*
g.
Without such a command it probably takes me many seconds (like 30 or so, way more than I am patient for) just to resize to a specific size. I'll make myself such a command tonight.
Never do anything you don't want to have to explain to the paramedics.
Re: Tonkabot's Max V2 Build
Yep, that's it. It was already installed, I just haven't used it in ages. mogrify will do the trick if you don't care about the original image, and it looks like convert does much the same stuff, but keeps the original alone.barry99705 wrote:
That's easy! You need to install imagemagic, works in all the common operating systems. Then look here.
Or something. I'll take a look at it closer.
THanks!
Re: Tonkabot's Max V2 Build
I actually use Paint.Net for the photo edits and resizes. My only complaint is that it doesn't do text with an offset background color to make it stand out better.
g.
g.
Delta Power!
Defeat the Cartesian Agenda!
http://www.f15sim.com - 80-0007, The only one of its kind.
http://geneb.simpits.org - Technical and Simulator Projects
Defeat the Cartesian Agenda!
http://www.f15sim.com - 80-0007, The only one of its kind.
http://geneb.simpits.org - Technical and Simulator Projects
-
Eaglezsoar
- ULTIMATE 3D JEDI
- Posts: 7159
- Joined: Sun Apr 01, 2012 5:26 pm
Re: Tonkabot's Max V2 Build
Thanks for the program recommendation. I just downloaded it and it is great for what I want to do.geneb wrote:I actually use Paint.Net for the photo edits and resizes. My only complaint is that it doesn't do text with an offset background color to make it stand out better.
g.
I have found several programs thanks to the users on the forum like MeshMixer.
Re: Tonkabot's Max V2 Build
I keep waiting for Tonkabot to discover "his" chapter.....
g.
g.
Delta Power!
Defeat the Cartesian Agenda!
http://www.f15sim.com - 80-0007, The only one of its kind.
http://geneb.simpits.org - Technical and Simulator Projects
Defeat the Cartesian Agenda!
http://www.f15sim.com - 80-0007, The only one of its kind.
http://geneb.simpits.org - Technical and Simulator Projects
Re: Tonkabot's Max V2 Build
Well, at least it is amusing. Was I supposed to have read everything in the forum to find out the secret behind chapter 22? I had actually just thought that there used to be one, but it was delete because it was obsolete. And yes, I had already figured out that it was non-trivial to fix the numbering.
My new connector housings came in today so I hope to finish up the assembly tonight. Maybe if I have my own dedicated manual chapter I can provide some pictures for it.
My new connector housings came in today so I hope to finish up the assembly tonight. Maybe if I have my own dedicated manual chapter I can provide some pictures for it.
Re: Tonkabot's Max V2 Build
Heh! What cracks me up is that you're the only guy to spot it. One of these days I'm going to build myself a face-palming machine just for those occasions when I REALLY stick my foot in it.
g.
g.
Delta Power!
Defeat the Cartesian Agenda!
http://www.f15sim.com - 80-0007, The only one of its kind.
http://geneb.simpits.org - Technical and Simulator Projects
Defeat the Cartesian Agenda!
http://www.f15sim.com - 80-0007, The only one of its kind.
http://geneb.simpits.org - Technical and Simulator Projects