Aurora's Rostock Max v2 build

Start your own build thread so others can see how it's going, and even help out!
Aurora900
Printmaster!
Posts: 98
Joined: Sun Sep 21, 2014 7:51 pm
Location: Long Island, New York

Aurora's Rostock Max v2 build

Post by Aurora900 »

Well... As I promised here's my build thread. For those who didn't catch my intro post, I'm Danielle. I'm new to the world of 3D printing and very excited about it. It was almost excruciating waiting to get off of work today to start my build!

Things started off pretty good. I did my initial checklist to make sure all my parts were in the kit.
[img]http://staticexperiment.com/rostock/DSCN0108s.jpg[/img]

I started to pop out all the pieces, everything came out very smoothly. In fact, nearly all the pieces came out just from removing the masking tape which held them together. I had to fix only one cut that didn't go all the way through on one piece. Everything else was perfect.

Heres the first set of pieces removed... And someone decided to join me. It's her favorite place to sit :P
[img]http://staticexperiment.com/rostock/DSCN0110s.jpg[/img]

Next I prepped the hot end, which I found the perfect stand for:
[img]http://staticexperiment.com/rostock/DSCN0120s.jpg[/img]

Things are starting to come together now...
[img]http://staticexperiment.com/rostock/DSCN0118s.jpg[/img]

The nuts were very difficult for me to get into the support pieces on the base no matter which way I tried to put them in. The instructions say that if you have trouble try going from the other side, but it didn't make a difference on most of them.

Next comes the motors and drive gears.... But, remember how I said things started off good? Well heres where they stopped being good :/
[img]http://staticexperiment.com/rostock/DSCN0122s.jpg[/img]

Anyone notice whats wrong here? Okay I'll spoil it... The threads are missing in the set screw holes! So now my build has ground to a halt.
bot
Printmaster!
Posts: 993
Joined: Thu Sep 25, 2014 12:18 am
Location: Vancouver
Contact:

Re: Aurora's Rostock Max v2 build

Post by bot »

See if there is a local machine shop/automotive repair shop that can tap those threads for you. They might do it for a couple bucks, or for free if you're very nice (It would take them a total of 15 minutes including finding the right size tap).
*not actually a robot
Aurora900
Printmaster!
Posts: 98
Joined: Sun Sep 21, 2014 7:51 pm
Location: Long Island, New York

Re: Aurora's Rostock Max v2 build

Post by Aurora900 »

bot wrote:See if there is a local machine shop/automotive repair shop that can tap those threads for you. They might do it for a couple bucks, or for free if you're very nice (It would take them a total of 15 minutes including finding the right size tap).
Yes this was my first thought actually. One of my clients can do this for me. I know because my boss just recently asked him to tap something for us :P

He's kinda creepy and slightly obsessed with me (because apparently I'm some kinda unicorn, being a girl who's into computers and electrical engineering stuff) but he'll do it for free.


Oh, also it was only one of the 3 gears. The other two are happily mounted on their motors already. Oddly enough both the holes are missing threads on this gear. Well I guess I'm not sure if that's odd or not, but I think it is.
bot
Printmaster!
Posts: 993
Joined: Thu Sep 25, 2014 12:18 am
Location: Vancouver
Contact:

Re: Aurora's Rostock Max v2 build

Post by bot »

Glad to hear you'll get it sorted quickly. I'm anxiously waiting for my kit to arrive... but I haven't got my workshop/office set up yet, so I'm kinda scrambling to do that.

Have fun with the rest of the build!
*not actually a robot
User avatar
crocky
Printmaster!
Posts: 270
Joined: Tue Aug 12, 2014 6:55 pm
Location: Werribee, Aust

Re: Aurora's Rostock Max v2 build

Post by crocky »

Looks like they have improved the airflow in the base, they're pretty big slots in front of the PSU and mine is a fairly new kit and it doesn't have them.

I think I'll leave one of the trim panels off until my big fan gets here!

Mine is waiting on a pair of crimping pliers (slow boat from China I think), I'm patient :)

Did you put dampers on the steppers in the base, well worth doing at this stage.

I also did mcslappy's mod to the hotend, 40w cartridge heater and a screw in thermistor.

Most enjoyable kit to build.....
Bob
Rostock Max V2, Ball Cup Arms, New Carriages, HE280, Dampers, PSU Breathing, Simplify 3D, GeckoTek3D, Raspberry Pi3. Duet soon... Kossel Mini still under construction.
Delta's are the way!
User avatar
Eaglezsoar
ULTIMATE 3D JEDI
Posts: 7185
Joined: Sun Apr 01, 2012 5:26 pm

Re: Aurora's Rostock Max v2 build

Post by Eaglezsoar »

A very nice build!
Your hotend looks great and should work well. Thanks for posting the pictures!
Aurora900
Printmaster!
Posts: 98
Joined: Sun Sep 21, 2014 7:51 pm
Location: Long Island, New York

Re: Aurora's Rostock Max v2 build

Post by Aurora900 »

Just talked to support on the phone, they asked me to send them a picture and they're going to send me a new pulley. I might still see if I can get this one tapped but the replacement will probably come before I have a chance to fix the bad one myself...
User avatar
MKGrinch
Prints-a-lot
Posts: 28
Joined: Fri Jun 13, 2014 9:11 pm
Location: Long Island NY

Re: Aurora's Rostock Max v2 build

Post by MKGrinch »

Welcome Danielle! Congrats on your first build, looking good so far!!! Keep up the good work and keep those pics coming! It is nice to see a local besides me here!!
He Who Dies With The Most Toys Wins!
User avatar
barry99705
Printmaster!
Posts: 707
Joined: Sun Aug 11, 2013 6:10 pm
Location: west ohio

Re: Aurora's Rostock Max v2 build

Post by barry99705 »

Aurora900 wrote:
bot wrote:See if there is a local machine shop/automotive repair shop that can tap those threads for you. They might do it for a couple bucks, or for free if you're very nice (It would take them a total of 15 minutes including finding the right size tap).
Yes this was my first thought actually. One of my clients can do this for me. I know because my boss just recently asked him to tap something for us :P

He's kinda creepy and slightly obsessed with me (because apparently I'm some kinda unicorn, being a girl who's into computers and electrical engineering stuff) but he'll do it for free.


Oh, also it was only one of the 3 gears. The other two are happily mounted on their motors already. Oddly enough both the holes are missing threads on this gear. Well I guess I'm not sure if that's odd or not, but I think it is.
That makes you a left handed unicorn, they're much rarer than standard unicorns.
Never do anything you don't want to have to explain to the paramedics.
Aurora900
Printmaster!
Posts: 98
Joined: Sun Sep 21, 2014 7:51 pm
Location: Long Island, New York

Re: Aurora's Rostock Max v2 build

Post by Aurora900 »

Support quickly got back to my email and confirmed that they will be sending me the replacement pulley. The guy I spoke to was nice and understanding. At least now I can confirm they have good support too. He encouraged me to continue the build while I wait for the part since the stepper motor will still be accessible. I didn't think it would be too easy to get to it with the top of the base on, but I took his word and continued on. As it turns out, hes right, it is pretty accessible still.

So I don't bore you all with a ton of pictures, lets skip to the tower supports all assembled and installed on the base:
[img]http://staticexperiment.com/rostock/DSCN0127s.jpg[/img]

The tower supports were fairly easy to assemble once I figured out what all the screws were supposed to be. At least with this kit most of the screw sizes are different enough that you'd know right away whether or not you have the right ones. I do wish the manual better described them and showed closeups. Either that or they could have actually labeled each bag with the part numbers. In some instances the part name mentioned in the manual was completely different from the names of the parts listed on the inventory checklists.

Next came the top plate, which was much easier for me to get on than the manual suggested:
[img]http://staticexperiment.com/rostock/DSCN0130s.jpg[/img]

I decided not to take any pictures of the washers installed on the bottom side of the top plate since that's pretty boring, but I do want to mention a couple things about that step of the build. The instructions do say that the holes were moved with the release of rev 6, however it does not say this until the end of that page of instructions. I sat there looking at mine for about 5 minutes panicking that they forgot to cut some holes..... until I read further where it says they moved them. This should really be mentioned earlier (or perhaps the old revisions should be taken out if theres no chance of those parts shipping, which is the reason I have to assume they are still in there.) The second thing I want to mention is that there are a few other similar sized holes near the ones used for the onyx mount and just telling us to "rotate" it some number of degrees to find the right holes may find you wondering which of these holes are actually for the mount. I was briefly confused about which one was the right hole in a couple spots, but I figured it out. Maybe that's just me though... My brain does silly things sometimes :P

Aside from that, the washers were pretty easy to get in. I used the "drawing in" with a screw technique and it work beautifully. I recommend that method over hitting it with a screwdriver as the manual also suggested. If you do decide to draw them in you absolutely must make sure you use a washer. At this point you should still have a few of the washers that came with the kit left; I used one of those.

Next came tightening up all the things I left loose. I didn't want to over-tighten anything so I used the nuts as a reference. I have carpel tunnel so I tend to do as much as I can with the electric driver, but if you can you should probably avoid that for this part unless you're extremely confident and know how much torque your driver puts out. I definitely recommend hand tightening these.

If you do use an electric driver for this part, make sure you pay close attention to the nuts.
[img]http://staticexperiment.com/rostock/DSCN0135s.jpg[/img][img]http://staticexperiment.com/rostock/DSCN0134s.jpg[/img]

As you can see above, the first picture is a loose nut and the second picture is a tightened one. As you screw it down watch the nut. You want to stop it as it touches the lip below the channel that the screw goes through. This is why it's important to use something with low torque and be aware of how long your driver takes to stop when you let go of the trigger. Since you can't feel how tight it is with the electric driver you need to be careful.

Yet another issue I found with the manual (again in reference to the onyx bed) is that at the beginning of the thermistor prep it tells you how much plastic tubing to cut. If you have a Rev7 bed this instruction will be very wrong. You need more like a quarter of an inch than 1.25 inches. As you can see in the following picture, I had prepped the thermistor before I even looked at the bed and once I taped it down I realized what I did wrong. This image is what it looks like if you blindly follow directions like I did:
[img]http://staticexperiment.com/rostock/DSCN0140s.jpg[/img]

All fixed here:
[img]http://staticexperiment.com/rostock/DSCN0144s.jpg[/img]

And here's the LED soldered on (I love showing off my soldering... you're going to see a lot of pictures of my soldering lol)
[img]http://staticexperiment.com/rostock/DSCN0146s.jpg[/img]

And all the components mounted to the bed:
[img]http://staticexperiment.com/rostock/DSCN0148s.jpg[/img]

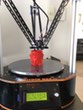
Next came the tricky part of mounting the bed. I had a bit of difficulty lining up the first couple holes, but after you get 2 or 3 in it becomes much easier. Here's one last shot of the finished base:
[img]http://staticexperiment.com/rostock/DSCN0149s.jpg[/img]

I'm glad that besides the one pulley, everything else has been going well. Yesterday I spent about 4 hours on the build. Today was 3 hours. I think I'm making decent time. I may go back and run the wires through the aluminum supports tonight, but probably not.

Also, I know the wiring looks like a rats nest right now... but don't worry I will be cleaning it up once I get a better idea of where everything is going down there. I'm more focused on getting it together first.
Aurora900
Printmaster!
Posts: 98
Joined: Sun Sep 21, 2014 7:51 pm
Location: Long Island, New York

Re: Aurora's Rostock Max v2 build

Post by Aurora900 »

MKGrinch wrote:Welcome Danielle! Congrats on your first build, looking good so far!!! Keep up the good work and keep those pics coming! It is nice to see a local besides me here!!

Another long islander! Awesome :P If you're curious, I'm in Merrick.


Also, a side note not in reference to you, but to the post I just made before this... I did put kapton tape over all the solder pads. I just took that picture before I got to it. Also, the big 12v pads were a little difficult to solder to for some reason...
geneb
ULTIMATE 3D JEDI
Posts: 5368
Joined: Mon Oct 15, 2012 12:47 pm
Location: Graham, WA
Contact:

Re: Aurora's Rostock Max v2 build

Post by geneb »

I'm going to be starting work on a second edition manual very soon. This 2nd edition will strip out all the "if you've got a thing that looks like this, do that, but if it looks like THIS, do THAT" nonsense. I'm also going to be dropping all the "optional" stuff and moving all that to a "mods" chapter at the end of the manual.

Nice build so far, good job!

g.
Delta Power!
Defeat the Cartesian Agenda!
http://www.f15sim.com - 80-0007, The only one of its kind.
http://geneb.simpits.org - Technical and Simulator Projects
Aurora900
Printmaster!
Posts: 98
Joined: Sun Sep 21, 2014 7:51 pm
Location: Long Island, New York

Re: Aurora's Rostock Max v2 build

Post by Aurora900 »

geneb wrote:I'm going to be starting work on a second edition manual very soon. This 2nd edition will strip out all the "if you've got a thing that looks like this, do that, but if it looks like THIS, do THAT" nonsense. I'm also going to be dropping all the "optional" stuff and moving all that to a "mods" chapter at the end of the manual.

Nice build so far, good job!

g.

Thanks! The multiple revisions for the bed being in the instructions are fine, that doesn't bother me (I can only assume that you were at some point trying to get rid of inventory and shipping some older revisions at the same time, also people who purchased an older kit may want to be able to reference the old instructions if they have to take apart their machine)... but what I'd really love to see is the actual Rev7 instructions. Also you might want to update some of the older pictures from the manual with the new versions of the base plates. I was very confused at first which plate was the right one because the vents are very different.
geneb
ULTIMATE 3D JEDI
Posts: 5368
Joined: Mon Oct 15, 2012 12:47 pm
Location: Graham, WA
Contact:

Re: Aurora's Rostock Max v2 build

Post by geneb »

Most if not all of the original photos will be thrown out. The 2nd edition manual won't replace what's there - it'll be a totally separate document.

I typically find out about part changes when someone emails me and goes, "What's this for?" :)

g.
Delta Power!
Defeat the Cartesian Agenda!
http://www.f15sim.com - 80-0007, The only one of its kind.
http://geneb.simpits.org - Technical and Simulator Projects
Aurora900
Printmaster!
Posts: 98
Joined: Sun Sep 21, 2014 7:51 pm
Location: Long Island, New York

Re: Aurora's Rostock Max v2 build

Post by Aurora900 »

geneb wrote:Most if not all of the original photos will be thrown out. The 2nd edition manual won't replace what's there - it'll be a totally separate document.

I typically find out about part changes when someone emails me and goes, "What's this for?" :)

g.
Oh, haha, even better! Too bad you probably won't have that until I'm done with my build though :P
geneb
ULTIMATE 3D JEDI
Posts: 5368
Joined: Mon Oct 15, 2012 12:47 pm
Location: Graham, WA
Contact:

Re: Aurora's Rostock Max v2 build

Post by geneb »

Yeah, the current production kit won't be here till Monday and I'm not planning a week-long deathmarch like I did for the current v2 manual. :)

g.
Delta Power!
Defeat the Cartesian Agenda!
http://www.f15sim.com - 80-0007, The only one of its kind.
http://geneb.simpits.org - Technical and Simulator Projects
Aurora900
Printmaster!
Posts: 98
Joined: Sun Sep 21, 2014 7:51 pm
Location: Long Island, New York

Re: Aurora's Rostock Max v2 build

Post by Aurora900 »

Put another 4.5 hours into it tonight, bringing me up to 11.5 hours total so far.

I didn't end up doing the wires last night... I was too lazy. They took me about an hour to get done today. It was actually pretty difficult for me to get them through. The easiest was the 18ga wires because they're pretty stiff and wanted to go in a straight line down the tube. The second most difficult was the 22ga wire, because theres a lot of them in that little tube and they wanted to keep bunching up. The end stop wires were the things nightmares are made of. I don't know how they expect you to get those through in pairs... I only got the first pair through together. The rest I had to do one by one and in order to prevent bunching I used the wires which were already pulled through to coax the rest through. I basically pulled as much wire as I could to the end I was feeding from, then started feeding the next wire. Once I felt the resistance of the wire pushing back I started pulling the existing wires back through the other side in short bursts as I fed the new wire in. This helped significantly to pull the new wires through and I continued that shuffling act until everything was through. It was a massive pain but I did it.

Here's all the towers in place with their wiring:
[img]http://staticexperiment.com/rostock/DSCN0152s.jpg[/img]

Next came the top... nothing really to talk about here... but here it is, complete with end stop switches and T nuts:
[img]http://staticexperiment.com/rostock/DSCN0160s.jpg[/img]

Actually... let me complain a little more about the manual, even though geneb is redoing it... (sorry lol) The manual did not mention that the tower supports for the top look completely different now until after all the instructions regarding them. I almost panicked again thinking I was missing pieces. Once I read further down I noticed the tiny little insert saying they changed them... but I nearly went crazy. I still haven't learned my lesson... that if I just read a bit more ahead usually all my questions get answered :P

Next up is the inside cheapskate assemblies. The manual was very confusing about this part. It says that you should line the inside and outside pieces up to make sure you have the correct orientation, and tells you to do it by making the eyes look to the right. That's simple enough.... but then it doesn't tell you which side of the inside plate you're actually supposed to install the u-joint base to. Without having prior knowledge for what this part is for or where it will end up once completely assembled its difficult to understand that it should be on the inner side of the inside plate. It's also over-complicating the whole matter. Seeing as the 2 holes towards the top of the plate are at different positions, a much simpler explanation to the correct orientation would be to simply tell the user to lay the inside plate flat with the hole closer to the top on the right. That's a sure fire way to make sure its in the right position to attach the u-joint base. It also simultaneously identifies to the user which side is the top because the bottom 2 holes are directly across from each other.

So instead of trying to figure out the orientation in relation to other pieces, just simply lay it down so that the hole closest to the top is on the right. You can see this in the picture below (which also happens to have the completed u-joint assembly)
[img]http://staticexperiment.com/rostock/DSCN0161s.jpg[/img]

You can also see the skates in the background there.... Those were a pain too. My fingers still hurt from pressing those all together. I don't know what the tolerance is typically supposed to be on those, but it was extremely extremely tight on some of mine. I actually had to place one of them on the floor and stand on it to get it on. I mean, I know I'm not very strong but damn were these tough.

And here we see the completed cheapskate assemblies mounted on the towers:
[img]http://staticexperiment.com/rostock/DSCN0165s.jpg[/img]

That's all for tonight... This portion of the build really tired me out! I didn't even bother to adjust the tension on the carriages yet, I'll do it tomorrow. So much struggling tonight, but I got through it. I'm a little sad that I couldn't complete it in 3 days like I wanted (I'm working fewer hours per day than anticipated), but I'm guessing I should have the rest done tomorrow night (hopefully)
User avatar
Eaglezsoar
ULTIMATE 3D JEDI
Posts: 7185
Joined: Sun Apr 01, 2012 5:26 pm

Re: Aurora's Rostock Max v2 build

Post by Eaglezsoar »

Outstanding job!
Please don't feel bad that it is taking longer then you would like, I believe it is better to slow down and
do it right the first time instead of racing through the build. Great build!
User avatar
MKGrinch
Prints-a-lot
Posts: 28
Joined: Fri Jun 13, 2014 9:11 pm
Location: Long Island NY

Re: Aurora's Rostock Max v2 build

Post by MKGrinch »

Aurora900 wrote:
MKGrinch wrote:Welcome Danielle! Congrats on your first build, looking good so far!!! Keep up the good work and keep those pics coming! It is nice to see a local besides me here!!

Another long islander! Awesome :P If you're curious, I'm in Merrick.


Also, a side note not in reference to you, but to the post I just made before this... I did put kapton tape over all the solder pads. I just took that picture before I got to it. Also, the big 12v pads were a little difficult to solder to for some reason...
Not far at all...Hicksville here....I put kapton tape on all my connections, it won't hurt just helps...keep up the good work.
He Who Dies With The Most Toys Wins!
Aurora900
Printmaster!
Posts: 98
Joined: Sun Sep 21, 2014 7:51 pm
Location: Long Island, New York

Re: Aurora's Rostock Max v2 build

Post by Aurora900 »

MKGrinch wrote:
Aurora900 wrote:
MKGrinch wrote:Welcome Danielle! Congrats on your first build, looking good so far!!! Keep up the good work and keep those pics coming! It is nice to see a local besides me here!!

Another long islander! Awesome :P If you're curious, I'm in Merrick.


Also, a side note not in reference to you, but to the post I just made before this... I did put kapton tape over all the solder pads. I just took that picture before I got to it. Also, the big 12v pads were a little difficult to solder to for some reason...
Not far at all...Hicksville here....I put kapton tape on all my connections, it won't hurt just helps...keep up the good work.
Yeah, that's only about 15 minutes or so away
Aurora900
Printmaster!
Posts: 98
Joined: Sun Sep 21, 2014 7:51 pm
Location: Long Island, New York

Re: Aurora's Rostock Max v2 build

Post by Aurora900 »

So tonight I made some more progress, mounted the top and got 2 of the belts on. I'm not going to do a fill update with pictures yet...

I was hoping to get my replacement pulley today but it didn't come... Which means I can't mount the 3rd belt. Feeling discouraged, I stopped early tonight... I suppose I could start on the ezstruder stuff, but *shrug* I'll do it tomorrow.

2.5 hours of work tonight, putting me at a total of 14 hours.
Aurora900
Printmaster!
Posts: 98
Joined: Sun Sep 21, 2014 7:51 pm
Location: Long Island, New York

Re: Aurora's Rostock Max v2 build

Post by Aurora900 »

Well the replacement pulley never came... so I called support today and asked them whats up... It apparently didn't ship out until today. I'm pretty upset about this but there's nothing anyone can do. They told me I would get it in 3 days, but it took them 4 days to even ship it...

Shit happens and I understand that... someone dropped the ball somewhere. We're all human. My instinct is to yell and scream but it's not going to make the part get here any sooner...
User avatar
crocky
Printmaster!
Posts: 270
Joined: Tue Aug 12, 2014 6:55 pm
Location: Werribee, Aust

Re: Aurora's Rostock Max v2 build

Post by crocky »

Be patient, you will get there soon enough :)

I've just spent almost a month waiting on crimping pliers to finish mine... Only paid $15 for them :)

Mine works now and just few more connectors on the hot end to complete today or tomorrow and it should be printing, I am a very disabled 63 old. Only got one arm and one leg that works and spend most of the days in a wheelchair but 3D printing is a very enjoyable pastime.
Bob
Rostock Max V2, Ball Cup Arms, New Carriages, HE280, Dampers, PSU Breathing, Simplify 3D, GeckoTek3D, Raspberry Pi3. Duet soon... Kossel Mini still under construction.
Delta's are the way!
Aurora900
Printmaster!
Posts: 98
Joined: Sun Sep 21, 2014 7:51 pm
Location: Long Island, New York

Re: Aurora's Rostock Max v2 build

Post by Aurora900 »

crocky wrote:Be patient, you will get there soon enough :)

I've just spent almost a month waiting on crimping pliers to finish mine... Only paid $15 for them :)

Mine works now and just few more connectors on the hot end to complete today or tomorrow and it should be printing, I am a very disabled 63 old. Only got one arm and one leg that works and spend most of the days in a wheelchair but 3D printing is a very enjoyable pastime.
I'm trying to be... but I'm a big fan of instant gratification lol

The most frustrating part is that its something that can be so easily fixed.... if you have access to the tool to fix it.

And wow... I'm sitting here wishing I had 3 hands for a few portions of this build... I can't even imagine doing it one handed.
User avatar
crocky
Printmaster!
Posts: 270
Joined: Tue Aug 12, 2014 6:55 pm
Location: Werribee, Aust

Re: Aurora's Rostock Max v2 build

Post by crocky »

I have very understanding wife and even putting a crimp on wires requires two of us and she is not a techo! and I like to do most of it. I used to run and own a computer business so it is not too hard. I had a pretty serious stroke about 13 years ago and now I do what I have to get things happening. It's all good :)
Bob
Rostock Max V2, Ball Cup Arms, New Carriages, HE280, Dampers, PSU Breathing, Simplify 3D, GeckoTek3D, Raspberry Pi3. Duet soon... Kossel Mini still under construction.
Delta's are the way!
Post Reply

Return to “The Build Zone”