- Initial Build Log (this post)
Upgrades and Adventures: - Higher Wattage PSU and Cloth Bed Insulator Testing
- Upgrading to an E3D V6 Hot End and Stepper Motor Heatsinks
- Case Fans and More Wiring
- PEI Print Surface
- The Heated Bed Terminal on the RAMBO Melts!
- Copper Heat Spreader
- Dual Extrusion Setup (Side-by-Side E3D V6 + Printed Effector Platform)
- failure.jpg (168.39 KiB) Viewed 8299 times
- sad.jpg (132.76 KiB) Viewed 8299 times
- funding.jpg (144.57 KiB) Viewed 8299 times
- shopping.jpg (134.37 KiB) Viewed 8299 times
Shipping was fast, even to the middle of Alaska. Before you knew it, the dinosaurs were building a Rostock Max V2!
- as01.jpg (120.03 KiB) Viewed 8299 times
- as02.jpg (131.78 KiB) Viewed 8299 times
- as03.jpg (134.6 KiB) Viewed 8299 times
- as04.jpg (131.71 KiB) Viewed 8299 times
- as05.jpg (138.05 KiB) Viewed 8299 times
- as06.jpg (131.18 KiB) Viewed 8299 times

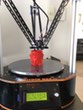
This isn't a 3d printer, it's a carnival ride!

Even carefully labelled, all the wires were pretty confusing! Let's double-check the instructions.

All put together, time for a final check and tightening all the nuts.

After more fear-induced double-checking of the wiring and procrastination, the power switch is flipped and the LCD comes to life. Nothing caught fire!

Z-axis adjustment and bed leveling took a couple hours of careful checking.

Oops, make sure the spool is in the right spot. That was a mess during the first print.

Wow, the first couple fan shroud prints sure came out nice! That's impressive.
Alright! We've got a 3d printer! And it works great! Now let's make some things!
TRex pokes her head into the totally professional-looking fume hood to check on the print! (The green ABS was a different brand and quite a bit smellier than the black.)

Here's TRex's first design! (Stega helped with some of the hard parts, like learning OpenSCAD, or maybe most of the hard parts...)

They work! Raaaaarrrr!

Yaaay for 3d printing! Nobody can stop us now!


You can check out TRex's working Extension Grabber Arm on Thingiverse.
Maybe once the dinosaurs calm down and finish printing Christmas presents, we can talk about all the other things planned for this printer, like upgrading to the (already acquired) E3D V6 hotend, wiring quick-connects, and an enclosure not made out of cardboard and plastic bags. Then playing with TGlass and nylon and maybe even some dual extrusion aspirations?
Thanks to SeeMeCNC for the great machine, MatterHackers for fast service, and to GeneB for the phenomenally well written assembly guide! The printer was a breeze to assemble (again, thanks in huge part to the excellent instructions) and is cranking out nice prints!


![[img]http://gchristopher.net/3dprinting/psu_sockets_small.jpg[/img]](http://gchristopher.net/3dprinting/psu_sockets.jpg)