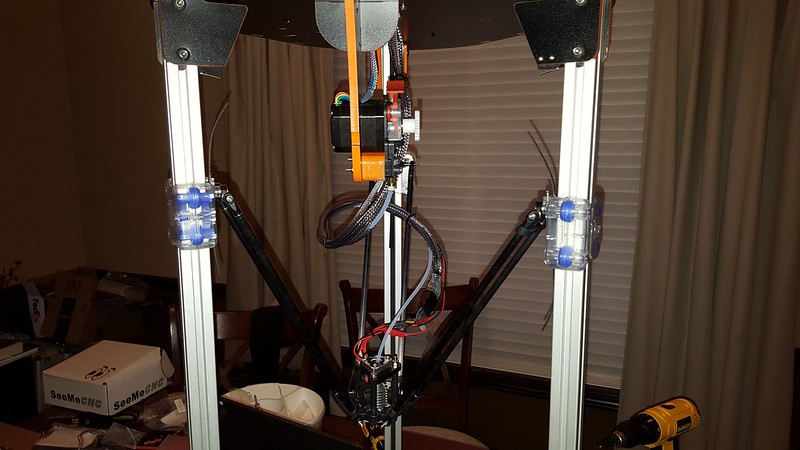
It was my daughters birthday yesterday (she turned 7), so I didn't get a lot done on the printer. I did make some progress though, as I was able to put in the aluminum tower parts and start building the top piece.
[img]https://farm6.staticflickr.com/5647/211 ... e077_z.jpg[/img]
[img]https://farm1.staticflickr.com/674/2106 ... b95e_z.jpg[/img]
I forgot to mention, which I thought was pretty neat, when I was at Microcenter the other day buying the power supply and cable management stuff, they had their own branded 3D Printer. From what I was told, it was a relabeled Makerbot, but they wanted about 1/2 the price. It is the 'PowerSpec 3D Pro", for sale t $599.00. They had it printing as a demo for all the 3D printers they were selling. With that, my family was with me to purchase the items I needed. They knew I was building a 3D Printer, but they didn't know what it was. This was a good example for them to watch it make something while I shopped at the store.
Anyhow, the experience was very positive. My wife was completely dumbfounded and amazed by watching it make some elephant that had movable feet. My kids were equally amazed, and couldn't wait for me to build the Rostock Max, as they thought it was a dream machine to make anything they wanted. Walking away from the store, my wife was very supportive of the overall purchase; she typically isn't "un-supportive", but rather "indifferent" on other hobbies that I have. This was the first one that she was actually excited to have me finish the build, as she wanted to make somethings as well!
While I have the momentum, I need to convince her to allow me to purchase a 3D Scanner. I have been doing some research on them, but just like the printers - everyone hates and loves them at the same time. It is hard to get an honest review of what works or doesn't work. Anyone here have a recommendation? I wouldn't want to spend more than ~$1200 (which is still more than what I want to spend.. but if it was 10x better than the rest, I guess I would spring for it).
Thanks,
Mike
Rostock Max V2 + Upgrades | Build thread
-
bvandiepenbos

- Printmaster!
- Posts: 927
- Joined: Thu Apr 05, 2012 11:25 pm
- Location: Goshen, IN
- Contact:
Re: Rostock Max V2 + Upgrades | Build thread
That is wonderful having your family's support and enthusiasm. In my opinion it was no 'coincidence' your wife and kid went to store and they just happened to see a 3d printer in action.
Having this available and getting your young daughter excited about 3d printing/technology is a awesome thing to do. What a blessing to her.
Having this available and getting your young daughter excited about 3d printing/technology is a awesome thing to do. What a blessing to her.
~*Brian V.
RostockMAX v2 (Stock)
MAX METAL "ShortyMAX"
MAX METAL Rostock MAX Printer Frame
NEMESIS Air Delta v1 & v2 -Aluminum delta printers
Rostock MAX "KITT" - Tri-Force Frame
GRABER i3 "Slim"
RostockMAX v2 (Stock)
MAX METAL "ShortyMAX"
MAX METAL Rostock MAX Printer Frame
NEMESIS Air Delta v1 & v2 -Aluminum delta printers
Rostock MAX "KITT" - Tri-Force Frame
GRABER i3 "Slim"
Re: Rostock Max V2 + Upgrades | Build thread
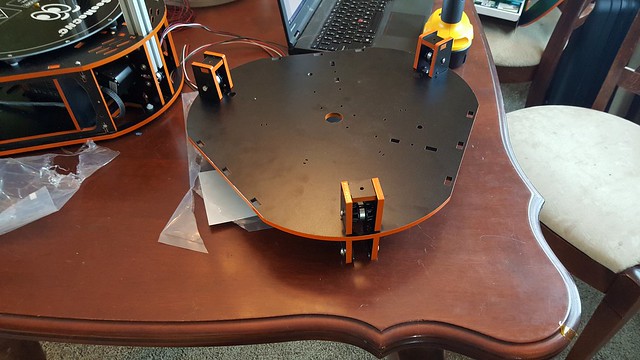
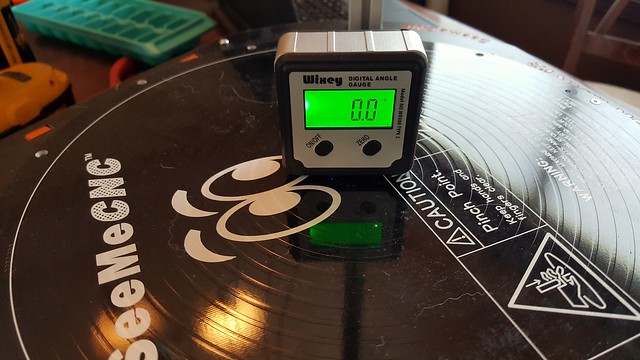
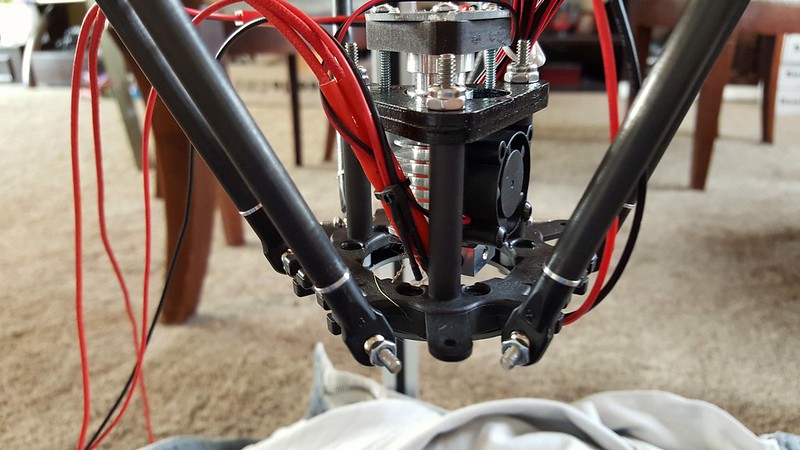
It is coming along... starting to look like a Delta printer now. I still need to do some wire sleeve wrapping on the extruder wires, hot end wires, and fan wires. I will wait until I get to the phase of wiring those parts before I sleeve the top half wiring from the towers, this way I can size them appropriately.
I plan to use old computer peripheral component power cords with the Hot End, making for a quick disconnect.
Anyhow, here are some of the latest pictures...
Perfect 90o on the tower and plate:
[img]https://farm6.staticflickr.com/5694/209 ... f803_z.jpg[/img]
[img]https://farm6.staticflickr.com/5832/209 ... 26e9_z.jpg[/img]
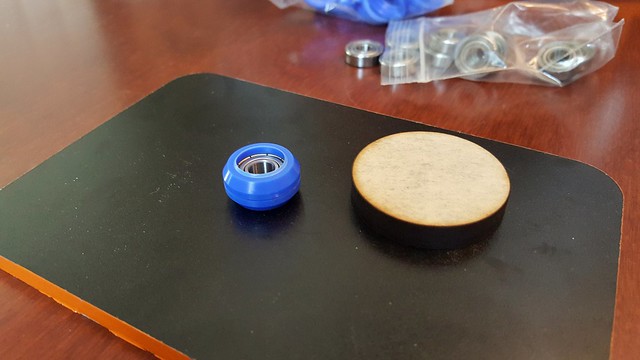
Building the carriage bearings. Using unused wood to press them in:
[img]https://farm1.staticflickr.com/730/2109 ... e1a2_z.jpg[/img]
Thanks,
Mike
I plan to use old computer peripheral component power cords with the Hot End, making for a quick disconnect.
Anyhow, here are some of the latest pictures...
Perfect 90o on the tower and plate:
[img]https://farm6.staticflickr.com/5694/209 ... f803_z.jpg[/img]
[img]https://farm6.staticflickr.com/5832/209 ... 26e9_z.jpg[/img]
Building the carriage bearings. Using unused wood to press them in:
[img]https://farm1.staticflickr.com/730/2109 ... e1a2_z.jpg[/img]
Thanks,
Mike
Re: Rostock Max V2 + Upgrades | Build thread
The install is coming along quite easily it seems. Flipping through the manual when I was building the base, seemed like some of the later parts would be more difficult. In contrast, it has been easier and pretty straight forward.
The new carriage design went on like a breeze:
[img]https://farm6.staticflickr.com/5698/211 ... 82f2_z.jpg[/img]
As did the Extruder:
[img]https://farm6.staticflickr.com/5667/205 ... 4377_z.jpg[/img]
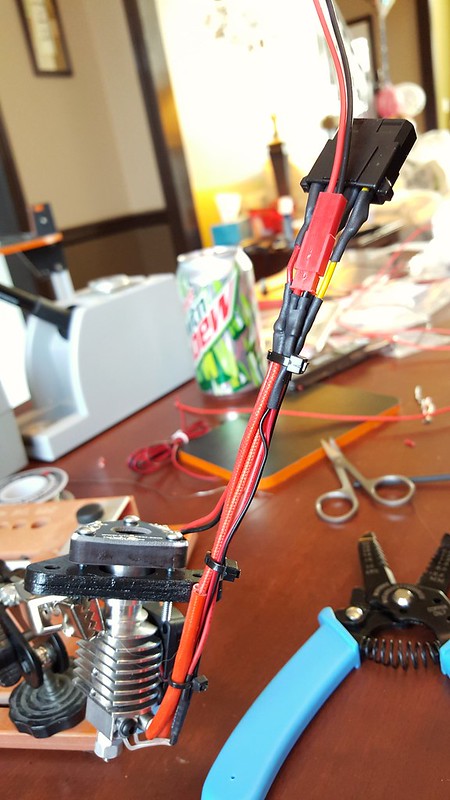
The next sections has me wiring the Extruder up to the top wires I had laying bare, and then the Hot Plate. As some sort of OCD that I have, it has been bothering me that I have bare wire laying about for the last few sections of the build. Now, I can finally put wire sleeves over the wires and cut to the necessary lengths.
For both of the Extruder, Fans, and Hot End - I plan on running those computer connectors I mentioned earlier. This will make replacement of any of those parts easy.
After dinner here, I will take some pictures of the wiring and install. At this pace, it looks like I will be 3D Printing this evening!
Thanks,
Mike
The new carriage design went on like a breeze:
[img]https://farm6.staticflickr.com/5698/211 ... 82f2_z.jpg[/img]
As did the Extruder:
[img]https://farm6.staticflickr.com/5667/205 ... 4377_z.jpg[/img]
The next sections has me wiring the Extruder up to the top wires I had laying bare, and then the Hot Plate. As some sort of OCD that I have, it has been bothering me that I have bare wire laying about for the last few sections of the build. Now, I can finally put wire sleeves over the wires and cut to the necessary lengths.
For both of the Extruder, Fans, and Hot End - I plan on running those computer connectors I mentioned earlier. This will make replacement of any of those parts easy.
After dinner here, I will take some pictures of the wiring and install. At this pace, it looks like I will be 3D Printing this evening!
Thanks,
Mike

Re: Rostock Max V2 + Upgrades | Build thread
I didn't do as much as I wished after dinner. This build is taking longer than it should, but I am taking my time. I am actually enjoying the build for a first! Normally, builds (RC planes, heli's, etc.) - I rush through them. This has been enjoyable.
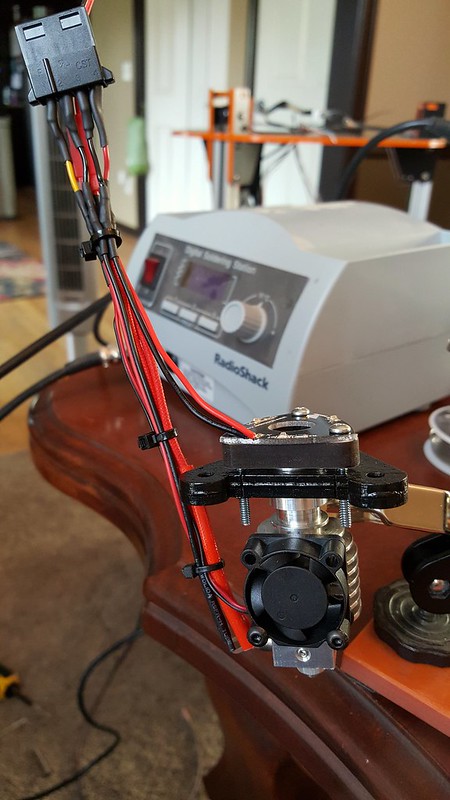
I am almost done with the top section wiring. The extruder is wired up, using the power connector from the PSU I purchased. I still have to wire the Hot End, Fans, and LED's. Before I do that, I want to build the Effector Platform and Arms first - allowing me to get a full wire length measurement, so I can properly cut the wires and sleeve them going to the hot end.
I will be doing this in the morning.
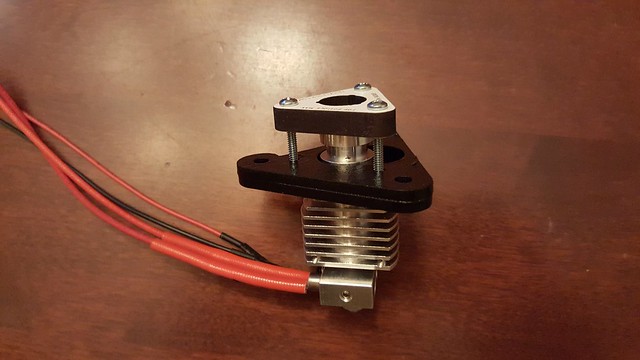
Here are a few pictures of the aftermarket parts I purchased. The Prometheus Hot End is assembled, although the wiring needs to be cut (re: waiting on the Effector Platform and Arms). The J-Head Groove Mount, 36mm carbon fiber, and the LED Hot End are shown in the picture. Once I get the platform built, I will attach the LED Light Ring and show pictures of that as well.
[img]https://farm1.staticflickr.com/633/2113 ... a6c4_z.jpg[/img]
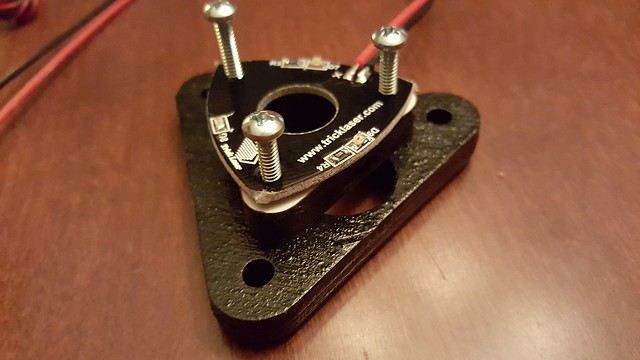
Picture showing the J-Head Groove Mount and the Prometheus Hot End; the top piece bolts down on the Prometheus to hold it in place.
[img]https://farm1.staticflickr.com/761/2050 ... 98a7_z.jpg[/img]
The LED Hot End sneaks right on top of the J-Head top mount. This will be wired right into the Power/Ground of the Hot End.
[img]https://farm6.staticflickr.com/5806/211 ... e0fb_z.jpg[/img]
Thanks,
Mike
I am almost done with the top section wiring. The extruder is wired up, using the power connector from the PSU I purchased. I still have to wire the Hot End, Fans, and LED's. Before I do that, I want to build the Effector Platform and Arms first - allowing me to get a full wire length measurement, so I can properly cut the wires and sleeve them going to the hot end.
I will be doing this in the morning.
Here are a few pictures of the aftermarket parts I purchased. The Prometheus Hot End is assembled, although the wiring needs to be cut (re: waiting on the Effector Platform and Arms). The J-Head Groove Mount, 36mm carbon fiber, and the LED Hot End are shown in the picture. Once I get the platform built, I will attach the LED Light Ring and show pictures of that as well.
[img]https://farm1.staticflickr.com/633/2113 ... a6c4_z.jpg[/img]
Picture showing the J-Head Groove Mount and the Prometheus Hot End; the top piece bolts down on the Prometheus to hold it in place.
[img]https://farm1.staticflickr.com/761/2050 ... 98a7_z.jpg[/img]
The LED Hot End sneaks right on top of the J-Head top mount. This will be wired right into the Power/Ground of the Hot End.
[img]https://farm6.staticflickr.com/5806/211 ... e0fb_z.jpg[/img]
Thanks,
Mike
Re: Rostock Max V2 + Upgrades | Build thread
I am going to cross post this question in a few spots, as I am at this point in the build where it makes a difference in how I continue:
The Prometheus Hot End instructions state to hard wire the cooling fan to a constant 12v connection. It specifically talks about NOT wiring it to the control board's layer fan (which makes sense). Yet, since the Prometheus is a "generic" hot end that doesn't take into consideration the design of the Rostock Max V2 and electronics - should I wire the Prometheus Hot End fan to the PEEK control board OR to a constant 12v hot plug?
Thank you!
Mike
Re: Rostock Max V2 + Upgrades | Build thread
No.... The Rostock is fine, there is a little bit of configuration that you will need to find to get the most out of Simplify 3D. It gets better the more you use itZenOhSix wrote:Thanks! I like Orange, and the black/orange contrasts well.crocky wrote:Nice paint job
Simplify 3D is pretty good, takes a little adjusting and then you will like it.
In regards to Simplify 3D - I have never used any CAD or SLICER program before. Therefore, I would be learning on that. Hopefully, there won't be any new "getting use to" since I have no previous experience.
Is that what you mean? Or did you mean that the Rostock required additional adjustments to use Simplify 3D?
Thank you,
Mike
Bob
Rostock Max V2, Ball Cup Arms, New Carriages, HE280, Dampers, PSU Breathing, Simplify 3D, GeckoTek3D, Raspberry Pi3. Duet soon... Kossel Mini still under construction.
Delta's are the way!
Rostock Max V2, Ball Cup Arms, New Carriages, HE280, Dampers, PSU Breathing, Simplify 3D, GeckoTek3D, Raspberry Pi3. Duet soon... Kossel Mini still under construction.
Delta's are the way!
Re: Rostock Max V2 + Upgrades | Build thread
Is this cutting it TOO close?
[img]https://farm6.staticflickr.com/5730/209 ... bc20_c.jpg[/img]
In the middle of the effector plate is the nozzle for the Prometheus. The screw head that goes through the LED light ring and into the effector plate (and holds in the J-Head Groove) is very close, but is recessed further than the nozzle. Here is a picture where the nozzle is resting on the hot plate:
[img]https://farm6.staticflickr.com/5625/209 ... 76a1_c.jpg[/img]
If the plate wasn't level, the screw heads would touch. This is using the bottom mount on the Prometheus, as seen here:
[img]https://farm6.staticflickr.com/5662/209 ... 4e60_c.jpg[/img]
I can use the top mount, which lowers the nozzle below the effector plate a good 1/2 to 1/3" of an inch.
Thoughts?
Thanks,
Mike
-
Polygonhell
- ULTIMATE 3D JEDI
- Posts: 2430
- Joined: Mon Mar 26, 2012 1:44 pm
- Location: Redmond WA
Re: Rostock Max V2 + Upgrades | Build thread
You'll want to give yourself more space than that, probably another 5-10mm.
At some point the corner of a print will curl up and the screws will hit it.
At some point the corner of a print will curl up and the screws will hit it.
Printer blog http://3dprinterhell.blogspot.com/
Re: Rostock Max V2 + Upgrades | Build thread
Thank you!Polygonhell wrote:You'll want to give yourself more space than that, probably another 5-10mm.
At some point the corner of a print will curl up and the screws will hit it.
I will make the adjustment and move on to the next part.
Mike
-
bvandiepenbos
- Printmaster!
- Posts: 927
- Joined: Thu Apr 05, 2012 11:25 pm
- Location: Goshen, IN
- Contact:
Re: Rostock Max V2 + Upgrades | Build thread
yes, you should move the hot end to top mounting slot so it sticks below platform farther.
moves it about 8 mm
I prefer to wire hot end fan to a constant 12v source so it is always on.
But , you can use the peek fan power connection, SeeMeCNC's Repetier fw is setup to turn it on when hot end is above 50c.
moves it about 8 mm
I prefer to wire hot end fan to a constant 12v source so it is always on.
But , you can use the peek fan power connection, SeeMeCNC's Repetier fw is setup to turn it on when hot end is above 50c.
~*Brian V.
RostockMAX v2 (Stock)
MAX METAL "ShortyMAX"
MAX METAL Rostock MAX Printer Frame
NEMESIS Air Delta v1 & v2 -Aluminum delta printers
Rostock MAX "KITT" - Tri-Force Frame
GRABER i3 "Slim"
RostockMAX v2 (Stock)
MAX METAL "ShortyMAX"
MAX METAL Rostock MAX Printer Frame
NEMESIS Air Delta v1 & v2 -Aluminum delta printers
Rostock MAX "KITT" - Tri-Force Frame
GRABER i3 "Slim"
-
bvandiepenbos
- Printmaster!
- Posts: 927
- Joined: Thu Apr 05, 2012 11:25 pm
- Location: Goshen, IN
- Contact:
Re: Rostock Max V2 + Upgrades | Build thread
For others maybe reading this build log, if you are using the OEM hot end, 1" stand offs and screws you probably need longer screws, if you mount LED ring with standoff screws. I think the rmax kit comes with 1-3/4" screws. I would get 6-32 x 2-1/4".
Note:
The light ring came with 3 short white plastic spacers, make sure these go on stand off screws between light ring and underside void of effector platform. Else there is a slight chance if you tighten screws super tight the LED ring can flex ruining it.
Another way to mount ring is with 3 small screws threaded into the extra holes on each side of standoff screws. They don't line up perfect, but will work. Mount light ring after tightening stand off screws. I use #6 x 3/8" long sheet metal screw. Carefully thread into plastic of effector platform. You don't need plastic spacers then. As long as you don't over-tighten screws.
~*Brian V.
RostockMAX v2 (Stock)
MAX METAL "ShortyMAX"
MAX METAL Rostock MAX Printer Frame
NEMESIS Air Delta v1 & v2 -Aluminum delta printers
Rostock MAX "KITT" - Tri-Force Frame
GRABER i3 "Slim"
RostockMAX v2 (Stock)
MAX METAL "ShortyMAX"
MAX METAL Rostock MAX Printer Frame
NEMESIS Air Delta v1 & v2 -Aluminum delta printers
Rostock MAX "KITT" - Tri-Force Frame
GRABER i3 "Slim"
Re: Rostock Max V2 + Upgrades | Build thread
Thanks Brian! I did get the plastic spacers installed under the LED ring, figured that's where they would go as there was no support behind them.
Tonight I got a lot accomplished, but couldn't muscle through to the finish line. I think I have about another hour worth of work, with the electronics being last!
Below are a few pictures I took throughout the evening; I apologize it wasn't that many - but you can see some of the TrickLaser stuff:
Here is the Hot End ready to go. I wired it so I had quick disconnects to everything, in the event surgery was ever needed:
[img]https://farm6.staticflickr.com/5716/209 ... 29da_c.jpg[/img]
Another view; notice the TrickLaser J-Head Groove, TrickLaser Hot End LED, and of course I purchased the Prometheus from TrickLaser as well:
[img]https://farm6.staticflickr.com/5817/211 ... 689b_c.jpg[/img]
Here is the Hot End from the bottom side. This is after I moved it down a notch, allowing for more clearance with the print nozzle as discussed earlier in this thread. Also take note of the TrickLaser LED Light Ring:
[img]https://farm1.staticflickr.com/672/2118 ... 1ea8_c.jpg[/img]
Here is the TrickLaser CF arms, holding the effector plate in place. Also notice the Zero Lash straps, although some of them randomly keep popping off?
[img]https://farm1.staticflickr.com/599/2098 ... 237b_c.jpg[/img]
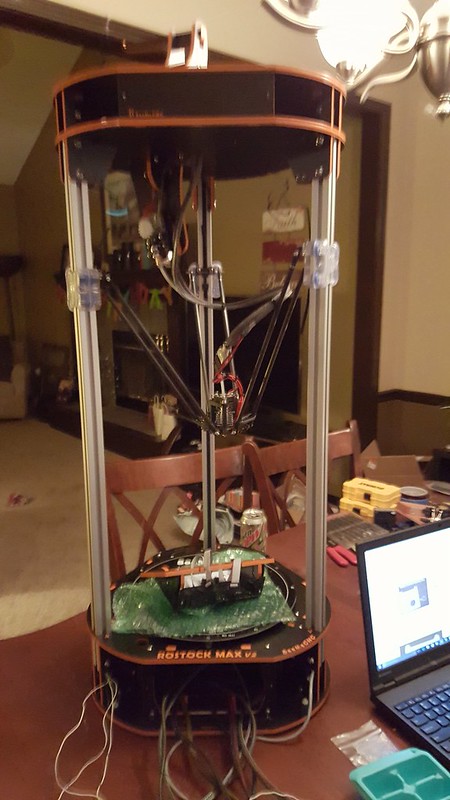
Here it sits, waiting for the electronics to be finished.. the LCD is done:
[img]https://farm6.staticflickr.com/5702/211 ... 2d6f_c.jpg[/img]
Thanks!
Mike
Tonight I got a lot accomplished, but couldn't muscle through to the finish line. I think I have about another hour worth of work, with the electronics being last!
Below are a few pictures I took throughout the evening; I apologize it wasn't that many - but you can see some of the TrickLaser stuff:
Here is the Hot End ready to go. I wired it so I had quick disconnects to everything, in the event surgery was ever needed:
[img]https://farm6.staticflickr.com/5716/209 ... 29da_c.jpg[/img]
Another view; notice the TrickLaser J-Head Groove, TrickLaser Hot End LED, and of course I purchased the Prometheus from TrickLaser as well:
[img]https://farm6.staticflickr.com/5817/211 ... 689b_c.jpg[/img]
Here is the Hot End from the bottom side. This is after I moved it down a notch, allowing for more clearance with the print nozzle as discussed earlier in this thread. Also take note of the TrickLaser LED Light Ring:
[img]https://farm1.staticflickr.com/672/2118 ... 1ea8_c.jpg[/img]
Here is the TrickLaser CF arms, holding the effector plate in place. Also notice the Zero Lash straps, although some of them randomly keep popping off?
[img]https://farm1.staticflickr.com/599/2098 ... 237b_c.jpg[/img]
Here it sits, waiting for the electronics to be finished.. the LCD is done:
[img]https://farm6.staticflickr.com/5702/211 ... 2d6f_c.jpg[/img]
Thanks!
Mike
-
predawnsky

- Printmaster!
- Posts: 169
- Joined: Sun Oct 05, 2014 8:11 pm
Re: Rostock Max V2 + Upgrades | Build thread
looking good
-
bvandiepenbos
- Printmaster!
- Posts: 927
- Joined: Thu Apr 05, 2012 11:25 pm
- Location: Goshen, IN
- Contact:
Re: Rostock Max V2 + Upgrades | Build thread
If the Zero Lash Straps pop off, secure them with a small zip tie around the barbed areas. Or super glue the wood joiners to rubber tube.
~*Brian V.
RostockMAX v2 (Stock)
MAX METAL "ShortyMAX"
MAX METAL Rostock MAX Printer Frame
NEMESIS Air Delta v1 & v2 -Aluminum delta printers
Rostock MAX "KITT" - Tri-Force Frame
GRABER i3 "Slim"
RostockMAX v2 (Stock)
MAX METAL "ShortyMAX"
MAX METAL Rostock MAX Printer Frame
NEMESIS Air Delta v1 & v2 -Aluminum delta printers
Rostock MAX "KITT" - Tri-Force Frame
GRABER i3 "Slim"
Re: Rostock Max V2 + Upgrades | Build thread
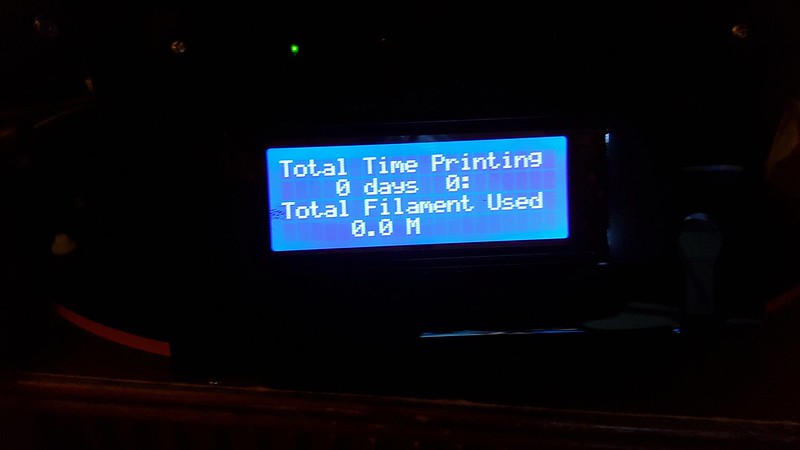
Ok.. the build is done.
I am in the process of uploading the firmware. I have made two changes, as I am flying some-what blind here.
1) The Prometheus instructions say to change the Thermistor type. I found in the Configuration.h file it was set to 97. I have now changed it to 8. It now reads:
#define EXT0_TEMPSENSOR_TYPE 8
2) I found in the configuration.h file a section for Rod Length. I changed the Delta diagnoal rod value to 300mm (which is what I purchased, the 300mm rods). It now reads:
#define DELTA_DIAGONAL_ROD 300.0 // mm
3) Because I have different stepper motors than the "stock", I also changed the motor current value as asked in the manual. It reads now:
#define MOTOR_CURRENT {155,155,155,165,0}
Is there anything else to change? I am uploading the firmware and giving it a go...
Mike
Re: Rostock Max V2 + Upgrades | Build thread
Well.. I am up and running!
Hahaha. The thing just makes me laugh.
I am currently printing my first ABS Layer Fan, so I can do some PLA stuff.
A few questions:
1) I didn't click on "Check for an Update" in the Matter Control software, but I have a bug/issue. When I was going through the manual to set it all up and stuff, anytime I pressed the "E+" button for the extruder to spool some material out, it would kill all motor functions after it followed that initial command. To fix it, I would have to close the application and restart. Thoughts? Maybe a newer version fixes this?
2) Because of the issue #1 above, I was only able to get out 10mm of filament. Then, I wasn't sure what to do? So - I peeled it off the nozzle? Well, I wanted to have 30mm or so (per the recommendation in the manual) - but because of the bug/issue with #1 above - it wouldn't start the print. I had to close out/come back in. When I did that, I then clicked PRINT immediately, and off it went. YET - when it first tried to lay down filament, it was like the nozzle was too high off of the glass. It was going around in the layers like it should, but it wasn't putting anything down - for the first 1/3rd layer. Finally - it grabbed and it caused a little mess on the board and a string ran into the nozzle.
Ultimately, it plowed on and it looks like it will be a successful print (minus the initial string on the first layer). Yet, why did this occur? Is the nozzle not down low enough to the glass? When I did the calibrations, I did the "slightly can't move" paper - it could when it was down - but barely *with resistance*.
3) When I prime, I should pull off the hanging filament, right?
4) ABS stinks (smells). Does PLA?
Haha. Still excited that I have it going!
[img]https://farm1.staticflickr.com/666/2121 ... 88c9_c.jpg[/img]
Notice the strings attached to the main - thats where it went awry at the beginning:
[img]https://farm1.staticflickr.com/733/2120 ... 126e_c.jpg[/img]
Still going:
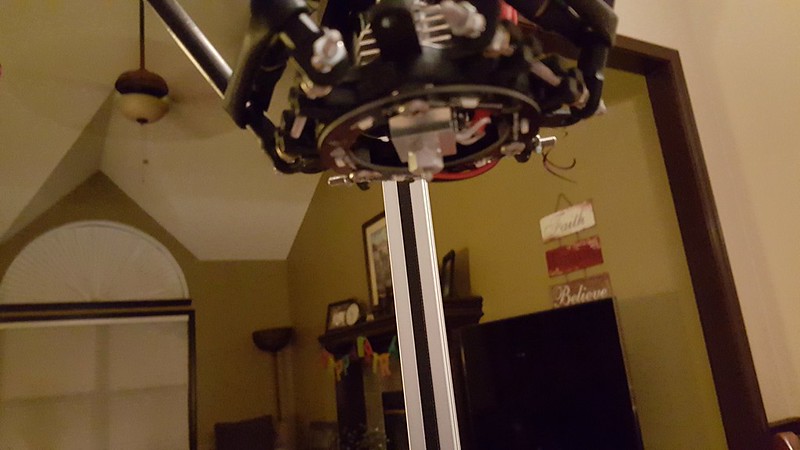
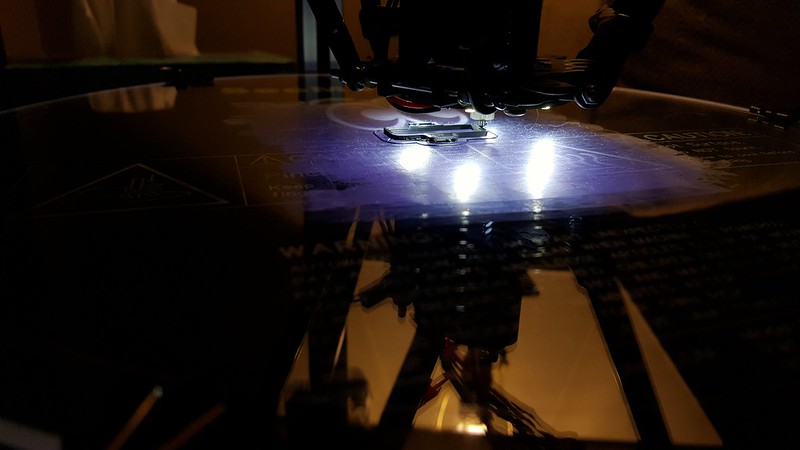
[img]https://farm6.staticflickr.com/5647/211 ... c8e7_c.jpg[/img]
Thanks,
Mike
Hahaha. The thing just makes me laugh.
I am currently printing my first ABS Layer Fan, so I can do some PLA stuff.
A few questions:
1) I didn't click on "Check for an Update" in the Matter Control software, but I have a bug/issue. When I was going through the manual to set it all up and stuff, anytime I pressed the "E+" button for the extruder to spool some material out, it would kill all motor functions after it followed that initial command. To fix it, I would have to close the application and restart. Thoughts? Maybe a newer version fixes this?
2) Because of the issue #1 above, I was only able to get out 10mm of filament. Then, I wasn't sure what to do? So - I peeled it off the nozzle? Well, I wanted to have 30mm or so (per the recommendation in the manual) - but because of the bug/issue with #1 above - it wouldn't start the print. I had to close out/come back in. When I did that, I then clicked PRINT immediately, and off it went. YET - when it first tried to lay down filament, it was like the nozzle was too high off of the glass. It was going around in the layers like it should, but it wasn't putting anything down - for the first 1/3rd layer. Finally - it grabbed and it caused a little mess on the board and a string ran into the nozzle.
Ultimately, it plowed on and it looks like it will be a successful print (minus the initial string on the first layer). Yet, why did this occur? Is the nozzle not down low enough to the glass? When I did the calibrations, I did the "slightly can't move" paper - it could when it was down - but barely *with resistance*.
3) When I prime, I should pull off the hanging filament, right?
4) ABS stinks (smells). Does PLA?
Haha. Still excited that I have it going!
[img]https://farm1.staticflickr.com/666/2121 ... 88c9_c.jpg[/img]
Notice the strings attached to the main - thats where it went awry at the beginning:
[img]https://farm1.staticflickr.com/733/2120 ... 126e_c.jpg[/img]
Still going:
[img]https://farm6.staticflickr.com/5647/211 ... c8e7_c.jpg[/img]
Thanks,
Mike
-
stonewater
- Printmaster!
- Posts: 345
- Joined: Mon Jan 06, 2014 1:24 am
Re: Rostock Max V2 + Upgrades | Build thread
nozzles will weep filament, if you let it sit heated up without priming it with your E button, it will take a few moments for the nozzle to fill and pressure to build up enough for it to extrude. you may also want to use the LCD screen to lower your Z height .01 to help with first layer sticking. I find myself having to do this occasionally if I change filament or if the room temp is different. as an example last week it was in the hi 90's here, and this week low 60's that changes the printer a bit. I like to print 5 loops on small parts,3 loops on larger parts. there is also a minimum extrusion setting in matter control.
Tom C
Tom C
MAX V1
325 MM carbon arms trick trucks effector mount LED ring heat spreader
Corvair750
V6 Hotend
Robo 3D
Flashforge creator
http://WWW.TeslagenX.com" onclick="window.open(this.href);return false; - Bedini experimenter kits, books, DVD's
325 MM carbon arms trick trucks effector mount LED ring heat spreader
Corvair750
V6 Hotend
Robo 3D
Flashforge creator
http://WWW.TeslagenX.com" onclick="window.open(this.href);return false; - Bedini experimenter kits, books, DVD's
-
HumanLiberty
- Printmaster!
- Posts: 75
- Joined: Tue Apr 14, 2015 4:27 pm
Re: Rostock Max V2 + Upgrades | Build thread
ZenOhSix wrote:Ok.. the build is done.
1) The Prometheus instructions say to change the Thermistor type. I found in the Configuration.h file it was set to 97. I have now changed it to 8. It now reads:
#define EXT0_TEMPSENSOR_TYPE 8
2) I found in the configuration.h file a section for Rod Length. I changed the Delta diagnoal rod value to 300mm (which is what I purchased, the 300mm rods). It now reads:
#define DELTA_DIAGONAL_ROD 300.0 // mm
Mike
Hi Mike - Congratulations on getting up and running!
I just installed the Prometheus, and since changing the #define EXT0_TEMPSENSOR_TYPE from 97 to 8,
my Noz and Bed LED screen readings are "def" (as in define, I presume.)
I tried running eeprom_clear and re-loading from arduino, to no avail.
Did you encounter this?
Does anyone know how to fix that?
Also, I'm concerned that Reconfiguring the nozzle Thermisor will screw with the original thermistor that remains on the bed, and was surprised there was no mention of this in the upgrade instruction.
Anyone have input on that?
Finally, Mike, just 'cause I wish I'd had this when I started, for your calibration, by far the best resource I've found is at this thread:
http://forum.seemecnc.com/viewtopic.php?f=36&t=8698
There's an .htmp script you can use to get within a few 1/100s of a mm all the way out to the edges, (which the SMCNC calib approach will not) while eliminating the need to futz with endstop screws. you can download here:
https://drive.google.com/file/d/0B06WCA ... pIUWs/view
If you want to install FRS they have an auto-calibration tool too, that looks freakin awesome, though I myself have not tried it.
Good luck!
-Eric
-
HumanLiberty
- Printmaster!
- Posts: 75
- Joined: Tue Apr 14, 2015 4:27 pm
Re: Rostock Max V2 + Upgrades | Build thread
Re the "def" readings - turned out the thermistor anchoring screw was too tight.
Also - shouldn't we refine PID in config.h to allow for higher temps? Currently, nozzle temp can't be set higher than 240.
Also - shouldn't we refine PID in config.h to allow for higher temps? Currently, nozzle temp can't be set higher than 240.
-
HumanLiberty
- Printmaster!
- Posts: 75
- Joined: Tue Apr 14, 2015 4:27 pm
Re: Rostock Max V2 + Upgrades | Build thread
I just found this thread with a bunch more values that should be redefined in the firmware:ZenOhSix wrote:Ok.. the build is done.
Is there anything else to change? I am uploading the firmware and giving it a go...
http://forum.seemecnc.com/viewtopic.php ... pid#p72591
-
Eaglezsoar

- ULTIMATE 3D JEDI
- Posts: 7185
- Joined: Sun Apr 01, 2012 5:26 pm
Re: Rostock Max V2 + Upgrades | Build thread
The thread you found is excellent and should solve the problems you have been experiencing.HumanLiberty wrote:I just found this thread with a bunch more values that should be redefined in the firmware:ZenOhSix wrote:Ok.. the build is done.
Is there anything else to change? I am uploading the firmware and giving it a go...
http://forum.seemecnc.com/viewtopic.php ... pid#p72591
Great build and great pictures!