
A collection dedicated to the Rostock: The Ultimate Rostock Printer Thing Collection!
Cheers,
Michael
The Ultimate Rostock Thing Collection
The Ultimate Rostock Thing Collection
Sublime Layers - my blog on Musings and Experiments in 3D Printing Technology and Art
Start Here:
A Strategy for Successful (and Great) Prints
Strategies for Resolving Print Artifacts
The Eclectic Angler
-
Eaglezsoar

- ULTIMATE 3D JEDI
- Posts: 7185
- Joined: Sun Apr 01, 2012 5:26 pm
Re: The Ultimate Rostock Thing Collection
Thanks for this and all your great posts!
-
Highcooley
- Printmaster!
- Posts: 121
- Joined: Sun Nov 18, 2012 10:23 am
Re: The Ultimate Rostock Thing Collection
A new thing for the collection: http://www.thingiverse.com/thing:50505
Looking forward to get some feedback if it helps.
Cheers,
Andy
Looking forward to get some feedback if it helps.
Cheers,
Andy
Re: The Ultimate Rostock Thing Collection
I was going to so that same thing (at some point) because it seemed like the ultimate test of the level bed. Nice!
thanks!
thanks!
Re: The Ultimate Rostock Thing Collection
Thanks, I added it and that is very cool! I'll be printing this as soon as I get a new glass build plate.
So, it looks like one should set layer thickness to .30mm in their slicer?
So, it looks like one should set layer thickness to .30mm in their slicer?
Sublime Layers - my blog on Musings and Experiments in 3D Printing Technology and Art
Start Here:
A Strategy for Successful (and Great) Prints
Strategies for Resolving Print Artifacts
The Eclectic Angler
-
Highcooley
- Printmaster!
- Posts: 121
- Joined: Sun Nov 18, 2012 10:23 am
Re: The Ultimate Rostock Thing Collection
Haven't tried what happens with 0.2mm but yes...I think 0.3 mm leaves a little bit of head room for uneven beds.mhackney wrote:Thanks, I added it and that is very cool! I'll be printing this as soon as I get a new glass build plate.
So, it looks like one should set layer thickness to .30mm in their slicer?
I just measured my bed again and figured out, that it is slightly bent upwards to the Z columnd because I ahevn't got paper clips there... need to correct that.
Re: The Ultimate Rostock Thing Collection
Thanks. Do you have a glass or borosilicate surface?
Regards,
Michael
Regards,
Michael
Sublime Layers - my blog on Musings and Experiments in 3D Printing Technology and Art
Start Here:
A Strategy for Successful (and Great) Prints
Strategies for Resolving Print Artifacts
The Eclectic Angler
-
Highcooley
- Printmaster!
- Posts: 121
- Joined: Sun Nov 18, 2012 10:23 am
Re: The Ultimate Rostock Thing Collection
I've got a borosilicate plate. As described, I've got 5 paperclips along the edges, all between two of the screws holding the bed to the printer. Except at the top side, where the leads are soldered to the board. If I measure close to all three columns, as well as their "negatives" (e.g. X -112.6/-65 and -112.6/65), I see that the glass plate is bent from center to the Z column. Or, as I leveled Z at the three columns, the X and Y negatives are far below zero. I probably need to attach more clips on one or both sides of the soldering pads.mhackney wrote:Thanks. Do you have a glass or borosilicate surface?
Regards,
Michael
Re: The Ultimate Rostock Thing Collection
@Highcooley - I have tried printing your calibration thing and some weird stuff is happening! After it prints the large circle first (2 wide) it then prints these odd dashes where the smaller circle is, then prints some other areas and comes back and fills in those dashes. The dashes are causing all sorts of headaches. I suspect this may be a slicing issue. What app and what parameters did you use to slice yours?
cheers,
Michael
cheers,
Michael
Sublime Layers - my blog on Musings and Experiments in 3D Printing Technology and Art
Start Here:
A Strategy for Successful (and Great) Prints
Strategies for Resolving Print Artifacts
The Eclectic Angler
Re: The Ultimate Rostock Thing Collection
I see from the gcode what is happening:
Do you have a smaller nozzle perchance? Mine is .5mm.
Sublime Layers - my blog on Musings and Experiments in 3D Printing Technology and Art
Start Here:
A Strategy for Successful (and Great) Prints
Strategies for Resolving Print Artifacts
The Eclectic Angler
Re: The Ultimate Rostock Thing Collection
Odder yet - that feature does not appear in your STL file! Your file clearly has 2 rings - a larger one and one about 1/2 to the center. My sliced version is printing 3 rings. The larger one you see here and another about 1cm inside that. Then the smaller ring. That smaller ring may also have another inset ring but I have stopped the print before it gets that far. Vary odd slicing issue. The radial line you see coming from X should go all the way to the outermost ring but it stops at the phantom inner ring!
Sublime Layers - my blog on Musings and Experiments in 3D Printing Technology and Art
Start Here:
A Strategy for Successful (and Great) Prints
Strategies for Resolving Print Artifacts
The Eclectic Angler
Re: The Ultimate Rostock Thing Collection
Ok, I figured part of this out! The outermost circle is a perimeter not the part! If I don't explicitly set extrusion widths (to .55mm) and let slic3r calculate them (.70mm) then the circles are generated as a continuous bead and not broken up into the "dashes". I think I can print it now.
Sublime Layers - my blog on Musings and Experiments in 3D Printing Technology and Art
Start Here:
A Strategy for Successful (and Great) Prints
Strategies for Resolving Print Artifacts
The Eclectic Angler
-
Highcooley
- Printmaster!
- Posts: 121
- Joined: Sun Nov 18, 2012 10:23 am
Re: The Ultimate Rostock Thing Collection
Sorry for my late reply. I was off during weekend. I sliced with slic3r, having set the nozzle to 0.5mm. I would have to check, if I set 0.55mm as the extrusion width. Anyway, I didn't have these dashes. But something other was a bit strange. Instead of printing continuous outlines one after the other, the perimeters where split up to different sections and the letters where printed separately. Although I checked the design twice, that the different parts should be merged into one single part, this somehow doesn't seem to be the case. Maybe netfabb would help. But I haven't tried it yet.mhackney wrote:Ok, I figured part of this out! The outermost circle is a perimeter not the part! If I don't explicitly set extrusion widths (to .55mm) and let slic3r calculate them (.70mm) then the circles are generated as a continuous bead and not broken up into the "dashes". I think I can print it now.

Re: The Ultimate Rostock Thing Collection
I bought some filament from RainBot this weekend. Since thier spools are wider than the ones from seemecnc or Protoparadigm (the only two spools I've ever had), I designed a kit to widen the spool holder. http://www.thingiverse.com/thing:60322
There are three different versions of the extensions. A single extension (you'll need to print two), a pair of extensions, or a set of small spacers to use instead of the big extensions.
There are three different versions of the extensions. A single extension (you'll need to print two), a pair of extensions, or a set of small spacers to use instead of the big extensions.
Re: The Ultimate Rostock Thing Collection
Great, thanks! I've added it to the collection.
Cheers,
Michael
Cheers,
Michael
Sublime Layers - my blog on Musings and Experiments in 3D Printing Technology and Art
Start Here:
A Strategy for Successful (and Great) Prints
Strategies for Resolving Print Artifacts
The Eclectic Angler
Re: The Ultimate Rostock Thing Collection
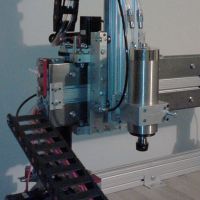
Mhackney, thanks for adding it to the collection. Here's a pic of the kit installed.
Re: The Ultimate Rostock Thing Collection
Cool. I am going to print it tonight to use with my new Add-A-Struder that is due to arrive tomorrow!
FYI - RichRap (the one an only) uploaded some Rostock things today that I added to the collection - a JHead adapter and an extruder.
FYI - RichRap (the one an only) uploaded some Rostock things today that I added to the collection - a JHead adapter and an extruder.
Sublime Layers - my blog on Musings and Experiments in 3D Printing Technology and Art
Start Here:
A Strategy for Successful (and Great) Prints
Strategies for Resolving Print Artifacts
The Eclectic Angler
Re: The Ultimate Rostock Thing Collection
@Av8r RC - the new spool rod and clip you made would be another great addition resized to the original extruder arm. Just say'n is all! (hint, hint)
Sublime Layers - my blog on Musings and Experiments in 3D Printing Technology and Art
Start Here:
A Strategy for Successful (and Great) Prints
Strategies for Resolving Print Artifacts
The Eclectic Angler
Re: The Ultimate Rostock Thing Collection
That was quick! Thanks, added to the collection. I'll print one of these too, I don't like that flat melamine spindle.
Sublime Layers - my blog on Musings and Experiments in 3D Printing Technology and Art
Start Here:
A Strategy for Successful (and Great) Prints
Strategies for Resolving Print Artifacts
The Eclectic Angler
Re: The Ultimate Rostock Thing Collection
Sublime Layers - my blog on Musings and Experiments in 3D Printing Technology and Art
Start Here:
A Strategy for Successful (and Great) Prints
Strategies for Resolving Print Artifacts
The Eclectic Angler
Re: The Ultimate Rostock Thing Collection
looks good!
My rostock build log http://forum.seemecnc.com/viewtopic.php?f=42&t=1228
Re: The Ultimate Rostock Thing Collection
It works great too! I love the little clip that holds it in place.
I have the full extension set printing now. My add a struder kit is due to arrive today and I received my Rainbot filament today. I now know what this extension is all about, those are WIDE spools!
I have the full extension set printing now. My add a struder kit is due to arrive today and I received my Rainbot filament today. I now know what this extension is all about, those are WIDE spools!
Sublime Layers - my blog on Musings and Experiments in 3D Printing Technology and Art
Start Here:
A Strategy for Successful (and Great) Prints
Strategies for Resolving Print Artifacts
The Eclectic Angler
Re: The Ultimate Rostock Thing Collection
@AV8r RC - I really love the way the filament spools roll smoothly off this Spool Rod! Nice upgrade. I used to have to baby-sit the filament spool to make sure it didn't get stuck, no longer with this. I am printing the extended set in black ABS to compliment my white Add-A-Struder kit!
Sublime Layers - my blog on Musings and Experiments in 3D Printing Technology and Art
Start Here:
A Strategy for Successful (and Great) Prints
Strategies for Resolving Print Artifacts
The Eclectic Angler
Re: The Ultimate Rostock Thing Collection
Yeah those spools are pretty wide. I'm glad it's working good for you.
I'm working on a fan duct right now. The one Highcooley posted will not work with the new nozzle.
I'm working on a fan duct right now. The one Highcooley posted will not work with the new nozzle.