Page 6 of 8
Re: BETA testers discussion
Posted: Wed Aug 27, 2014 4:34 pm
by Chewy64
erickphd wrote:CORRECTION: after getting to the gantry build, it struck me that the rollers use the front and back slot of the extrusion and not the side ones... thus the wires have to go down the center hole... now where is my 22 gauge magnet wire???
Myself and Brent used floss. I tied one end of mine to the threaded rod and the other end to the wires (removed from the connector obviously) I then passed the threaded rod through the center hole and pulled the wires through with the floss.
Re: BETA testers discussion
Posted: Wed Aug 27, 2014 4:53 pm
by Kevinvandeusen
stepper wires run down inside wall of cabinet, switch goes inside extrusion, is how I understand it. and it worked well.
Re: BETA testers discussion
Posted: Wed Aug 27, 2014 5:20 pm
by mhackney
I had originally run the stepper wires down extrusion as per one of the SeeMeCNC photos but then guanu chimed in with wires down the side and limit switch down column. So I changed things over.
BTW, found my homing problem - my switch was faulty intermittently. I had some extras so I used one of those and now it homes properly. But it turns out, the switch is not used for homing, it's a limit switch! So I need to do a quick firmware config change and I'm good to go.
Re: BETA testers discussion
Posted: Wed Aug 27, 2014 9:54 pm
by Kevinvandeusen
Mhackney, , I am nowhere near the arduino engineer you appear to be! Any chance this process will become almost plug and play? I consider myself an electrical, and mechanical type person, but arduino is new to me.
Re: BETA testers discussion
Posted: Wed Aug 27, 2014 9:59 pm
by mhackney
Yes. The grbl firmware is very plug and play. I'll post my hex file tomorrow.
Re: BETA testers discussion
Posted: Wed Aug 27, 2014 10:54 pm
by mhackney
I've posted the firmware and some instructions over on my build thread to get folks started quickly. Note that I'm using the most recent .9g version go grbl, SeeMeCNC posted a hex file for the earlier .8 version. We may as well start up to date!
Really, all you need to do is flash the grbl.hex file to the Arduino and you are good to go. There are many utilities out there to do this for various platforms. I use the tools built into the Arduino IDE to do it - they work on all platforms supported by the IDE.
Re: BETA testers discussion
Posted: Wed Aug 27, 2014 11:41 pm
by brent
Re: BETA testers discussion
Posted: Thu Aug 28, 2014 11:28 am
by Chewy64
Started cleaning out the PSU last night while I wait for the rest of the parts to come:
[img]http://i.imgur.com/94v3Ctbl.jpg[/img]
Should be able to wire this baby up here real quick as I got most done last night. No issue with fitting any of the remaining parts. All is well for now. Does anyone have a link to a nice petri dish that will work? (Guanu, WILL PYREX WORK?!)
Re: BETA testers discussion
Posted: Thu Aug 28, 2014 1:23 pm
by Polygonhell
When cleaning out the PSU, you really should connect 3.3V to the sense line, it's usually shorted to it on the 25 pin connector. Some PSU's don't seem to care much, but it is used as feedback for the delivered voltage.
Re: BETA testers discussion
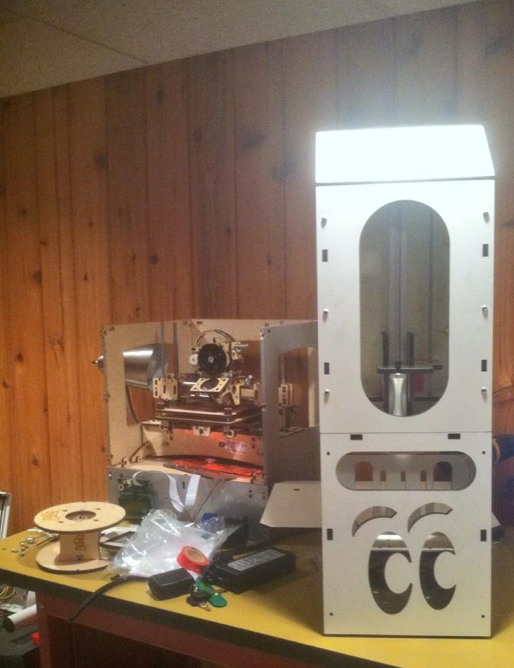
Posted: Fri Aug 29, 2014 12:15 pm
by erickphd
OK, mine is done- total build time 6:45. I had the benefit of mhackney's build thread, plus prior experience in toy and furniture building...

[img]
http://i.imgur.com/2NsGzMwl.jpg[/img]
Some post-build thoughts:
1. The door latch would be better if it was magnetic. I'm going to design one and put it out on thingiverse.
2. I'm concerned that there are some light leaks from the back panel around the nuts, and at several places where there are gaps in panels (such as at the top of the door). I plan on using some aluminum HVAC tape to fix those places. There is also a lot of light leakage around the door and the nut slots in the door.
3. I would have built the z stage before putting the extrusion into the chassis - put extrusion into top, then through z stage, bottom, etc. Leave the antibacklash part for later. Don't mount the motor until you add the threaded rod into the z stage. My kit came with three tall nuts - two for the z stage and I used the other as a locknut at the motor coupler -no loctite needed.
4. In looking at the build platform alignment to the bottom of the petri dish, it is clear that the surfaces are not parallel. A solution to this might be to include a ball and socket joint in the aluminum build platform that would allow for immediate adjustment, then with a lock screw, set it in place. Kinda like a tripod mount upside down...
5. As has been noted before, the holes for mounting the arduino are wrong. To save time, I used some special double-sided mounting tape with some very strong adhesion.
As I don't have a suitable build vat (my trial fit petri dish is plastic) I'll have to wait to try a build. But I do have the silicone filler for the window, some fresh resin, the projector, computer and software to get it working. So has anybody heard how or if we are getting one??
Re: BETA testers discussion
Posted: Fri Aug 29, 2014 6:08 pm
by Chewy64
erickphd wrote:
5. As has been noted before, the holes for mounting the arduino are wrong. To save time, I used some special double-sided mounting tape with some very strong adhesion.?
The holes on mine lined up perfectly. Chances are you used the wrong holes. The Arduino does not site close to the side panel, like you would expect. It side a good inch or two from it. I'll upload a picture later.
Re: BETA testers discussion
Posted: Fri Aug 29, 2014 10:39 pm
by erickphd
OK - but if you line up the usb connector on the arduino so that it is slightly recessed from the side panel, the holes in my shelf panel are not in the right spot for that. Would love to see your arrangement - mhackney's build log is exactly what I experienced here. My tape is .080" thick with VHB adhesive so it is not coming off easily! I'd rather have the USB connector easily accessible from the side panel to exchange cables as needed.
Re: BETA testers discussion
Posted: Sat Aug 30, 2014 8:47 am
by mhackney
John confirmed that the hole location to mount the Arduino is basically a bug in the beta kits. Expect it to be fixed. The goal is to mount the Arduino with the USB connector sticking out the side port for it. It is a nice arrangement.
Re: BETA testers discussion
Posted: Sat Aug 30, 2014 2:33 pm
by erickphd
Yup- that's what I thought. Easy enough to fix..and not a "show stopper" for us beta testers.
Re: BETA testers discussion
Posted: Sat Aug 30, 2014 5:59 pm
by mhackney
I'd like to get some info from anyone who has printed from Creation Workshop on a PC - especially if you have the simple case of a single monitor and your projector hooked up to the PC.
When you show the calibration grid, what happens? Does the window with the grid in it show up on the projector and if so, is it a movable/resizable window?
Similarly, when you print, does a window showing the layer image appear on your projector and it is also movable/sizable or does CW fill the entire projected image with just the layer image?
I'm struggling with trying to use Windows 7 on a virtual machine on a Mac. It doesn't look like I can share a projector - but it would help if I knew what was supposed to happen.
Cheers,
Michael
Re: BETA testers discussion
Posted: Sat Aug 30, 2014 7:03 pm
by Glacian22
I'm running exactly that setup, Creation Workshop on a PC, with a monitor and a projector. When you tell CW to display the calibration grid, it shows it fullscreen on the projector (or whichever video output you tell CW to work with). Same with displaying each layer image, CW just shows it fullscreen on the projector.
Re: BETA testers discussion
Posted: Sat Aug 30, 2014 9:32 pm
by mhackney
Hey thanks!
I am going to install Windows 7 on my iBook so it boots natively into Windows, that should give me something to work with.
Re: BETA testers discussion
Posted: Mon Sep 01, 2014 7:26 am
by brent
mhackney wrote:John confirmed that the hole location to mount the Arduino is basically a bug in the beta kits. Expect it to be fixed. The goal is to mount the Arduino with the USB connector sticking out the side port for it. It is a nice arrangement.
The power wires from the gShield are in the way if you wanted to mount it flush.
Re: BETA testers discussion
Posted: Mon Sep 01, 2014 9:25 am
by Kevinvandeusen
I got mine to mount in the hole just back a little but still easy to plug in usb. The power wires take a bend upwards, but not too bad. My projector is hooked up and displaying the black and red test pattern from CW, but I have no clue where to go from here!
Re: BETA testers discussion
Posted: Mon Sep 01, 2014 9:36 am
by mhackney
Me too, it would be better of the power leads came off perpendicular, I don't like that but I left about 1/4" and it fits ok.
Re: BETA testers discussion
Posted: Mon Sep 01, 2014 9:55 am
by erickphd
Yes, I positioned the USB connector slightly recessed to accommodate the power wires, but it is no problem getting connected to it that way.
Re: BETA testers discussion
Posted: Mon Sep 01, 2014 6:33 pm
by whoisjoecarr
My build is coming along. I had to spend some time filing the tabs or holes for the Projector Deck and the Vat Base plate. Everything else came together well, especially thanks to mhackney's build thread!
Re: BETA testers discussion
Posted: Mon Sep 01, 2014 10:06 pm
by erickphd
Yes, same here - I'm ready to print but need a vat. Is seemecnc just using a glass petri dish with PDMS cast into the bottom? Or are we getting a dish to use for testing? And if I need to purchase it, no problem... just need to know what the recommended situation is for this unit.
Re: BETA testers discussion
Posted: Tue Sep 02, 2014 3:46 pm
by whoisjoecarr
I used a different tactic for running the stepper motor wires. I dropped a length of dental floss down the extrusion and tied a slip knot around all 4 wires and was able to pull them down together without any trouble.
Re: BETA testers discussion
Posted: Tue Sep 02, 2014 4:20 pm
by erickphd
Not a huge deal, but IMHO the stepper wires are better off going down the right side through holes provided for them and ty-wraps. I used the center hole in the extrusion for the two end stop switch wires.