I do 100% everything here in house. Well I do my anodizing outside of course. I build remote camera dolly systems for a client and have to anodize large sections of railing for tracks, the camera dolly, motor mounts and such. Really fun anodizing a 5ft long section of aluminum. It is a great skill I am very glad to have taken the time and money to learn. The small parts on this scale can be done in a few 5 gallon buckets with ease. I choose the carbon fiber to reduce weight and because I enjoy the way it looks. On the stock hotend the bolts and 3 spacers are about 20 grams. That is without the nuts (seem to have misplaced my stock ones) My spacers and screws are only are only 9.1 grams. I also am able to source my carbon fiber at a much better rate than I can aluminum spacers and that is even after I factor in the aluminum for the end caps. My titanium hardware does eat into a budget a bit compared to steel, but it was a personal trade off I choose. I think if I get to the point that I can sell a few of the mounts, the whole system even with titanium hardware can come in at a level slightly above other systems I have seen in wood and steel. I am lucky to have some good contacts for the more expensive components I use which helps keep the cost down.
Milling the spacer end caps is not too hard but it does need the most attention of the whole process right now. But they are a great size to use up bits and bots of aluminum left over after milling other projects and even the hotend mounts. The carbon fiber mount I am working on has some really fun aluminum inserts in it that are a great way to reclaim the last bit out of a small scrap of 6061. Does my heart good to see a billet turned into parts and only have a swiss cheese matrix of thin aluminum bits left over due to good plating and close milling of parts together.
Aluminum and carbon fiber E3d V6 mount. RELEASED!
-
travelphotog
- Printmaster!
- Posts: 398
- Joined: Tue Jul 15, 2014 12:30 pm
- Location: Huntsville, Alabama (Marshall Space Flight Center)
- Contact:
Re: Aluminum and carbon fiber E3d V6 mount.
http://713maker.com/ Custom aluminum and carbon fiber hot end mounts for the Rostock Max and Orion.
-
travelphotog
- Printmaster!
- Posts: 398
- Joined: Tue Jul 15, 2014 12:30 pm
- Location: Huntsville, Alabama (Marshall Space Flight Center)
- Contact:
Re: Aluminum and carbon fiber E3d V6 mount.
Jassper wrote:I just remembered something that may bring this project to a screetching halt (at least until a new board revision is done, and one is coming soon)
As it is now, the three mounting holes for the standoffs are electronically isolated, however the 3 in the middle are not. Anyone who has one of the Yellow Jacket boards look at the top of it, you will see a G- and a G+. The G- is connected to the ground and the G+ is connected to the hot end positive. This was intended to be use in conjunction with the http://tricklaser.com/LED-hot-end-heati ... ED-HAT.htm Top Hat LED from Trick Laser. This would allow you to eliminate the wires and use the screws as conductors to power the LEDs but somewhere alone the line that didn't happen. So until that is removed from the current version of the Board, I would highly recommend using Nylon screws to secure the hotend clamp
If we can agree on a size and also share a good source for everyone, I could tap the holes in the mount to match a screw size that could be nylon or metal which should solve the issue and keep things on track.
http://713maker.com/ Custom aluminum and carbon fiber hot end mounts for the Rostock Max and Orion.
Re: Aluminum and carbon fiber E3d V6 mount.
Here is what I am talking about above,
With standard SeeMe hotend
[img]http://www.themakerhive.com/FTP/jassper/hep_stock.jpg[/img]
And with a groove mount
[img]http://www.themakerhive.com/FTP/jassper/hep_groove.jpg[/img]
Also after looking closer to the board, the short stand off on the top side isn't needed as there is nothing protruding from the board in those areas
The MakerHive
Yellow Jacket Quick Clip Plug in board
Berd-Air Cooling Kit
The MakerHive Store
Some things are meant to be closed, your mind isn't one of them.
There is a difference between what you know and what you have been told
Yellow Jacket Quick Clip Plug in board
Berd-Air Cooling Kit
The MakerHive Store
Some things are meant to be closed, your mind isn't one of them.
There is a difference between what you know and what you have been told
-
nitewatchman

- Printmaster!
- Posts: 626
- Joined: Thu May 01, 2014 9:51 pm
- Location: Birmingham, Alabama
Re: Aluminum and carbon fiber E3d V6 mount.
.STL's available?Jassper wrote:Here is what I am talking about above,
Also after looking closer to the board, the short stand off on the top side isn't needed as there is nothing protruding from the board in those areas
-
travelphotog
- Printmaster!
- Posts: 398
- Joined: Tue Jul 15, 2014 12:30 pm
- Location: Huntsville, Alabama (Marshall Space Flight Center)
- Contact:
Re: Aluminum and carbon fiber E3d V6 mount.
OK so if the "top" side can be flat and the "bottom" side is where we need to mill a recess then we are 100% good to go. If you PM me a STL or STEP file I should be able to mill one out and get it sent up your way. in Yellow of course!Jassper wrote:Here is what I am talking about above,
With standard SeeMe hotend
[img]http://www.themakerhive.com/FTP/jassper/hep_stock.jpg[/img]
And with a groove mount
[img]http://www.themakerhive.com/FTP/jassper/hep_groove.jpg[/img]
Also after looking closer to the board, the short stand off on the top side isn't needed as there is nothing protruding from the board in those areas
http://713maker.com/ Custom aluminum and carbon fiber hot end mounts for the Rostock Max and Orion.
Re: Aluminum and carbon fiber E3d V6 mount.
The only reason now that it would need to be recessed is for the aforementioned reason that the inner 3 holes on the board are not electrically isolated. but I can easily use a piece of insulation.travelphotog wrote:Jassper wrote:Here is what I am talking about above,
OK so if the "top" side can be flat and the "bottom" side is where we need to mill a recess then we are 100% good to go. If you PM me a STL or STEP file I should be able to mill one out and get it sent up your way. in Yellow of course!
Here is the STL but you might want to verify measurements and hole spacing as I drew this really quick. Everything seems to line up. Also it looks like the E3 has a larger body than the Hotends I have so not sure it will work with those, maybe you can check that.
http://www.themakerhive.com/FTP/jassper/test.stl I'll try to verify it tonight and there are a few areas I would like to tweak.
SO, on another subject, Our Makerspace has 2 Shapoko II's. What are you using for a motor and what software? one of ours is using the stock Arduino w/GRBR shield running a Dewalt 20,000 RPM router. I'm using a Lamp dimmer to control the speed. The other I am trying to hook up a Rambo Board with a 400 watt spindle from Inventables.
The MakerHive
Yellow Jacket Quick Clip Plug in board
Berd-Air Cooling Kit
The MakerHive Store
Some things are meant to be closed, your mind isn't one of them.
There is a difference between what you know and what you have been told
Yellow Jacket Quick Clip Plug in board
Berd-Air Cooling Kit
The MakerHive Store
Some things are meant to be closed, your mind isn't one of them.
There is a difference between what you know and what you have been told
-
travelphotog
- Printmaster!
- Posts: 398
- Joined: Tue Jul 15, 2014 12:30 pm
- Location: Huntsville, Alabama (Marshall Space Flight Center)
- Contact:
Re: Aluminum and carbon fiber E3d V6 mount.
Jassper wrote:The only reason now that it would need to be recessed is for the aforementioned reason that the inner 3 holes on the board are not electrically isolated. but I can easily use a piece of insulation.travelphotog wrote:Jassper wrote:Here is what I am talking about above,
OK so if the "top" side can be flat and the "bottom" side is where we need to mill a recess then we are 100% good to go. If you PM me a STL or STEP file I should be able to mill one out and get it sent up your way. in Yellow of course!
Here is the STL but you might want to verify measurements and hole spacing as I drew this really quick. Everything seems to line up. Also it looks like the E3 has a larger body than the Hotends I have so not sure it will work with those, maybe you can check that.
http://www.themakerhive.com/FTP/jassper/test.stl I'll try to verify it tonight and there are a few areas I would like to tweak.
SO, on another subject, Our Makerspace has 2 Shapoko II's. What are you using for a motor and what software? one of ours is using the stock Arduino w/GRBR shield running a Dewalt 20,000 RPM router. I'm using a Lamp dimmer to control the speed. The other I am trying to hook up a Rambo Board with a 400 watt spindle from Inventables.
Since this lives in my office I have to stay with this style of motor so I can mill late at night and not keep my other half awake with motor noises in the next room. One of the very best things I have done for my mill was upgrading to a full metal slotted bed. It squared up the mill right away and is super easy to attach things to now. I really LOVE that upgrade. The red cable chain is the very reason I bought my Max for. I saw the need for many printed parts on the mill to get it up and running faster and to keep it nice and clean. My cable chain is one of the very first things I ever printed. It was researching the mill that I first saw the Max V2 and i fell in love with it the moment I saw it. Sitting in the airport in Newark waiting to catch a flight home. The moment I saw the giant Delta I knew I wanted it and that it would be my 3D printer to set up the mill with.
For hardware I have the following on the mill. 400W DC spindle with speed controller, Full metal t-slot bed, Upgraded Z axis rod and bearings ( this is also a super good upgrade and worth the cost). I run a TINYg controller for the controller but might be switching to MACH3 shortly so I can use SOLIDcam as I can not find a post processor for the TINYg for SOLIDcam. Right now I use SOLIDWORKS and HSMXPRESS which is a great pairing. I would go to HSMWORKS if I had an extra $7500 for the 3D milling package. I like to barter at times and was able to trade shooting some ad stuff for a local oil valve company for one of their legal copies of SOLIDCAM. Upgrading to a MACH3 or MACH4 system will allow me to take full use of that. I run the mill though CHILIPeppr right now with the TINYg. Over all it is a great combo, though from time to time it has a controller fart and dumps a job here and there (GRRR)
This is my next mill I think https://www.finelineautomation.com/prod ... cnc-router" onclick="window.open(this.href);return false; I am limited by the small work area of the Shapeoko. I need the large space for some on going projects. I have good contacts in the music world and custom amps and guitar parts are in high demand, but my Shapeoko limits the size of the projects I can do and has cost me a few jobs already sadly.
I will work on the file you sent over and get back to you shortly. I will print it out and see how it all lines up. I will also look at ways to shield the board from the aluminum. If we had to, it could be milled on both sides but it might take me a week or so to get it all sorted out in my free time.
http://713maker.com/ Custom aluminum and carbon fiber hot end mounts for the Rostock Max and Orion.
-
travelphotog
- Printmaster!
- Posts: 398
- Joined: Tue Jul 15, 2014 12:30 pm
- Location: Huntsville, Alabama (Marshall Space Flight Center)
- Contact:
Re: Aluminum and carbon fiber E3d V6 mount.
Jimustanguitar wrote:There's no reason that you can't just use it as a connector board. There's plenty of extra JHead groove to put a different mount in there and stack the YJ on top of it.
[img]http://i.imgur.com/Lp4xi1M.png[/img]
OK so I got a board shape for the YJ last night and threw some 2.33mm CEM PCB on the mill and cut one out. So looking at this I am really wondering how you fit the E3d V6 into this guy. From what I see the center mount is 11mm for the SEEMECNC mount. Which fits pretty much spot on on my test board I made. But as it is a 11mm hole, the 16mm E3d V6 is not wanting to fit without making the hole larger. So I would love to see how you managed to fit it on there. Is it just as simple as cutting the hole larger for the E3D?
I know it is not an issue with the Yellowjacket. It was made for the 11mm sized coolers. I am just wondering how folks are getting it on there. only way I see is cutting on the board. Since you seem to have gotten up and going on a V6 I thought I would ask you.
http://713maker.com/ Custom aluminum and carbon fiber hot end mounts for the Rostock Max and Orion.
-
travelphotog
- Printmaster!
- Posts: 398
- Joined: Tue Jul 15, 2014 12:30 pm
- Location: Huntsville, Alabama (Marshall Space Flight Center)
- Contact:
Re: Aluminum and carbon fiber E3d V6 mount.
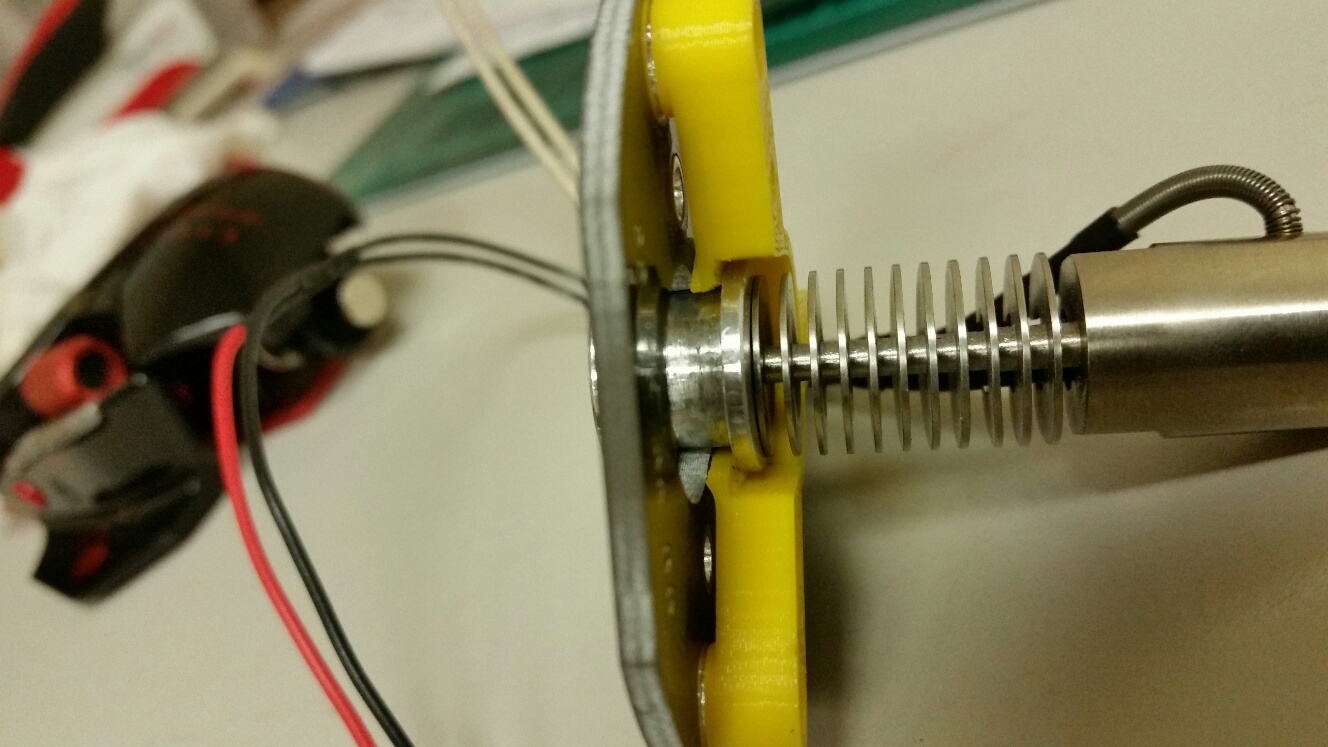
OK guys... I have been working on this tonight but it is time to hit the sack for a bit. I have to do photographer interviews tomorrow for a bit in the AM which is my least favorite part of my job. I have been looking at this and I think I have the answer to pretty much all the issues we have found so far including the worry of shorting something out with the 3 central screws. I have not mocked it up on the E3d yet but I should have that done tomorrow.. Here is a mock up of the stock SEEMECNC head.
Pretty much the Yellowjacket sits right on top of the SEEMECNC stock mount I made yesterday. None of the holes in question are touching anything that can short them, they line up with the weight reduction slots I already had so are not in danger of being shorted out.
The stock nut holds the head nice and tight with just a thin spacer (2MM ish) on the bottom side. This mock up is on 36mm spacers but I can of course supply stock length carbon fiber spaces on the final design.
Ok that is it for me tonight. 3:30 is my bedtime today guys. Looking forward to everyone's thoughts tomorrow and pretty much it works almost the same for the E3d V6 with no mods to the Yellowjacket board from what I am seeing right now.
- SEEMECNC stock head and Yellowjacket mock up.
- The holes we were concerned about are now safe from harm of being shorted.
Ok that is it for me tonight. 3:30 is my bedtime today guys. Looking forward to everyone's thoughts tomorrow and pretty much it works almost the same for the E3d V6 with no mods to the Yellowjacket board from what I am seeing right now.
http://713maker.com/ Custom aluminum and carbon fiber hot end mounts for the Rostock Max and Orion.
Re: Aluminum and carbon fiber E3d V6 mount.
That looks more or less how I mounted the stock hotend to the yellowjacket board - had to add a couple of washers under the nut, but could have gone either side of the board along with the stock spacer.
The E3dv6 had to have more than 1/4" added - more like 1/2" (13mm was my guess). The E3dv6 fan just about clears the effector with the extra 13mm added to the stock 1" aluminium spacers.
The E3dv6 had to have more than 1/4" added - more like 1/2" (13mm was my guess). The E3dv6 fan just about clears the effector with the extra 13mm added to the stock 1" aluminium spacers.
-
Jimustanguitar

- ULTIMATE 3D JEDI
- Posts: 2631
- Joined: Sun Mar 31, 2013 1:35 am
- Location: Notre Dame area
- Contact:
Re: Aluminum and carbon fiber E3d V6 mount.
To mount a JHead to the YJ mount, you do have to dremel the C shaped hole into a U. There's just a sliver on each side that has to be removed. Looks like you got it.
I think the shorting problem is because of solder pads on bottom that don't have a via or through hole.
[img]http://i.imgur.com/nrofIbe.png[/img]
I think the shorting problem is because of solder pads on bottom that don't have a via or through hole.
[img]http://i.imgur.com/nrofIbe.png[/img]
-
travelphotog
- Printmaster!
- Posts: 398
- Joined: Tue Jul 15, 2014 12:30 pm
- Location: Huntsville, Alabama (Marshall Space Flight Center)
- Contact:
Re: Aluminum and carbon fiber E3d V6 mount.
OK now I see those guys. I only had the mock up I made which of course does not have any of that stuff on the bottom.
But my understanding is that two of the three central screws closest to the hotend are also not isolated? So if we screw those two into a metal mount they will short out yes? If that is the case then I would go using the E3d mount pretty much how I had it, then put a small spacer between the YJ and the Mount to account for the screws holding the E3D down. This will not have the need of using the 3 srews that can short in a metal mount and also not have the need to widen and risk damage to the YJ to allow the larger E3d 16mm mount width needed.
The same seems to hold true for the stock hotend and even fixes the spacer issue on the head mount.
Since only the bottom 3 screws are removed from the effector plate to change a head, this system would allow the stock SEEMECNC head, Jhead, E3D V6 and E3D Volcano (with V6 cooler) to be used without any mods or cutting to the YJ. Changing heads is simply a matter of three screws to bolt on the "head unit" which which would be an aluminum mount to hold the print head steady, three carbon fiber spacers, then the YJ with the stand off spacers. But this whole unit is one item and just bolts right on. So anyone running any of these three style heads can use just the aluminum mount or if they choose to buy a YJ they just screw it on top and have the best features in one unit. Being modular allows someone to say maybe buy aluminum mounts for what ever head they have right now, then add a YJ at any point later. Or anyone who owns a YJ right now can add the aluminum mount without too much hassle, just three screws and three small YJ stand off spacers and the carbon fiber spacers..
How does this sound/look to you guys?
It will be simple to mill the needed spacers between the YJ and the mount so I think we might have a winner here.
But my understanding is that two of the three central screws closest to the hotend are also not isolated? So if we screw those two into a metal mount they will short out yes? If that is the case then I would go using the E3d mount pretty much how I had it, then put a small spacer between the YJ and the Mount to account for the screws holding the E3D down. This will not have the need of using the 3 srews that can short in a metal mount and also not have the need to widen and risk damage to the YJ to allow the larger E3d 16mm mount width needed.
How does this sound/look to you guys?
It will be simple to mill the needed spacers between the YJ and the mount so I think we might have a winner here.
http://713maker.com/ Custom aluminum and carbon fiber hot end mounts for the Rostock Max and Orion.
-
Jimustanguitar
- ULTIMATE 3D JEDI
- Posts: 2631
- Joined: Sun Mar 31, 2013 1:35 am
- Location: Notre Dame area
- Contact:
Re: Aluminum and carbon fiber E3d V6 mount.
Check with Glenn on the exact dimensions and layout/schematic of the board since he knows it best, but if you're using the outside 3 holes and raising the board off of the mount I think it solves the problem. Also is more universal and lets you hack it later without modifying the mount itself.
I did something similar to this when I first added my YJ connector, but I attached the connector board to the clamp with the inner 3 holes instead.
[img]http://i.imgur.com/aKHSndG.png[/img]
I wish there was a way to incorporate the quick disconnect functionality without covering up the beautiful aluminum and CF structure of the mount...
Re: Aluminum and carbon fiber E3d V6 mount.
That's correct travelphotog. Jim you have an older version of the board, those pads are no longer there, but the 3 j-mount holes are actually through-hole solder pads so there is exposure both on top and bottom plus a via.
And if cutting this out of Carbonfiber works out, then no worries at all. And like I said earlier, I can change the board before next order to isolate those holes.
Thats not raising the nozzle too high is it?
And if cutting this out of Carbonfiber works out, then no worries at all. And like I said earlier, I can change the board before next order to isolate those holes.
Thats not raising the nozzle too high is it?
The MakerHive
Yellow Jacket Quick Clip Plug in board
Berd-Air Cooling Kit
The MakerHive Store
Some things are meant to be closed, your mind isn't one of them.
There is a difference between what you know and what you have been told
Yellow Jacket Quick Clip Plug in board
Berd-Air Cooling Kit
The MakerHive Store
Some things are meant to be closed, your mind isn't one of them.
There is a difference between what you know and what you have been told
-
travelphotog
- Printmaster!
- Posts: 398
- Joined: Tue Jul 15, 2014 12:30 pm
- Location: Huntsville, Alabama (Marshall Space Flight Center)
- Contact:
Re: Aluminum and carbon fiber E3d V6 mount.
We can shrink the size of the carbon fiber spacers with ease. We can work out the needed heights for the three main heads, SEEME, E3d and E3d Volcano. there seems to be MANY Jheads out there of a few sizes so we might need to maybe look at the most popular and size the carbon fiber spacers based on them. But adjusting the spacer height for the main heads is easy on my end. Just so I am clear, the three main mount, outer most large screw holes in the YJ are not attached to any traces right? it is only those inner three we had to worry about?
http://713maker.com/ Custom aluminum and carbon fiber hot end mounts for the Rostock Max and Orion.
-
travelphotog
- Printmaster!
- Posts: 398
- Joined: Tue Jul 15, 2014 12:30 pm
- Location: Huntsville, Alabama (Marshall Space Flight Center)
- Contact:
Re: Aluminum and carbon fiber E3d V6 mount.
EDIT... The mount is now what holds the heads, so spacing the YJ up a bit does not mess with the hot end spacing at all. On the stock SEEME the YJ is what mounting nut screws down to, but the bottom of the hotend is held in place by the aluminum mount so does not get effected height wise by the YJ being spaced up a bit.
http://713maker.com/ Custom aluminum and carbon fiber hot end mounts for the Rostock Max and Orion.
Re: Aluminum and carbon fiber E3d V6 mount.
Right. However there is a small solder jumper pad next to them is someone wanted to connect them and transfer power down to the effector plate. But those pads should be clear.travelphotog wrote:We can shrink the size of the carbon fiber spacers with ease. We can work out the needed heights for the three main heads, SEEME, E3d and E3d Volcano. there seems to be MANY Jheads out there of a few sizes so we might need to maybe look at the most popular and size the carbon fiber spacers based on them. But adjusting the spacer height for the main heads is easy on my end. Just so I am clear, the three main mount, outer most large screw holes in the YJ are not attached to any traces right? it is only those inner three we had to worry about?
The MakerHive
Yellow Jacket Quick Clip Plug in board
Berd-Air Cooling Kit
The MakerHive Store
Some things are meant to be closed, your mind isn't one of them.
There is a difference between what you know and what you have been told
Yellow Jacket Quick Clip Plug in board
Berd-Air Cooling Kit
The MakerHive Store
Some things are meant to be closed, your mind isn't one of them.
There is a difference between what you know and what you have been told
-
travelphotog
- Printmaster!
- Posts: 398
- Joined: Tue Jul 15, 2014 12:30 pm
- Location: Huntsville, Alabama (Marshall Space Flight Center)
- Contact:
Re: Aluminum and carbon fiber E3d V6 mount.
It is on the top of the board yes? If so then I think we are OK. I was thinking to use 4-40 screws which would have smaller heads (but they still just hold the YJ OK) so if this pad is on the top then we should clear it OK with a smaller head screw. I can mill a tiny lip on the spacer under the YJ to center them up on the YJ mount holes and make sure the 4-40 screws are centered even though it is a small screw size.
http://713maker.com/ Custom aluminum and carbon fiber hot end mounts for the Rostock Max and Orion.
-
precisionpete
- Printmaster!
- Posts: 115
- Joined: Mon Mar 31, 2014 4:53 pm
Re: Aluminum and carbon fiber E3d V6 mount.
If the pads are not used why not remove the pad instead of milling things around it?
Sharp razor blade and cut right through the pad of copper and lift it off.
Sharp razor blade and cut right through the pad of copper and lift it off.
Re: Aluminum and carbon fiber E3d V6 mount.
One is on top, and one is on the bottom, so as long as one or the other isn't touching you will be fine.travelphotog wrote:It is on the top of the board yes? If so then I think we are OK. I was thinking to use 4-40 screws which would have smaller heads (but they still just hold the YJ OK) so if this pad is on the top then we should clear it OK with a smaller head screw. I can mill a tiny lip on the spacer under the YJ to center them up on the YJ mount holes and make sure the 4-40 screws are centered even though it is a small screw size.
As long as the screw head isn't larger than 8mm it should be fine.
The MakerHive
Yellow Jacket Quick Clip Plug in board
Berd-Air Cooling Kit
The MakerHive Store
Some things are meant to be closed, your mind isn't one of them.
There is a difference between what you know and what you have been told
Yellow Jacket Quick Clip Plug in board
Berd-Air Cooling Kit
The MakerHive Store
Some things are meant to be closed, your mind isn't one of them.
There is a difference between what you know and what you have been told
-
travelphotog
- Printmaster!
- Posts: 398
- Joined: Tue Jul 15, 2014 12:30 pm
- Location: Huntsville, Alabama (Marshall Space Flight Center)
- Contact:
Re: Aluminum and carbon fiber E3d V6 mount.
One of my main goals in working with Jassper in relation to the Yellowjacket is to not change his product in order for my mount to work with his product. It is easier for me to adjust my toolpaths and mill something to fit his great product than it is for him to make adjustments to the Yellowjacket. I would like for the two items to work together as some have asked and I am striving to do this so that no mods need to be made to the Yellowjacket so anyone past or present can use my mount with his board and enjoy a great printing experience with more than one style of head if they choose. The Yellowjacket does a great job of cleaning up the print head visual and that is something I like very much.
http://713maker.com/ Custom aluminum and carbon fiber hot end mounts for the Rostock Max and Orion.
-
travelphotog
- Printmaster!
- Posts: 398
- Joined: Tue Jul 15, 2014 12:30 pm
- Location: Huntsville, Alabama (Marshall Space Flight Center)
- Contact:
Re: Aluminum and carbon fiber E3d V6 mount.
Jassper wrote:One is on top, and one is on the bottom, so as long as one or the other isn't touching you will be fine.travelphotog wrote:It is on the top of the board yes? If so then I think we are OK. I was thinking to use 4-40 screws which would have smaller heads (but they still just hold the YJ OK) so if this pad is on the top then we should clear it OK with a smaller head screw. I can mill a tiny lip on the spacer under the YJ to center them up on the YJ mount holes and make sure the 4-40 screws are centered even though it is a small screw size.
As long as the screw head isn't larger than 8mm it should be fine.
OK that works good. the standard 4-40 head is 4.75mm across. On the mock up I cut out last night that seems to cover the screw hole just fine so we are good there. I will mill the body of the spacer to about 7.5mm OD and then mill a small raised insert to center it in the YJ screw hole and then bore a 4-40 clearance hole for the mounting screw. I think we are looking good here. The 7.5MM OD size will insure we clear the lower pad contact also with a tiny bit to spare. I should have something mocked up in CAD shortly. If I can I will mill a test set of spacers later today. I have to cut out a guitar pick guard first though today. Once I throw that on the mil I will jump in CAD and see what I can get worked up.
http://713maker.com/ Custom aluminum and carbon fiber hot end mounts for the Rostock Max and Orion.
Re: Aluminum and carbon fiber E3d V6 mount.
Sounds awsome
The MakerHive
Yellow Jacket Quick Clip Plug in board
Berd-Air Cooling Kit
The MakerHive Store
Some things are meant to be closed, your mind isn't one of them.
There is a difference between what you know and what you have been told
Yellow Jacket Quick Clip Plug in board
Berd-Air Cooling Kit
The MakerHive Store
Some things are meant to be closed, your mind isn't one of them.
There is a difference between what you know and what you have been told
-
bvandiepenbos

- Printmaster!
- Posts: 927
- Joined: Thu Apr 05, 2012 11:25 pm
- Location: Goshen, IN
- Contact:
Re: Aluminum and carbon fiber E3d V6 mount.
Looking great guys!
~*Brian V.
RostockMAX v2 (Stock)
MAX METAL "ShortyMAX"
MAX METAL Rostock MAX Printer Frame
NEMESIS Air Delta v1 & v2 -Aluminum delta printers
Rostock MAX "KITT" - Tri-Force Frame
GRABER i3 "Slim"
RostockMAX v2 (Stock)
MAX METAL "ShortyMAX"
MAX METAL Rostock MAX Printer Frame
NEMESIS Air Delta v1 & v2 -Aluminum delta printers
Rostock MAX "KITT" - Tri-Force Frame
GRABER i3 "Slim"
-
Jimustanguitar
- ULTIMATE 3D JEDI
- Posts: 2631
- Joined: Sun Mar 31, 2013 1:35 am
- Location: Notre Dame area
- Contact:
Re: Aluminum and carbon fiber E3d V6 mount.
travelphotog wrote:One of my main goals in working with Jassper in relation to the Yellowjacket is to not change his product in order for my mount to work with his product. It is easier for me to adjust my toolpaths and mill something to fit his great product than it is for him to make adjustments to the Yellowjacket. I would like for the two items to work together as some have asked and I am striving to do this so that no mods need to be made to the Yellowjacket so anyone past or present can use my mount with his board and enjoy a great printing experience with more than one style of head if they choose. The Yellowjacket does a great job of cleaning up the print head visual and that is something I like very much.
Collaboration and sharing is what it's all about