3rd magnetic arm upgrade

A place to talk about user-made mods and upgrades to their machines
Post Reply
User avatar
Generic Default
Printmaster!
Posts: 558
Joined: Mon Jun 03, 2013 6:56 pm
Contact:

3rd magnetic arm upgrade

Post by Generic Default »

A few days ago I made yet another upgrade to my magnetic arms. Shortened the tubes, turned some recycled PTFE ball cups, press fit taped the cups onto the tubes, and now I'm getting the smoothest prints I've ever seen on a 3d printer.

Here are a few pictures of the setup;
print closeup effector.jpg
closeup 2 setup.jpg

The PTFE cups have a 60 degree mating surface for the 3/8ths chrome steel ball bearings. The balls are loctite'd into hex cap screws, which are threaded into untapped printed nylon parts. The cheapskate mounts are over a year old now, but the effector is new. The brass tubes are 7/16th inches (0.44) in diameter, thin wall, light weight and very rigid. The lack of friction on these ball cups is unbelievably low. I'm happy with them for now. 8-)

My main concern is if the cups will stay press fitted tight enough to avoid drifting over time. Right now the arms are equal in length to within 0.05mm, but if they drift it will cause problems in the future. Still better than what I had before!


I was testing single extrusion on my Tri hotend. The printed nylon effector plate can take a lot of heat, but the 4mm fan keeps the heat sink room temperature. It might be cool enough to test with a PLA plate.
Check out the Tri hotend!
User avatar
Eaglezsoar
ULTIMATE 3D JEDI
Posts: 7185
Joined: Sun Apr 01, 2012 5:26 pm

Re: 3rd magnetic arm upgrade

Post by Eaglezsoar »

Did you machine your PTFE Ball Cups or is there an outside source that you used?
I would be VERY interested in purchasing a set of the cups, when you are not so busy, this would make a great kit for you to sell.
User avatar
Generic Default
Printmaster!
Posts: 558
Joined: Mon Jun 03, 2013 6:56 pm
Contact:

Re: 3rd magnetic arm upgrade

Post by Generic Default »

It's on my list of things to sell on polystroooder.com

First I have to finish getting the payment stuff setup and get the hotend sales going.


I'll definitely make a full magnetic arm kit, everything will be ultra-precise and smooth. I can only get these arms to within 0.05mm length with the methods I'm using now, but there are ways to keep it to 0.01mm.

I machined the ball cups out of recycled PTFE 0.625 round rod. It needs a center drill for the mating surface and a regular twist drill for the tube to fit into. Easy to do on a lathe, and it doesn't need any tolerances since the lengths are set after the cups are on the tubes.

I'll make this design better in the future, but I think this is the most precise method of delta arm positioning in the world right now! No slop whatsoever!
Check out the Tri hotend!
User avatar
BONE
Printmaster!
Posts: 288
Joined: Fri Jul 25, 2014 9:10 am

Re: 3rd magnetic arm upgrade

Post by BONE »

Looks like a nice setup. I've been wondering how development on the magnetic arms are going. Just building mine now, but this will be an upgrade probably in a few months. Keep up the good work. Are there any videos of it running with the new arms.
The BONE ZONE build thread.
User avatar
teoman
ULTIMATE 3D JEDI
Posts: 1783
Joined: Sat May 24, 2014 5:43 pm

Re: 3rd magnetic arm upgrade

Post by teoman »

That is pretty cool. Can you give an estimate on the times?
When on mobile I am brief and may be perceived as an arsl.
travelphotog
Printmaster!
Posts: 398
Joined: Tue Jul 15, 2014 12:30 pm
Location: Huntsville, Alabama (Marshall Space Flight Center)
Contact:

Re: 3rd magnetic arm upgrade

Post by travelphotog »

Any chance of making the arms with nice shinny 3K carbon fiber tubes? It is just a personal preference. I must say I am sort of kicking myself for picking up the E3d V6 so fast and before I saw your Tri head hot end. Double extruders is a major item on my TO DO list. Really kicking myself for not finding your system first.
http://713maker.com/ Custom aluminum and carbon fiber hot end mounts for the Rostock Max and Orion.
User avatar
Generic Default
Printmaster!
Posts: 558
Joined: Mon Jun 03, 2013 6:56 pm
Contact:

Re: 3rd magnetic arm upgrade

Post by Generic Default »

Don't kick yourself, I'm the one who's intentionally not advertising it right now! I don't want to have a bunch of people waiting on pre-orders like most companies do. I want to hit the ground running with the best hotend on the market.

My first production batch of the Tri hotend is ~5 weeks away, 100 kits, EVERYTHANG you need to get it working, even extra parts you may or may not use.

Since you have the E3D on the way, maybe use the next 5 weeks to get your printer all perfect. Make those magnetic arms and stuff. I wish I could make beta kits right now, but I have no way to machine the parts to the needed tolerances. My own arms were calibrated with a set of 12 inch digital calipers, but I'll design the production arm kits to be perfect. Most likely aluminum tubes with threads for precise length adjustments. Balls will probably be machined as one piece instead of gluing ball bearings into hex head cap screws. I'm considering some other really cool design elements that nobody else has thought of yet.
.
No compromises. I want the most accurate and smooth delta arms on this planet!

As for times on the magnetic arm kit... well I've already committed a lot of time and money to the hotend thing. I can't invest in these magnetic arms until I sell a lot of hotends and recover my investment on those.

Did I mention that I'm also working on something to convert hot glue sticks into filament? And another hotend that prints in solid aluminum? Watch this market over the next year...
Check out the Tri hotend!
User avatar
BONE
Printmaster!
Posts: 288
Joined: Fri Jul 25, 2014 9:10 am

Re: 3rd magnetic arm upgrade

Post by BONE »

Geezzz.... Generic, slow down. I don't think you enough going on. I think I'm going to have to just redesign the entire Delta to keep. Why? Because I can.
The BONE ZONE build thread.
McSlappy
Printmaster!
Posts: 809
Joined: Wed Dec 11, 2013 9:11 pm
Location: Queensland, Australia
Contact:

Re: 3rd magnetic arm upgrade

Post by McSlappy »

Generic, if you're doing aluminium arms, see about getting them anodised... I'd love to have some hot pink or electric blue arms :)
I loved my Rostock so much I now sell them in Oz :)
travelphotog
Printmaster!
Posts: 398
Joined: Tue Jul 15, 2014 12:30 pm
Location: Huntsville, Alabama (Marshall Space Flight Center)
Contact:

Re: 3rd magnetic arm upgrade

Post by travelphotog »

If you use 6061 I can anodize them. Do it all the time for my own stuff and for a few local clients. Just saying.
http://713maker.com/ Custom aluminum and carbon fiber hot end mounts for the Rostock Max and Orion.
RocketMagnet
Printmaster!
Posts: 169
Joined: Sun Sep 14, 2014 3:22 pm

Re: 3rd magnetic arm upgrade

Post by RocketMagnet »

I'd guess Carbon Fibre would be the best material for the arms due to it's inherent anti vibration properties.
It's not just weight reduction that many non full carbon road bikes still have carbon forks as the first upgrade up through the model hierarchy, it takes out the road buzz.Personally I've upgraded my non Carbon mountain bikes to carbon bars and seatposts for weight and also comfort...
I believe it's due to the alternating weave pattern and different orientation of alternate layers inhibits the vibration transfer through CF.

Completely new to printing and still trying to source one (Delta) in the UK (everywhere is sold out) so maybe the magnetic connectors are overkill already?

Question I do have is does ambient temperature affect printer calibration, so would metal arms be affected more due to their larger coefficient of thermal expansion Vs that for CF or the standard plastic arms?
User avatar
BONE
Printmaster!
Posts: 288
Joined: Fri Jul 25, 2014 9:10 am

Re: 3rd magnetic arm upgrade

Post by BONE »

RocketMagnet wrote: Question I do have is does ambient temperature affect printer calibration, so would metal arms be affected more due to their larger coefficient of thermal expansion Vs that for CF or the standard plastic arms?
From what I've read, not really. If you keep the printer in the same place and get it ready to print the same way each time, you should not have a problem. This is why some people build chambers for the printer, to get those constant conditions for printing.

For calibration, you will want to get everything up to temp and calibrate it that way.
The BONE ZONE build thread.
User avatar
Generic Default
Printmaster!
Posts: 558
Joined: Mon Jun 03, 2013 6:56 pm
Contact:

Re: 3rd magnetic arm upgrade

Post by Generic Default »

I've actually thought a lot about the arm material in the last couple of months.

Carbon fiber is rigid, has low thermal expansion, and is lightweight, but it's expensive and hard to machine efficiently.

Stainless steel is rigid, strong, has relatively low thermal expansion, and comes in tube form at a low cost. Plus it's easy to machine.

Aluminum is the lightest and is still pretty strong, but is less rigid than stainless and has more thermal expansion. It's the easiest to machine.


There are other options but those are the main ones for arm material in mass production. I'm leaning toward stainless, because CF is just too expensive.
Thermal expansion isn't a problem if the printer is Z leveled after it's up to temperature. I'll calculate the expansion amounts sometime. Press fits are tricky with thermal expansion though.


The ball material, magnetic material, and ball socket material are important too! Not to mention the geometries for this kind of stuff.
Check out the Tri hotend!
bdjohns1
Printmaster!
Posts: 238
Joined: Sat Jan 25, 2014 9:50 pm
Location: Madison, WI

Re: 3rd magnetic arm upgrade

Post by bdjohns1 »

Generic Default wrote: The ball material, magnetic material, and ball socket material are important too! Not to mention the geometries for this kind of stuff.
I got one of those samples of the igus low-wearing filament intended for use in bearings. As I was working through some other issues I had swapped my own magnetic arms out for tricklaser's CF/rod end joints to eliminate that as a variable. If I put them back in the machine, I might use my filament sample to make some bearing cups. As igus's documentation describes it, their filament would be ideally suited to the task - substantially less wear than ABS or nylon.
User avatar
Generic Default
Printmaster!
Posts: 558
Joined: Mon Jun 03, 2013 6:56 pm
Contact:

Re: 3rd magnetic arm upgrade

Post by Generic Default »

I saw that stuff a while ago, it looks awesome. I don't know how much it costs though..... And I wonder why they didn't show nylon in the comparison chart? I was thinking about extruding MDS nylon to print with. It's stronger, more rigid, and more slippery than any other filament on the market right now.

Also, I filed a provisional application recently for some of the features on my Tri hotend that I haven't disclosed yet. A few of the claims relate to the arm mechanics. I've been careful to not claim anything that isn't completely novel, and my intent is primarily to protect from patent trolls in the future.

Here are a few pictures of the latest arms. They're 316 stainless steel tubes, 1/2 inch in diameter. The bright stainless tubes with collet ends looks awesome, more in real life than in the pictures on this post. The new ball cups are printed for now, although I have plans for high temperature ones that will need to be machined. Or if we get PEI filament soon......Both metal and/or plastic arms could work. I've been making a very big delta printer capable of working over ~150 degrees celsius with a full heated build chamber, which is where a lot of these new things are coming from.

I like these because they are concentric due to the collet design. Each collet slides onto the ends of the tube, then a printed nut-sleeve is threaded over the collet to lock it in place on the tube. The 3/8th magnet fits inside the collet and *almost touches the chrome ball bearing. I'll redo them in nylon for wear resistance; right now they're black ABS.


Overall this setup is a huge improvement over previous arms, although I'd prefer to use other materials for the collets. But these are dirt cheap right now; Stainless tubes are ultra stiff with low thermal expansion and they end up making a fairly inexpensive setup. I just like how precise and concentric these new arms are. They don't slip because the threads are tapered and the nut holds them on really tight.
Attachments
collet cross section shaded.png
magnetic arm collet.png
tube arm collets.png
printed arm collet.png
Check out the Tri hotend!
User avatar
DavidF
Printmaster!
Posts: 779
Joined: Thu Aug 29, 2013 12:12 pm
Location: Delaware

Re: 3rd magnetic arm upgrade

Post by DavidF »

Well, looks a bit like overkill, but I really like how the end is made.
http://www.youtube.com/user/aonemarine" onclick="window.open(this.href);return false;
Lost pla castings? see me
User avatar
BONE
Printmaster!
Posts: 288
Joined: Fri Jul 25, 2014 9:10 am

Re: 3rd magnetic arm upgrade

Post by BONE »

Generic,
I really like that design. Had you thought about adding O-rings into the nut and collect to provide a little extra grip? I would think that it would help also with the vibrations and possible loosening of the threads.
The BONE ZONE build thread.
User avatar
Generic Default
Printmaster!
Posts: 558
Joined: Mon Jun 03, 2013 6:56 pm
Contact:

Re: 3rd magnetic arm upgrade

Post by Generic Default »

I don't think O-rings are needed for these since they have tapered threads. The angle is 1.5 degrees, so it gets to be a really tight friction fit once they're threaded on all of the way.


Vibrations aren't a problem but thermal is expansion is. For most printers, like the one they're on now, thermal expansion doesn't happen because the printer is open-air and only the printed parts and bed get hot. But these arms need to work on a big delta printer I'm making that has the entire build volume heated up to 150 degrees C. So only a few plastics will work for the arms, right now I'm leaning towards Ultem PEI. I might make metal cups since thermal expansion won't make them get loose (the arms are stainless steel).

I want a system that lasts indefinitely, has ultra low friction, length tolerances of +-0.03 millimeters, and is extremely rigid. I considered putting silicone rings in the collet where it contacts the rod because silicone has the highest temperature range of grippy stuff the arms would benefit from. Plus there is the small amount of damping you talked about; high frequencies should be absorbed but low frequencies should be passed.
Check out the Tri hotend!
User avatar
joecnc2006
Printmaster!
Posts: 150
Joined: Tue May 14, 2013 11:42 am

Re: 3rd magnetic arm upgrade

Post by joecnc2006 »

Thread the Aluminum, screw on the ends to the exact length, then setscrew or clamp in place.
Joe
http://www.joescnc.com" onclick="window.open(this.href);return false;
User avatar
teoman
ULTIMATE 3D JEDI
Posts: 1783
Joined: Sat May 24, 2014 5:43 pm

Re: 3rd magnetic arm upgrade

Post by teoman »

Or you could even solder the threads.
When on mobile I am brief and may be perceived as an arsl.
McSlappy
Printmaster!
Posts: 809
Joined: Wed Dec 11, 2013 9:11 pm
Location: Queensland, Australia
Contact:

Re: 3rd magnetic arm upgrade

Post by McSlappy »

This is all looking really nice. Hurry up so I can stock your goodies down under mate!
I loved my Rostock so much I now sell them in Oz :)
User avatar
LorenOlepi
Printmaster!
Posts: 76
Joined: Tue Apr 30, 2013 5:40 pm
Location: CT

Re: 3rd magnetic arm upgrade

Post by LorenOlepi »

Any kits available yet... looking to revamp my V1
User avatar
mhackney
ULTIMATE 3D JEDI
Posts: 5412
Joined: Mon Mar 26, 2012 4:15 pm
Location: MA, USA
Contact:

Re: 3rd magnetic arm upgrade

Post by mhackney »

Just reading through this. GenericDefault, have you tried the Delrin/Acetal filament yet? It is really really nice. Delrin is a great material for this application I think.

Sublime Layers - my blog on Musings and Experiments in 3D Printing Technology and Art

Start Here:
A Strategy for Successful (and Great) Prints

Strategies for Resolving Print Artifacts

The Eclectic Angler
User avatar
Glacian22
Printmaster!
Posts: 330
Joined: Thu Apr 04, 2013 6:07 am
Location: Seattle

Re: 3rd magnetic arm upgrade

Post by Glacian22 »

I'd love to get in on a set of arms too...been using carbon fiber with traxas ends, and they're definitely not as nice as magnets :D
User avatar
Generic Default
Printmaster!
Posts: 558
Joined: Mon Jun 03, 2013 6:56 pm
Contact:

Re: 3rd magnetic arm upgrade

Post by Generic Default »

I'm actually getting away from magnets for arms. They pop off too easily, which is one of the main causes of print failures for me. If you had a reliable system that you didn't mess with, they would probably be fine, but I modify my printer so much that it causes problems. I've been doing a lot of PLA at high temperatures (240+), which makes almost perfect prints, but overhangs curl up on the edges without support. When it cools, the nozzles collide with it. If it's big enough the magnets disconnect and the print is ruined.


The new arm system is identical, except that rather than having magnets in the cups, I tension the linear carriages to the effector plate with aramid strings preloaded with steel springs. The aramid is put through a vented cap screw, then knotted and (optionally) glued. Magnets have a constant holding force that decreases with the cube of the distance. Once they get disconnected, they don't reconnect. The force is about a pound per magnet arm, I'm guestimating.

The springs/strings have a constant holding force that increases with distance. So if they get pushed out of place, they reconnect most of the time. Plus you can adjust the preload, making the system more rigid.

Pictures are better. I'll probably make a video demo of how to create this new arm system, along with a comparison to the magnetic arm system. I still need to experiment with a few more things before I do, like nylon cap screws as mating surfaces.

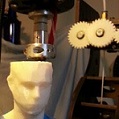
First picture from earlier this year shows my current magnetic arm setup with printed trimmer line magnet cups/collets and glued ball bearings in cap screws.
current magnetic arm setup.png
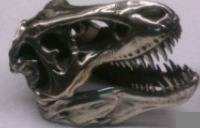
Second picture is more recent of my big delta build setup. 0.5 inch CF tube arms and turned aluminum ball cups. Threaded brass balls screwed onto set screws, inserted into aluminum effector plate.
The yellow/red thing is the aramid cord, the springs are not in the picture. Notice how the aramid strings enter the socket head cap screws at a point exactly half way between the two brass ball centroids. This keeps the preload constant across the entire build surface, without torquing the effector. As you get a more and more rigid setup, you have to build to closer tolerances to make stuff work. I plan on eliminating the steel springs eventually.
isometric bottom of hotend on effector.png
Check out the Tri hotend!
Post Reply

Return to “Mods and Upgrades”