I buy the silicone repair tape at Menards.
They have red, black, blue and yellow.
Introducing: Albertus Magnus
-
bvandiepenbos

- Printmaster!
- Posts: 927
- Joined: Thu Apr 05, 2012 11:25 pm
- Location: Goshen, IN
- Contact:
Re: Introducing: Albertus Magnus
~*Brian V.
RostockMAX v2 (Stock)
MAX METAL "ShortyMAX"
MAX METAL Rostock MAX Printer Frame
NEMESIS Air Delta v1 & v2 -Aluminum delta printers
Rostock MAX "KITT" - Tri-Force Frame
GRABER i3 "Slim"
RostockMAX v2 (Stock)
MAX METAL "ShortyMAX"
MAX METAL Rostock MAX Printer Frame
NEMESIS Air Delta v1 & v2 -Aluminum delta printers
Rostock MAX "KITT" - Tri-Force Frame
GRABER i3 "Slim"
Re: Introducing: Albertus Magnus
I received my Raspberry Pi2 and it's great! The OS upgrade was super simple (just apt-get update/dist-upgrade) and it's much faster. I can now stream the camera at 1080p 30fps with no worries of stuttering as this is quad core.
I've been running the new Repetier-Server for a while and I'm pretty happy with it. With the Pi2 it's really quick, and the GUI is slick. I'm going to work on a Cura plugin so I can send the gcode directly to Repetier-Server.
I've been running the new Repetier-Server for a while and I'm pretty happy with it. With the Pi2 it's really quick, and the GUI is slick. I'm going to work on a Cura plugin so I can send the gcode directly to Repetier-Server.

Re: Introducing: Albertus Magnus
I've finally decided to upgrade to a 24v power supply and found your thread for how you did it. One question I have is whether the RAMBO board needs 5V as well as 12V and if so, where/how do you get that to the RAMBO?rpress wrote:First up is the 24V power supply. In lieu of using the provided 12V ATX supply, I have opted for a supply capable of providing the voltage and current needed to heat the bed quickly.
[img]https://lh6.googleusercontent.com/-CbDt ... 153842.jpg[/img] [img]https://lh5.googleusercontent.com/-aARE ... 164332.jpg[/img]
[img]https://lh5.googleusercontent.com/-sXdl ... 164509.jpg[/img] [img]https://lh6.googleusercontent.com/-oQB6 ... 102107.jpg[/img]
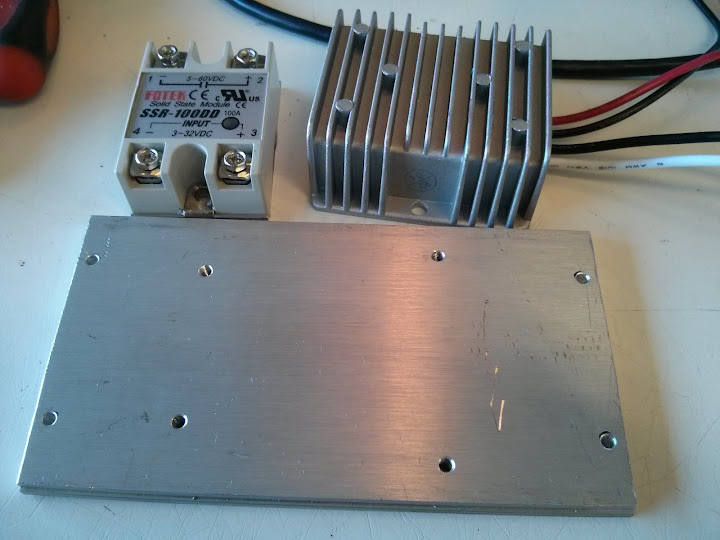
The parts used are:
Mean Well SP-500-24 power supply
Crydom D1D40 solid state relay
Hossen 24V-12V 240W DC/DC converter
Aluminum bar 6.5"x3.5"x0.25"
Sheet metal 6.75"x4.75"x0.0625
Various crimp terminals
It works quite well, and fits with no modifications to the base. I adjusted the voltage down to 19.5V to reduce the power consumption to about 550W peak. As the bed warms up the resistance goes up too so it's not using peak power for very long. It's wired so only the bed is running at the higher voltage and everything else is running at 12V.
Note in one photo I show the FOTEK solid state relay. This is hardly capable of 100A, and it's temperature would get to 60C when running. The Crydom SSR is much better, even though it's rated for 40A it's hardly above room temperature.
-
nitewatchman

- Printmaster!
- Posts: 626
- Joined: Thu May 01, 2014 9:51 pm
- Location: Birmingham, Alabama
Re: Introducing: Albertus Magnus
My printer is setup exactly like this also. Rambo does not require 5vdc.
Good luck, mine works very well.
Good luck, mine works very well.
Re: Introducing: Albertus Magnus
Thanks!nitewatchman wrote:My printer is setup exactly like this also. Rambo does not require 5vdc.
Good luck, mine works very well.
-
Eaglezsoar

- ULTIMATE 3D JEDI
- Posts: 7185
- Joined: Sun Apr 01, 2012 5:26 pm
Re: Introducing: Albertus Magnus
Rpress, your pictures are so well focused and clear I just have to ask, which camera did you use to take your pictures?

Re: Introducing: Albertus Magnus
If I wanted to wrap my hot end, could I use this flue tape? It's rated 600F, and I need to get my E3D close to that (280C) to change nozzles.
Questions? Ask in a thread - PMs are off.
AI Calibration | Dimensional Accuracy Calibration | Hand-Tune your PID | OctoPi + Touchscreen setup | My E3D hot end mount, Z probe, fan ducts, LED ring mount, filament spool holder, etc.
AI Calibration | Dimensional Accuracy Calibration | Hand-Tune your PID | OctoPi + Touchscreen setup | My E3D hot end mount, Z probe, fan ducts, LED ring mount, filament spool holder, etc.
-
barry99705

- Printmaster!
- Posts: 707
- Joined: Sun Aug 11, 2013 6:10 pm
- Location: west ohio
Re: Introducing: Albertus Magnus
It will conduct electricity and heat. It's not an insulator, it's just aluminum duct tape with high heat adhesive.626Pilot wrote:If I wanted to wrap my hot end, could I use this flue tape? It's rated 600F, and I need to get my E3D close to that (280C) to change nozzles.
Never do anything you don't want to have to explain to the paramedics.
Re: Introducing: Albertus Magnus
Hi folks,
I got all of the parts to put together 24v heating for my bed, including a Crydom D1D40 SSR (I figured I'd spend the money to get a good quality SSR). However, after hooking everything up, the SSR doesn't seem to be functioning correctly -- it let's the 24V go through immediately. I've even tried tying both of the trigger pins to ground and still, the bed begins heating immediately. Does that mean I got a bad SSR? How can I test it for sure?
Thanks,
Dean
EDIT: Never mind -- I had the output wired incorrectly on the SSR (I had it in between the V+ and the bed ) Everything is working now
I got all of the parts to put together 24v heating for my bed, including a Crydom D1D40 SSR (I figured I'd spend the money to get a good quality SSR). However, after hooking everything up, the SSR doesn't seem to be functioning correctly -- it let's the 24V go through immediately. I've even tried tying both of the trigger pins to ground and still, the bed begins heating immediately. Does that mean I got a bad SSR? How can I test it for sure?
Thanks,
Dean
EDIT: Never mind -- I had the output wired incorrectly on the SSR (I had it in between the V+ and the bed
Re: Introducing: Albertus Magnus
Sorry I haven't been following this thread.
Glad you got it working! You can wire it on either side, but the polarity of how you hook up the SSR output terminals (the big ones) will change. The SSR is not like a normal relay, and polarity matters. DC SSRs use MOSFETs. These act like a switch when wired in one direction and a diode when wired in the other. So when wired wrong they act like a diode and will conduct current even when they are turned off.dpmacri wrote:EDIT: Never mind -- I had the output wired incorrectly on the SSR (I had it in between the V+ and the bed
Most of my photos are from my Nexus 4 phone, I might have a couple from my GH4. Decent lighting and careful focus certainly help.Eaglezsoar wrote:Rpress, your pictures are so well focused and clear I just have to ask, which camera did you use to take your pictures?
Re: Introducing: Albertus Magnus
Where did you get the mounts for the FST sensors? I found the sensors and JohnSL's board but not the metal mounts that you are using.rpress wrote:Finished the FSR bed sensors for auto leveling. JohnSL's board works great, they're quite sensitive.
[img]https://lh6.googleusercontent.com/-xfTc ... 135418.jpg[/img]
[img]https://lh5.googleusercontent.com/-Tt6U ... 140909.jpg[/img]
Thanks,

Re: Introducing: Albertus Magnus
That's cool. Any idea on the dimensions so that I can replicate?Nylocke wrote:He machined those on this lathe.
Thanks!
Re: Introducing: Albertus Magnus
rpress wrote:Dual cold ends! Today I will play with the gcode necessary to work the retractions needed for the upsilon.
[img]https://lh4.googleusercontent.com/-lSIF ... 023_173810[/img]
People have requested info on the FSR mount so here is a simple drawing:
[img]https://lh5.googleusercontent.com/-VK6K ... 065907.jpg[/img]
There is not much play in the mount, as I didn't want the bed moving around. So it's important that the mount is tightened when the bed is up to temperature.
Re: Introducing: Albertus Magnus
Thanks, I think I read passed that image a dozen times without it registering what it was (face + palm).