I recently had the opportunity to set up a brand new workshop. My old space was just a table in a corner in the house where there was room. Now, I have an entire room set aside just to work in, and it has done wonders!
The biggest thing I learned from this experience is that it pays to set up the most "deep" system of organization possible. My old workshop was just some shelving and desks with various parts stacked on top of each other, in boxes and bags, etc. If I wanted to find some screws, I would go to the bin where I had all my boxes of screws, and I would dig through the boxes. I was often unsure whether I had a specific size. If I wanted hot end parts, I had to dig through a freezer bag full of hot end-related stuff, and sometimes I didn't know whether I'd find what I needed. There were times when I would order something I thought I didn't have, and when I moved everything to the new workshop, I found several duplicated orders of stuff I had simply forgot that I had. Over the years, lesser-used things tended to get buried.
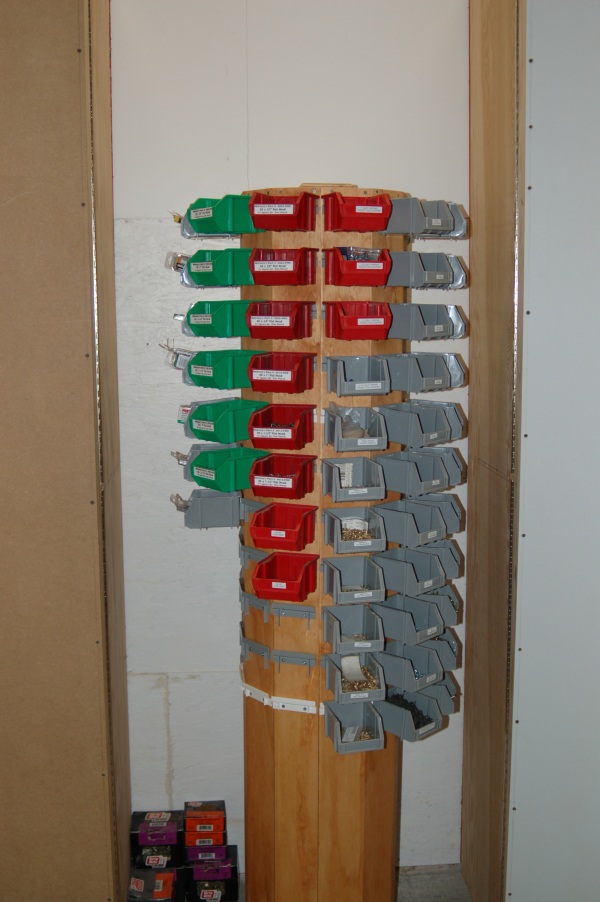
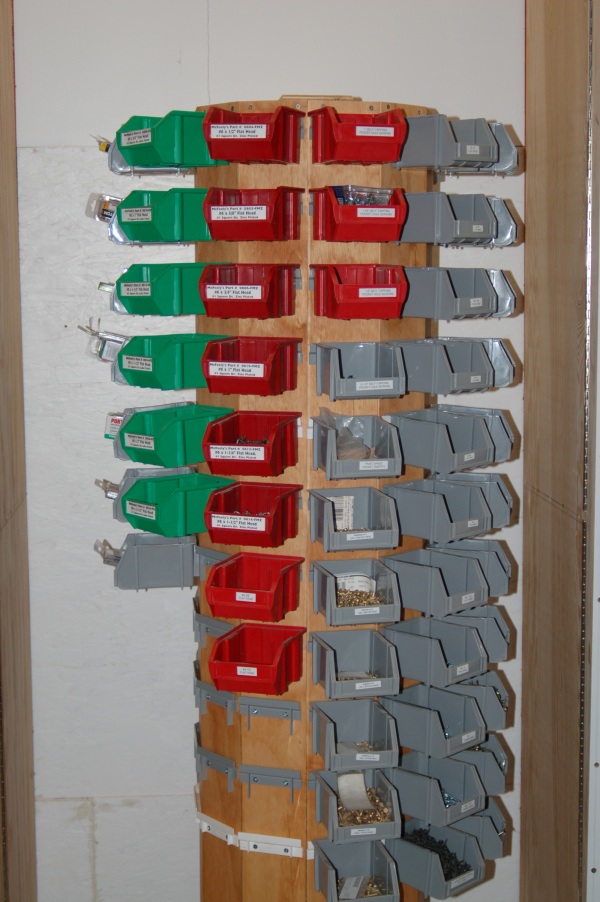
The new workshop's storage is based on the idea of having many smaller storage spaces, each of which holds a narrowly-defined kind of Thing. For this, I bought two large bin racks, each of which has 22 plastic bins of varying sizes:
These are pretty easy to put together. Each one takes about ten minutes - not bad for furniture of this size! The bins all come with labels, so you can see what's in each one without having to look inside. I'm liking bin racks a lot more than shelves. The organizational possibilities are much better for storing the wide variety of things that are required to do my work.
This was somewhat annoying to assemble. It took a couple hours. The bench top isn't pre-drilled, so you have to lay it out on the frame as perfectly as possible, and drill the pilot holes yourself. They also ship the cheapest screws on Earth, and one of the screw heads sheared off when I was driving it in. (Ironically, one of the reviewers on Amazon had that exact thing happen to him.) I'd use my own wood screws if I had it to do over. It also came fairly banged up - UPS is really not good at delivering large, heavy items unscathed. (I wound up sending back a Muscle Rack because UPS left it on my front porch with the box open and parts falling out, and the shelves themselves were all scuffed up.) I was able to un-bend some bent steel, and I put the marred surface of the workbench facing down, so it looks alright. They give you a power strip that you can fix to any side of the frame, which is really helpful. The main point of this workbench is to give me a place to corral my soldering iron and most of my hand tools, for which it has metal bins, and also to have a stand-up workstation. I can also drill holes in this thing for attaching clamps, without having to feel like I'm messing up a decent piece of furniture. It also comes with a tablet stand - not a huge deal, but easily one of its most useful features. Makes it super easy to have assembly instructions right in front of you. If you can get a workbench like this at a local shop, that's probably better than letting UPS beat the hell out of it. (Which they often do.)
Finally, I got this to hold all my metric screws, locknuts and washers, and this to hold all the inch stuff. No more digging through boxes of screws! I used a $20 label maker to label all the bins, so it's obvious at a glance whether I have a given size or not:
I also figured out that it's really a lot better to have your workshop in a distinct room if you have cats. I always had to store stuff up high, put boxes in front of things, etc. because if I didn't, one of my cats would jump on the desk and knock things on the floor. He doesn't get to come in here, and while I miss his company, it is really nice not to have to barricade everything whenever I step away.
In the future, I'm thinking about getting one of these adjustable-height workstations from McMaster-Carr, just to have a place to do final assembly. It can be ordered with a static-dissipating work surface. Fairly expensive, but possibly worth it:
McMaster-Carr adjustable-height workstation.png (12.33 KiB) Viewed 7927 times
What do you all do to keep your workshops organized and efficient?
Organized is not my middle name. I'm the type that always has clutter on the workbench from whatever. When I need to do something, I'll clear away what space I need for the task, and maybe once a year I'll put everything in its place. On the bright side, I generally remember exactly where I left something, so it works for me.
My workbench is a solidcore door laid over two half-height bookshelves that I use either standing or on my tall stool. I've also got a 30x60 metal office desk I've had forever. Plus sawhorses and boards that get set up when required.
The bulk of my small part collections are in 18-compartment adjustible divider craft boxes (9.5"x14"x2") which go on those bookshelves. Larger stuff gets collected in rectangular food-storage containers, no favorite brand. Carpentry stuff (large nails, screws, etc) are either in the original boxes or in metal tea tins (some round, some square) that are easy to move to the job when needed. Also a number of smaller containers, mainly from stuff that came with its own box.
I'm going to chime in somewhat, as with no less than 4 distinct work/storage areas, all with distinct needs and largely organized by 3 different people, I have some depth to my observations about this.
Cabinets:
They aren't particularly cheap, they may not be the sturdiest things. You need either a lot of studs, or some impressive anchors to hold them on the wall in all conditions. But they make a work-room look a lot cleaner and neater. They give you places to put things that you may want to keep out of sight or protected from sawdust and other garbage, such as electronic components, O-rings, and fittings. They also usually have a lot of different holes for shelves. Do yourself a favor and don't buy the cheap plastic shelf pins, nor the simple metal ones with a ground or hammered flat. They will snap or tear out at the worst times. Buy some nice L shaped ones, so you can spread load better. If you have anyone else in your workshop, or anything heavy that is still movable (Say a small surface plate), eventually you will tear them out if you use the small ones (If the cabinet doesn't fall off the wall. Had that happen a few times). This won't fix all the problems if you use cruddy partical board or cheap 1/2 plywood. buy quality shelves. You'll regret it otherwise. Also, clear fronts may look nice, and let you see what you (or someone else) shoved in there at first, they will eventually get dusty and either craze (If plastic) or present a major shatter risk (Glass and plastic). I personally like to use a wooden front, with corkboard on the front. That gives you room for notes and diagrams, as well as having easy to update lists of what's in there. Other nice options are whiteboard or chalkboard paint, especially on metal fronted cabinets where you can use magnets. Buy plenty of shelf pins, and a good number of shelves to start with. If nothing else, it gives you an excuse to buy more cabinets later.
Bins, Bins, Bins:
Anything large, unique, bulky, or sensitive should be in the most practical size of clear sided bin. Plumbing stuff, or random carpentry brackets go very well in the flip top bins you can buy at most stores. But beware, they no longer make most like they used to. If you want a flip top bin, make sure you can see the wire of the hinge, that it goes all the way along, and that it has some kink or bend in it to hold it. The bins without that are usually ~75 cents cheaper, and fall apart if you drop them when they have more that around 10 pounds in them. The wire both helps hold it together, and is an indicator that it isn't the very cheapest crud they could ship. Moving more than 40 pounds in a all plastic flip top bin will ensure that it never closes properly again. When you're not buying flip top bins, most that you can't dent with a thumb do OK for lighter loads. Heavy stuff wants for a tough bin. As with the cabinets, don't cheap out. The bin will survive a lot more if you buy good quality, and a bin that breaks will usually do more damage than the cost differential.
Smaller stuff, like fasteners can be stored well in two ways. If it's something you're likely to need a set off outside your workshop, put it in a divided box or two. Make sure each one contains ONE kind of thing, and if at all possible, that all of that one kind of thing is in it. Plumbing stuff shouldn't mingle with electrical, or you'll end up breaking something when you grab the wrong kind of solder. Also consider breaking down a thing into useful, usable tool kits. For example, have an electrical/electronics cabinet or shelf, and have power electrical (Wire nuts of many sizes, plugs, switches, plug testers, and AC sensors and isolated screwdrivers) seperate from signal electronics (Soldering iron, crimpers, RJ45, cable testers, crimp pins, hook-up wire), so that dependent on the project you can have one, easy to use tool case at a time. This also makes it easier to loan out tools. If someone asks to power some electrical stuff to run ethernet, this way it takes them effort to find wire nuts to splice it back together with when they mess up, or they will do it the right way, saving you the time of fixing it later. It also means that you can keep working with your arduino's while your third cousin burns through a few miles of fuse wire and turns his house into a death trap. Those bins that stack are wonderful for screws and bolts. My suggestion: Plan a size progression and have screws sorted by length, and nuts and bolts sorted by size, with the nuts and bolts in adjacent, matched columns. Resist temptation to mix fasteners that are "Close". You will never get it sorted again without tossing the whole lot and restocking, and it will cause you no end of devilment finding the 2-56 bolt in the bin of 8-32 fasteners, or you'll get wood screws when you need sheet metal screws (And vice versa).
Big power tools should be on wheels if at all practical (No, don't try to put a Haas SL-10 on them, but a bandsaw works well), unless you have a very large shop. Plan your storage, and make sure that if they have a dust port, that you have enough adapters or whatever for them all to end up at a common size at the same time. Even if you only have 2 tools and a shop vac right now, if you plan to expand, put the work in early. It makes for a much more pleasant working environment, and a healthier one. Large drill presses unfortunately mostly don't work well on wheeled tool bases (At least that I've found). So try to find a good spot for that to live. For smaller tools, such as bench grinders, oscillating sanders, disk/belt sanders, scroll saws, and other benchtop tools, consider building a workbench with a section of swappable surface, and storing them bolting to surfaces under the main one until you need it to work on. Hand power tools you use a lot and which are reasonably standard in shape/size may deserve their own special holders and shelves, such as circular saws, power drills, and belt sanders. Unpowered hand tools should be stored either on racks, or in one of those rolling tool carts you see at every mechanics. If it came in it's own box of reasonable quality (Many saws, almost all caliper, micrometers, router bits, chisel sets, and other precision instruments), leave it in there unless you intend to make cork or foam inserts for it. The manufacturer wouldn't have spent the money to give you a box like that if it didn't make a difference in how well it survives.
Workbenches:
For each person expected to work in a shop, there should be ~3/5 workbenches, rounded to the nearest whole number, at a minimum. I recommend building your own, with each one set at a comfortable height and depth for what you expect to do on it. I find most commercial ones to be one size fits no one. Some applications call for different kinds of surfaces. Make sure you consider that as well. good solid exterior plywood works well for most purposes, and is relatively cheap. Hardwood can give you a number of different kinds of surface, depending on the treatment, as can bamboo, but is more expensive. I find for tables that you expect to slide things along, sanding it smooth and then waxing it well helps boards and metals slide reasonably. If it's a multi-part top, expect it to take damage where each join is, and don't count on it staying level unless you put effort in when you build it. Laminates can be done pretty easily and cheaply if you're willing to put the time in, and look slick while scaring less than bare wood. But they can't be resurfaced or worked on as easily.
Flooring:
Avoid carpet at all costs. For light duty work, such as modeling or fiber arts, engineered wood is suitable. For electronics and soldering, tile or concrete, possible with the interlocking plastic tiles on top. For carpentry, either plastic interlocked tile, or concrete with the occasional anti-stress mat. It makes a lot of difference in what you can get done, and how productive you feel. If you can deal with the time and effort, epoxy treatments over concrete look and feel good, make cleaning easier, and make it much easier to find that one little screw you just dropped that you need to finish reassembling something.
If you want to have heavy duty work going on, consider putting in fixed duct dust extraction, and a shop air system. If you do go for shop air, you have some things you need to be aware of: Black iron pipe and fittings are ONE use only. NPT is designed to distort the threads to seal properly. You can't endlessly take it apart and put it back together. Think of it like PVC fittings/pipe. Once it's air-tight, you'll need to cut the ends off and get new fittings if you want a new joint that's good. Make sure you have at least one air tank. If you have more than one, put a dryer and filter between the two, and if you plan to keep it pressurized constantly, an automatic water drain on each one. Each leg should come off the top of the pipe, and make a U turn to head downwards, to avoid ruining driers or tools. In addition, the bottom of it should also be a T, with either a valve or a water drain of some kind on it, for much the same reasons. The main line should slope to a point with a drain on it as well. Put a filter and regulator on each access point (Those pipes can have crud come off the inside, especially if you don't take good care of eliminating water.) If it's for a tool that requires lubricated air, and will be there permanently, put one on that assembly. FRL's are standard units and easily available. Put a quick connect at the end of each FR unit. If you have lubricated air tools that float around, and sensitive tools, put additional conditioning equipment onto quick connect fittings, and plug your air hose through.
Lighting:
More is better. You want nice powerful lights on the ceiling, and lots of it. Avoid stuff that skews color perception such as mercury and sodium vapor lamps, especially with their long warmup time. CFL's also have a relatively annoying warm up time. LED's, incandescents, Florescent tubes, and linear tube LEDs (The LED replacement for said florescent tubes) all warm up nicely, and most have reasonable color profiles. Any work surface that is overhung by cabinets or shelves, or has large numbers of parts bins along one edge, should have some form of supplimental light to make sure the surface is well illuminated. Tools like grinders, lathes, band-saws, and drill-presses should have work lights (Many have them pre-installed, but if not it's pretty trivial to add them). You want as few shadows as possible when working with almost anything.
Machines:
Rostock Max V2, Duet .8.5, PT100 enabled E3D V6 and volcano, Raymond style enclosure
Automation Technology 60W laser cutter/engraver
1m X-carve router
It's supported on the bottom using a 12" steel Lazy Susan bearing and is attached at the top by an arm & center pin.
I pre-drilled all the bin locations on my ShopBot - I can hang bins all the way to about 8" above the bottom. I cut the plastic bin mounts apart so I can use them individually.
Re: Carpet - I hate carpet. All it does is collect and store dust. I used to have one carpeted room in my house. One day, I sent my robot vacuum in there. It came out with a full tank. I kept doing this, and after several weeks, the tank was still coming back full. When I closed off that room, the tank would come back perhaps half-full or less. Carpet is basically the devil, and ruins indoor air quality. This place is all hardwood. I bought a bunch of floor protectors (the kind they make so office chairs don't mar the surface) and they seem to be doing great. I'm also trying to have a minimum of objects on the floor that a screw can roll under. I don't know how much time I've spent hunting after some tiny M2 screw that I don't have any extras of, because it bounced off the table and went in some random direction.
Re: Lighting - I'm finding that I like a mix of warm (~3500K) and cool (~6000K) color temperatures, coming in from different angles. Too much cool white makes the place look like a dentist's office. I'm also going to be putting in some RGB LED accent lighting.
I share a shop with Lady McGrumpy. Her stuff is organized, in it's place and labeled.
Mine is the total opposite of that -- she tried to clean my stuff up once and I nearly divorced her over it. Took me a week to get everything back into heaps and layers. I know where stuff is -- my system LOOKS chaotic but it works for me.
--
I want to say one word to you. Just one word. Are you listening? PLASTICS. There is a great future in plastics.
626Pilot, all that you have shown us are great organization tools but that workbench is really impressive! I love the looks of bamboo and that work bench rocks!
I clicked on the link and although it is expensive for shipping, I will have to save my pennies to purchase it. Thanks for your posting!
“ Do Not Regret Growing Older. It is a Privilege Denied to Many. ”
My shop (aka spare bedroom) is organized in a decidedly bipolar fashion. It very clean... And then the next moment BAM! It's a complete disaster....
Plastic from support material goes everywhere.. Just to say I found some clear pla support that I had not used since I first put together my Prussa... Over a year ago.
I tried to get some plastic boxes to put components in (resistors and such) but the issue with that is that the plastic bags they come in from mouser don't nicely fit in the boxes.. And if you take the stuff out of the packages you got to spend a few minutes figuring out what peice is what.
Gonna see about making me one of those trees... Lazy s


