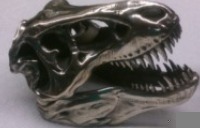
Im up and running (does happy twirly dance) Just finished the calibration last night, went pretty easy. Printed first parts today. I still need to work on the retraction settings a bit, they are in thier stock configuration right now and I have excessive stringing. I still need to add some fans but for a first print Id say things went well.
One thing I do need to find out is that in slic3r there is a start and stop g code where I tried adding the M42 P6 S255 to turn on the peek fan, but it does not apply it to the g code and i Have to manually add it in.
First print!!
First print!!
- Attachments
-
-
http://www.youtube.com/user/aonemarine" onclick="window.open(this.href);return false;
Lost pla castings? see me
Lost pla castings? see me
-
Eaglezsoar

- ULTIMATE 3D JEDI
- Posts: 7159
- Joined: Sun Apr 01, 2012 5:26 pm
Re: First print!!
Looks good for a first print! I don't know why Slic3r is not keeping your settings, perhaps someone else can help
you with that. You just about have it, just a little more tweaking.
you with that. You just about have it, just a little more tweaking.

Re: First print!!
Where'd you get that filament? It's pretty.
Go to G-Code Editor and pick Start Code from the dropdown. Paste your G-code there. (Caveat: Never tried it myself)
Go to G-Code Editor and pick Start Code from the dropdown. Paste your G-code there. (Caveat: Never tried it myself)
Questions? Ask in a thread - PMs are off.
AI Calibration | Dimensional Accuracy Calibration | Hand-Tune your PID | OctoPi + Touchscreen setup | My E3D hot end mount, Z probe, fan ducts, LED ring mount, filament spool holder, etc.
AI Calibration | Dimensional Accuracy Calibration | Hand-Tune your PID | OctoPi + Touchscreen setup | My E3D hot end mount, Z probe, fan ducts, LED ring mount, filament spool holder, etc.
Re: First print!!
More importantly, where did you get the hot end? That's a lot longer than the stock hot end and the nozzle is longer as well. 
Don't mess with the Start Code/End Code in Repetier, it'll just cause you headaches when you forget it's there. Can you post a screen shot of your Slic3r configuration that shows your start/end settings?
g.
Don't mess with the Start Code/End Code in Repetier, it'll just cause you headaches when you forget it's there. Can you post a screen shot of your Slic3r configuration that shows your start/end settings?
g.
Delta Power!
Defeat the Cartesian Agenda!
http://www.f15sim.com - 80-0007, The only one of its kind.
http://geneb.simpits.org - Technical and Simulator Projects
Defeat the Cartesian Agenda!
http://www.f15sim.com - 80-0007, The only one of its kind.
http://geneb.simpits.org - Technical and Simulator Projects
Re: First print!!
Missing spacer?geneb wrote:More importantly, where did you get the hot end? That's a lot longer than the stock hot end and the nozzle is longer as well.
g.
Re: First print!!
Spacer is in there, its just under the mounting plate instead of on top.Zerosink wrote:Missing spacer?geneb wrote:More importantly, where did you get the hot end? That's a lot longer than the stock hot end and the nozzle is longer as well.
g.
The filament is from seemecnc its the blue pla they sell.
I have a print running right now, but after that ill get a screen shot for ya....Man 100 micron prints really show any issues with bed leveling LOL Think im going to go back over it with a dti and see how exact i can get it. The paper trick is only good for so far it seems....
http://www.youtube.com/user/aonemarine" onclick="window.open(this.href);return false;
Lost pla castings? see me
Lost pla castings? see me
Re: First print!!
I used to calibrate by mounting a dial gauge to the effector. These days I just print the first layer and I look at where the lines are too thin or too fat. If a tower is too "tall" the lines will be too fat close to it and too thin far away from it. If it's too short, it will be the other way around. Visualize it as though you had a triangle with the endstop screws at each point. To raise a point on the triangle you lower the screw, to lower a point you raise the screw. In true engineering style, you only adjust 1 screw at a time and then you observe the effects before you make any other changes.
I tweak the endstop screws 1/8 to 1/4 turn until it looks even. Accuracy on that is probably around 10 thou. I would take it all the way down to +- 0.5 thou with the dial gauge, but this is quicker and less trouble.
I tweak the endstop screws 1/8 to 1/4 turn until it looks even. Accuracy on that is probably around 10 thou. I would take it all the way down to +- 0.5 thou with the dial gauge, but this is quicker and less trouble.
Questions? Ask in a thread - PMs are off.
AI Calibration | Dimensional Accuracy Calibration | Hand-Tune your PID | OctoPi + Touchscreen setup | My E3D hot end mount, Z probe, fan ducts, LED ring mount, filament spool holder, etc.
AI Calibration | Dimensional Accuracy Calibration | Hand-Tune your PID | OctoPi + Touchscreen setup | My E3D hot end mount, Z probe, fan ducts, LED ring mount, filament spool holder, etc.

Re: First print!!
626Pilot wrote:I used to calibrate by mounting a dial gauge to the effector. These days I just print the first layer and I look at where the lines are too thin or too fat. If a tower is too "tall" the lines will be too fat close to it and too thin far away from it. If it's too short, it will be the other way around. Visualize it as though you had a triangle with the endstop screws at each point. To raise a point on the triangle you lower the screw, to lower a point you raise the screw. In true engineering style, you only adjust 1 screw at a time and then you observe the effects before you make any other changes.
I tweak the endstop screws 1/8 to 1/4 turn until it looks even. Accuracy on that is probably around 10 thou. I would take it all the way down to +- 0.5 thou with the dial gauge, but this is quicker and less trouble.
^^Same exact way I do it.
The first layer tells you everything about what is right and wrong with your printer. If something is wrong the print gets cancelled as more often than not problems get compounded further on by issues apparent in the very first layer.
If you 1st layer lays down nice and even with great stick, chances are your entire print will be very successful.
"Now you see why evil will always triumph! Because good is dumb." - Spaceballs
-
Eaglezsoar
- ULTIMATE 3D JEDI
- Posts: 7159
- Joined: Sun Apr 01, 2012 5:26 pm
Re: First print!!
That is the best description I have ever read on how to calibrate the tower height. Thanks for simplifying this for everyone.626Pilot wrote:I used to calibrate by mounting a dial gauge to the effector. These days I just print the first layer and I look at where the lines are too thin or too fat. If a tower is too "tall" the lines will be too fat close to it and too thin far away from it. If it's too short, it will be the other way around. Visualize it as though you had a triangle with the endstop screws at each point. To raise a point on the triangle you lower the screw, to lower a point you raise the screw. In true engineering style, you only adjust 1 screw at a time and then you observe the effects before you make any other changes.
I tweak the endstop screws 1/8 to 1/4 turn until it looks even. Accuracy on that is probably around 10 thou. I would take it all the way down to +- 0.5 thou with the dial gauge, but this is quicker and less trouble.
Re: First print!!
Yeah, I found out from John last night that they'd changed the nozzle design a bit.
I started testing a new branch of Marlin last night - it not only does auto-level, but it's been specifically designed to compensate for DELTA_RADIUS issues. The result of this will be that there will no longer be any manual calibration steps to take.
g.
I started testing a new branch of Marlin last night - it not only does auto-level, but it's been specifically designed to compensate for DELTA_RADIUS issues. The result of this will be that there will no longer be any manual calibration steps to take.
g.
Delta Power!
Defeat the Cartesian Agenda!
http://www.f15sim.com - 80-0007, The only one of its kind.
http://geneb.simpits.org - Technical and Simulator Projects
Defeat the Cartesian Agenda!
http://www.f15sim.com - 80-0007, The only one of its kind.
http://geneb.simpits.org - Technical and Simulator Projects
-
Eaglezsoar
- ULTIMATE 3D JEDI
- Posts: 7159
- Joined: Sun Apr 01, 2012 5:26 pm
Re: First print!!
If you can get this to work to auto-level the Rostock Max, we will all come to your house and give you one big group hug!geneb wrote:Yeah, I found out from John last night that they'd changed the nozzle design a bit.
I started testing a new branch of Marlin last night - it not only does auto-level, but it's been specifically designed to compensate for DELTA_RADIUS issues. The result of this will be that there will no longer be any manual calibration steps to take.
g.
Re: First print!!
*backs away slowly*
Delta Power!
Defeat the Cartesian Agenda!
http://www.f15sim.com - 80-0007, The only one of its kind.
http://geneb.simpits.org - Technical and Simulator Projects
Defeat the Cartesian Agenda!
http://www.f15sim.com - 80-0007, The only one of its kind.
http://geneb.simpits.org - Technical and Simulator Projects
Re: First print!!
I tried calibrating the way you suggested, man that's just too easy. Auto level? Yea id like that! 
http://www.youtube.com/user/aonemarine" onclick="window.open(this.href);return false;
Lost pla castings? see me
Lost pla castings? see me
Re: First print!!
Ok been going printer happy lately, the prints look great but I have a problem with stringing really bad in my opinion. I have tried the retraction up to 18mm at 60mm/s and it looks better but not right. Ive been trying to figure out how to tke a screen shot but so far have been unsucessful. One other think is that my extruder makes a popping noise and I see it kick back. This does not appear to be a retraction, but more of a skip? Could I be over extruding or something?? Im new to the whole printing thing, but so far have been very happy with the prints ive been getting except for the stringing.
http://www.youtube.com/user/aonemarine" onclick="window.open(this.href);return false;
Lost pla castings? see me
Lost pla castings? see me
-
cope413
- Printmaster!
- Posts: 446
- Joined: Sun Jun 30, 2013 5:52 pm
- Location: Orange County, CA
- Contact:
Re: First print!!
18mm is wayyy too much retraction. Sounds like your extruder is skipping. The most you should set your retraction is 8-10mm. After that, there is no benefit gained. You can search the forum for the thread on retraction for more on that if you're interested.
Couple things...
What speed are you printing at?
Do you have a fan blowing across the bed/parts?
What temp is your extruder?
Any z-lift on retraction?
Wipe?
If I tried to print the parts, I would set print temp to 190-195C. Print speeds to 40mm/s. 5mm retract with 45mm retract speed. 3mm z-lift on retract. Wipe before retract. 100mm/s move speed. Fan across the bed after the first layer.
Also, I only use z-lift when there are multiple parts on the build plate. Typically, it isn't needed when you're only printing 1 part, but it can help a lot with stringing that you're experiencing.
Fellow Philosophy majors unite!
"The proverbial achilles heel of property monistic epiphenomenalism is the apparent impossibility of ex-nihilo materialization of non-structural and qualitatively new causal powers."
"The proverbial achilles heel of property monistic epiphenomenalism is the apparent impossibility of ex-nihilo materialization of non-structural and qualitatively new causal powers."
Re: First print!!
stuck a magnifying glass in front of the smaller print...
http://www.youtube.com/user/aonemarine" onclick="window.open(this.href);return false;
Lost pla castings? see me
Lost pla castings? see me
Re: First print!!
Temp is 195, retractiong any where from 1 to 18, retract speed 35 to 55, print speeds 30 to 90, (prints just fine at 90) moves 150, z lift tried zero and 2.
Wipe?? not sure what that is in slic3r, is that minimum distance after retraction?? If so I have it set to 5 atm.....
Nozzle .55 filament 1.75, although it measures 1.77.......???? No fan yet....
Wipe?? not sure what that is in slic3r, is that minimum distance after retraction?? If so I have it set to 5 atm.....
Nozzle .55 filament 1.75, although it measures 1.77.......???? No fan yet....
http://www.youtube.com/user/aonemarine" onclick="window.open(this.href);return false;
Lost pla castings? see me
Lost pla castings? see me
-
cope413
- Printmaster!
- Posts: 446
- Joined: Sun Jun 30, 2013 5:52 pm
- Location: Orange County, CA
- Contact:
Re: First print!!
Ok, fan is #1 priority.
Are you on .9.10b slic3r?
Try dropping to 190.
5mm retract at 50mm/s.
Minimum travel after retraction: 3
Under Printer Settings -> Extruder 1 -> select "Wipe before retract"
Why do you have .55 for your nozzle? If you have the stock hotend, that's a .5mm nozzle.
Put your measured filament diameter into the "Filament Settings" tab in Slic3r.
Fellow Philosophy majors unite!
"The proverbial achilles heel of property monistic epiphenomenalism is the apparent impossibility of ex-nihilo materialization of non-structural and qualitatively new causal powers."
"The proverbial achilles heel of property monistic epiphenomenalism is the apparent impossibility of ex-nihilo materialization of non-structural and qualitatively new causal powers."
Re: First print!!
I have version 9.9 in repetier host, dont see a whipe setting, not box to check....I did try droppig to 190c and the extruder jammed. With the .55 nozzle setting the base layer edges line up nice and smooth but at .5 there are little raised ridges, how ever the top infill isnt so great but I think this is beacuse I have not added a cooling fan. Ill try to update slic3r and see if I get the wipe box....
http://www.youtube.com/user/aonemarine" onclick="window.open(this.href);return false;
Lost pla castings? see me
Lost pla castings? see me
Re: First print!!
ok have it down loaded and running a print now....
http://www.youtube.com/user/aonemarine" onclick="window.open(this.href);return false;
Lost pla castings? see me
Lost pla castings? see me
-
cope413
- Printmaster!
- Posts: 446
- Joined: Sun Jun 30, 2013 5:52 pm
- Location: Orange County, CA
- Contact:
Re: First print!!
Ok, if your first layer isn't correct, it's not the nozzle size that's causing it. Changing that may have fixed your first layer issue, but it's going to cause other issues.
Try slowing down your first layer to 15-20mm/s, and use a 2-3 loop skirt 6mm away from the object to get your filament flowing.
If your first layer isn't adhering properly, then you probably need to adjust/calibrate your z-height.
Try using a 200% extrusion width on the first layer (under Print Settings -> advanced) and a .35mm first layer height. Both can help with first layer adhesion.
You can also try a 200C first layer, and then have it drop to 195 after the first layer.
Fellow Philosophy majors unite!
"The proverbial achilles heel of property monistic epiphenomenalism is the apparent impossibility of ex-nihilo materialization of non-structural and qualitatively new causal powers."
"The proverbial achilles heel of property monistic epiphenomenalism is the apparent impossibility of ex-nihilo materialization of non-structural and qualitatively new causal powers."