Rostock Max v2 calibration help

Having a problem? Post it here and someone will be along shortly to help
Post Reply
User avatar
jeffhuber
Printmaster!
Posts: 146
Joined: Sun May 25, 2014 11:04 pm
Location: San Francisco
Contact:

Rostock Max v2 calibration help

Post by jeffhuber »

Hello all!

Newbie here.

Just got my rockstock max v2 printing and my very first print (the peek fan shroud) came out pretty crappy. I realized it probably wasnt calibrated well, so I started from scratch and calibrated the whole thing again.

Well I printed the peek fan shroud again, and got better results, but still seems something is off.

here is an album of photos of the peek fan shroud http://imgur.com/a/aUYXp (the top looks particularly bad)

can any of your problem solving eyes see the problem? belt loose, motor underpowered, etc?

thanks guys!!! :D
Rostock max v2 with e3d v6
User avatar
nitewatchman
Printmaster!
Posts: 624
Joined: Thu May 01, 2014 9:51 pm
Location: Birmingham, Alabama

Re: Rostock Max v2 calibration help

Post by nitewatchman »

I think that you are significantly under extruding.

In the assembly manual (I am at work and don't have it here) there is a paragraph in the calibration section regarding checking the number of steps per milimeter on the extruder drive in the EEPROM Configuration. Make sure that this is correct and then check that the actual extruded length of filament equals the amount commanded by the Extrude Button on Repetier "Manual Control" screen. Also check that your set screws on the extruder hobbed roller are tight and that the roller is not slipping on the stepper motor shaft. Also check to be sure that your universal joints are free, a little lubricant of almost any type can help here.

This should also help with the layer splitting problem.
User avatar
jeffhuber
Printmaster!
Posts: 146
Joined: Sun May 25, 2014 11:04 pm
Location: San Francisco
Contact:

Re: Rostock Max v2 calibration help

Post by jeffhuber »

nitewatchman, why do you say that? The line thickness seems correct...

I think the gaps in the model are coming from something different. I say this because in some places it seems to have filled perfectly, and in other places there is that really large gap. Also this problem seems to get worse the higher the layers. At the bottom it's fine, at top it's not.

Also the part appears to have a slight contour on the left vertical side of the shroud in the first picture. that also leads me to think there is an alignment problem.

Here is the image that i think probably shines the most light into the problem

[img]http://i.imgur.com/1O9nWUc.jpg[/img]
Rostock max v2 with e3d v6
User avatar
nitewatchman
Printmaster!
Posts: 624
Joined: Thu May 01, 2014 9:51 pm
Location: Birmingham, Alabama

Re: Rostock Max v2 calibration help

Post by nitewatchman »

I thought that the bottom and top looked underfilled and that the side filament layers were very rounded and became uneven as the build went higher.

I could also be very wrong.
Polygonhell
ULTIMATE 3D JEDI
Posts: 2417
Joined: Mon Mar 26, 2012 1:44 pm
Location: Redmond WA

Re: Rostock Max v2 calibration help

Post by Polygonhell »

It's not the best print to gauge quality on, can you print one of the 20mm test cubes or just a simple cylinder?
To me it actually looks to me like your over extruding resulting in the uneven wall finish and your bottom layer might be slightly too high, as to the gaps on the top, it looks like the Slicer didn't even generate paths to fill them, so either the slicer is failing on that model, or you have a ton of slop/backlash or a binding ujoint somewhere
As I said above print issues are much easier to diagnose from geometrically simple parts.
User avatar
jeffhuber
Printmaster!
Posts: 146
Joined: Sun May 25, 2014 11:04 pm
Location: San Francisco
Contact:

Re: Rostock Max v2 calibration help

Post by jeffhuber »

Printing a 1 in cube! I will report back! Thanks guys!
Rostock max v2 with e3d v6
User avatar
jeffhuber
Printmaster!
Posts: 146
Joined: Sun May 25, 2014 11:04 pm
Location: San Francisco
Contact:

Re: Rostock Max v2 calibration help

Post by jeffhuber »

Ok printed 4 objects that should help a lot to figure out what is going on.
  • Cube - looks just about perfect
  • Hollow Pyramid - skew and layer cooling issues
  • Mustache ring (yes, mustache ring) - layer cooling issues
  • Hollow cylinder - skew issues
  • (pictures of all of them in an album)
Cube
I was really pleased with how this came out. Everything seemed to "just work". I even measured it with my micrometer and the tolerances seemed fairly good. ~.99 inches for every dimension.

[img]http://i.imgur.com/97JfNAhl.jpg[/img]

Hollow Pyramid
Well I knew this would probably not work, but I figured I'd give it a go anyway. Two issues here. First of all - I suspect the preview layer is not cooling enough before the next layer prints. The extruder head "pushes" around the previous layer when printing the next layer. This makes the shafts look so messy. Is this correct? So the solution would be to print at a cooler temperature, or have the machine move slower at the thin shafts. I've read you don't want to cool ABS though? The second issue of skew I will cover in the hollow cylinder.

[img]http://i.imgur.com/WXAi4lXl.jpg[/img]
[img]http://i.imgur.com/08qWqZul.jpg[/img]
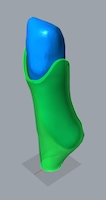
Mustache Ring
Nothing more to note, except the issue of layer cooling which you can also see here.

[img]http://i.imgur.com/BwA80lAl.jpg[/img]

Hollow Cylinder
I'm really glad that I printed this part because it highlighted a pretty big alignment error in the machine. As you can see below - there is probably about ~5 degrees slant along the Z axis. Layer adhesion was good, but on the bottom layer, I wondered whether I was printing too "high" - in that the plastic isn't getting flattened enough.

[img]http://i.imgur.com/6zBppHWl.jpg[/img]
[img]http://i.imgur.com/3qkLJbPl.jpg[/img]

********************************************************************************************************************************************

Machine Notes
  • All of black flat screws for alignment at the top and bottom of the aluminum towers are tightened.
  • Heated bed and extruder are able to reach their proper temperature and maintain it
  • The Z axis tower is not visibly leaning any direction
  • The top eccentric spacer on the Z axis cheapskate does audibly say "click-clack" when rocked back and forth by hand
********************************************************************************************************************************************

My recommended next steps in order:
  1. Tighten down eccentric spacer on top of cheapskate for z axis
  2. Realign Z tower with "script 3" from gene's assembly guide. Perhaps if the z tower is too low, then it could introduce the skew bias?
  3. Slow down machine during thin geometries
********************************************************************************************************************************************

My questions:
  1. What else should I observe about the machine to correct the skew?
  2. Does my list of recommended next steps make sense? What else would you do?
To recap, the 3 issues:
  1. Goopy layers for small geometries
  2. Skew away from Z axis - this is the most alarming
  3. Spreading - perhaps not quite low enough?
Thank you so much guys!
Rostock max v2 with e3d v6
Post Reply

Return to “Troubleshooting”