EDIT** I really need to learn how the type more accurately
For ABS having an enclosure is like the difference between night and day. it hasn't affected the belt or arm, however the longest print I've had on with it so far has been 13 hours more time might pose a problem. I let you know if / when I come across it. Going to be putting on a 56hr print next week so that should be a good identifier of a problem.
Motors apart from extruder and underneath so they don't get affected. On the ezstruder I have a 40mm fan which I'll end up porting to the outside. It won't cool down the chamber because air will go in, over stepper and then exit the enclosure.
Don't know how much exposure it'll get here in introductions section but anyways here goes..
most (not all) the STL's below will need modifying. I will update them hopefully on Saturday (I'll write modified after it so you know its been done). But just incase you want to change them in the meantime then here they are.
Please READ BEFORE printing them:
//////The Bottom corners need the towers removed (very important) otherwise you will lose bed volume as the arms can't travel as far down////// (I cut mine off with a band saw will print them again as soon as I get some more ABS)
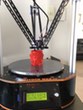
- I was unable to get the arch on the corners perfect the is a 2mm gap (see Picture below sorry about quality) 2mm isn't much but it does annoy me that I messed up.
- All the pieces are printed in many pieces on purpose this allows for some movement for miss cut perspex (or plexiglass I think it's called?)
- I glued all the pieces together with Weldon 3, it's like water so be careful if it spills on your job DO NOT wipe it let it dry. You will need an applicator bottle the finer the needle the better for a beginner.
- You might be wondering why I made the groove so deep in the top frame, if it's not you won't be able to get them on later. You probably could make them a little less deep but it might involve a lot a swearing when it comes time to fit (believe I did a lot of this, I could probably buy another V2 with the money in the swear jar)
- the top part that sits above the door has a slot in it. This is for a strip of LED's they're purely for my need to have some geek factor, they have no function apart from illuminating the doors edge.
- obviously you will want to put your machine's name on the bottom panel instead of mine. Mines called 3D Portal because I'm a Portal nut

yes I did mention I am a Geek
on my 3rd post I put up the measurements for the perspex note that some pieces have a 10 degree cut some a 20 degree cut and some both. If you need some pointers on gluing and how to get the angle right when gluing let me know and I'll try to explain it with some pics that i took when i made it.