Aurora's Rostock Max v2 build
Re: Aurora's Rostock Max v2 build
I think he might mean the exposed resistor leads that you twist and crimp to the insulated wire and cover with kapton tape.
*not actually a robot
Re: Aurora's Rostock Max v2 build
Also I just realized those weren't the wires I was dealing with lol... I was dealing with the thermistor wires. Cause the heater wires don't get a connector, they go right into the screw terminals. Once I realized that I figured they would be okay if they were missing a strand or two. What I ended up doing was a combination of slightly crimping and then soldering it to ensure it doesn't slip out if it ever gets pulled on. I cut back two strands so they would be captured by the larger opening at the end, and then the rest fit nicely into the smaller crimp in the middle. I figure 18ga is a bit overkill for a thermistor who's wires are around 28ga. I'm guessing this based on my handy PCB ruler... which is totally awesome and if any of you do work with electronics, its pretty useful:
[img]http://staticexperiment.com/rostock/DSCN0226s.jpg[/img]
(There's a bunch more stuff on the back too... but its mostly stuff I'd never need)
Anyways... So I left off with mounting the hot end... here it is mounted:
[img]http://staticexperiment.com/rostock/DSCN0217.jpg[/img]
I don't really have any pictures from here on out of the progress because it was all wiring stuff pretty much and there isn't much to show for that.
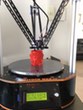
But shes finally done (almost, i didn't put the acrylic on yet because I want to make sure everything works first). What a heavenly blue glow:
[img]http://staticexperiment.com/rostock/DSCN0225s.jpg[/img]
[img]http://staticexperiment.com/rostock/DSCN0226s.jpg[/img]
(There's a bunch more stuff on the back too... but its mostly stuff I'd never need)
Anyways... So I left off with mounting the hot end... here it is mounted:
[img]http://staticexperiment.com/rostock/DSCN0217.jpg[/img]
I don't really have any pictures from here on out of the progress because it was all wiring stuff pretty much and there isn't much to show for that.
But shes finally done (almost, i didn't put the acrylic on yet because I want to make sure everything works first). What a heavenly blue glow:
[img]http://staticexperiment.com/rostock/DSCN0225s.jpg[/img]
Re: Aurora's Rostock Max v2 build
That ruler is cool, and the printer is magnificent. I'm so jealous right now. Mine doesn't arrive until tomorrow sometime...
*not actually a robot
Re: Aurora's Rostock Max v2 build
Okay so I'm performing all the calibration stuff in repetier and while I was doing the PID auto tune I heard a loud pop like something exploded come from the printer... I have no idea where it came from and everything still seems to be working. Does anyone know what this could have been? It sounded very reminiscent of the sound you would hear if you shorted 2 live wires together.
-
Mac The Knife
- ULTIMATE 3D JEDI
- Posts: 1407
- Joined: Sun May 11, 2014 6:18 pm
Re: Aurora's Rostock Max v2 build
Yep, it was an air pocket in the rtv holding the resistors in. Mine did that, and I pulled the plug right away!!
R-Max V2
Eris
Folger Tech FT-5 R2
Eris
Folger Tech FT-5 R2
Re: Aurora's Rostock Max v2 build
Is that okay though? I mean, do I have to take this apart and redo the RTV? Or is it okay?Mac The Knife wrote:Yep, it was an air pocket in the rtv holding the resistors in. Mine did that, and I pulled the plug right away!!
Re: Aurora's Rostock Max v2 build
Oh, also... the printers name. I forgot to mention this before I believe... Her name is Reese. I don't know if any of you are Stargate SG-1 fans, but it's my favorite show. If you're a fan of the show you'll certainly know about the replicators. Reese is the android who created them and I think that is a very fitting name for a 3d printer 
Re: Aurora's Rostock Max v2 build
Getting about same area with the config now, I have done the pids and just having a rest before I attack the z and further on.
Didn't have the pop sound as I modified the hot end per Mcslappy and used a 40w Cartridge and a screw in thermistor..
Sounds like you are nearly there now
Didn't have the pop sound as I modified the hot end per Mcslappy and used a 40w Cartridge and a screw in thermistor..
Sounds like you are nearly there now
Bob
Rostock Max V2, Ball Cup Arms, New Carriages, HE280, Dampers, PSU Breathing, Simplify 3D, GeckoTek3D, Raspberry Pi3. Duet soon... Kossel Mini still under construction.
Delta's are the way!
Rostock Max V2, Ball Cup Arms, New Carriages, HE280, Dampers, PSU Breathing, Simplify 3D, GeckoTek3D, Raspberry Pi3. Duet soon... Kossel Mini still under construction.
Delta's are the way!
Re: Aurora's Rostock Max v2 build
Guess you did better wit the RTV than I didcrocky wrote:Getting about same area with the config now, I have done the pids and just having a rest before I attack the z and further on.
Didn't have the pop sound as I modified the hot end per Mcslappy and used a 40w Cartridge and a screw in thermistor..
Sounds like you are nearly there now
Everything seems fine though and I've run through all the calibration except the e steps... I'll do that one if I find it necessary. I just prepared the peek fan shroud and just waiting for the bed to come up to temp now... lets see how this goes lol
I forgot to pick up gluesticks, so I'm trying hairspray for now... if it fails miserably then I'll go get some gluesticks tomorrow
Re: Aurora's Rostock Max v2 build
On a side note, I had to fix the horizontal radius about 6 times... I think I'm pretty much an expert on calibrating the z height at the towers now haha, I started getting some of them in one try after a while
-
Mac The Knife
- ULTIMATE 3D JEDI
- Posts: 1407
- Joined: Sun May 11, 2014 6:18 pm
Re: Aurora's Rostock Max v2 build
I find it odd that we have to come up with our own horizontal radius, with injected molded parts and all. I would think they'd all be the same for the Max.
R-Max V2
Eris
Folger Tech FT-5 R2
Eris
Folger Tech FT-5 R2
Re: Aurora's Rostock Max v2 build
Yeah... hairspray is not working very well... It curls up and sticks to the side of the hot end and then gets dragged around...
Re: Aurora's Rostock Max v2 build
It's because the actual radius changes when convexity or concavity is factored in. Say you have a perfectly 100% ultimate flat surface. That surface would have the correct Z height without having to fix anything after homing in the height at each tower. That surface is lets say 100mm across. Now in the real world it doesn't exist and due to manufacturing processes, this surface has a very slight curve to it. So now that it has a curve to it, its actually longer... lets say 100.5mm. Because it's still only 100mm from tower to tower, you're going to have a discrepancy in height in the middle due to the actual length of the surface being longer. Since everyones surface is different, we all have different values for our true horizontal radius. When I say true radius, I mean the radius of the surface as opposed to the distance from one edge to the other.Mac The Knife wrote:I find it odd that we have to come up with our own horizontal radius, with injected molded parts and all. I would think they'd all be the same for the Max.
Re: Aurora's Rostock Max v2 build
Also this is the result of one of the first attempts... you can see where it dragged that outer edge in when it didn't stick to the bed. The rest of it actually was sticking for the most part, but that first bit didn't stick and curled up and stuck to the hot end and went for a ride...
[img]http://staticexperiment.com/rostock/DSCN0229s.jpg[/img]
[img]http://staticexperiment.com/rostock/DSCN0229s.jpg[/img]
Re: Aurora's Rostock Max v2 build
Try squishing the first layer down more. Drop the Z height by a hair.
*not actually a robot
Re: Aurora's Rostock Max v2 build
You think? It seemed more like an adhesion issue to me... The hairspray was not very sticky at all when I touched it afterwards. Tomorrow I'm going to pick up the proper gluesicks and try again... if it doesn't work then I'll mess with the z height.bot wrote:Try squishing the first layer down more. Drop the Z height by a hair.
I'm mostly very happy to see the thing moving and actually doing something though
Re: Aurora's Rostock Max v2 build
Squashing down the first layer is a classic technique. Most people use it even when using glue stick or other means, it helps ensure it has contact around the entire print.
*not actually a robot
-
Earthbound
- Printmaster!
- Posts: 458
- Joined: Sun Sep 07, 2014 2:39 am
Re: Aurora's Rostock Max v2 build
After printing the PEEK fan shroud to my satisfaction, I went and got ambitious. I fought poor adhesion issues on a bunch of attempts. I have gluestick and aquanet, tried each alone and also in combination. I'm convinced the method is sound, so I increased the bed temp to 100 and decreased the Z clearance by 0.1mm (by increasing the Z height in EEPROM). Since doing that, I have not had any adhesion failure. I'm only printing ABS at the moment.
"Trust no quote from the Internet." - Abraham Lincoln
-
Eaglezsoar

- ULTIMATE 3D JEDI
- Posts: 7159
- Joined: Sun Apr 01, 2012 5:26 pm
Re: Aurora's Rostock Max v2 build
Aurora900, do you have a source for the PCB ruler?
-
Mac The Knife
- ULTIMATE 3D JEDI
- Posts: 1407
- Joined: Sun May 11, 2014 6:18 pm
Re: Aurora's Rostock Max v2 build
Aurora900 wrote:It's because the actual radius changes when convexity or concavity is factored in. Say you have a perfectly 100% ultimate flat surface. That surface would have the correct Z height without having to fix anything after homing in the height at each tower. That surface is lets say 100mm across. Now in the real world it doesn't exist and due to manufacturing processes, this surface has a very slight curve to it. So now that it has a curve to it, its actually longer... lets say 100.5mm. Because it's still only 100mm from tower to tower, you're going to have a discrepancy in height in the middle due to the actual length of the surface being longer. Since everyones surface is different, we all have different values for our true horizontal radius. When I say true radius, I mean the radius of the surface as opposed to the distance from one edge to the other.Mac The Knife wrote:I find it odd that we have to come up with our own horizontal radius, with injected molded parts and all. I would think they'd all be the same for the Max.
I understand that part, I was questioning why there would be a difference from one kit to the next. As long as they are all the same version, with the same parts, why would the radius be different.
R-Max V2
Eris
Folger Tech FT-5 R2
Eris
Folger Tech FT-5 R2
-
barry99705

- Printmaster!
- Posts: 707
- Joined: Sun Aug 11, 2013 6:10 pm
- Location: west ohio
Re: Aurora's Rostock Max v2 build
MDF is never truly flat, or even the same out of flatness between runs. Also the heated build plate will warp under heat slightly differently with every part. Then there's build tolerances. Not everyone will tighten the screws the same, some tighter than others, which will cause slight variances in shape and distances between parts. None of it is a lot of distance, but added up, and it's enough to cause issues.Mac The Knife wrote:Aurora900 wrote:It's because the actual radius changes when convexity or concavity is factored in. Say you have a perfectly 100% ultimate flat surface. That surface would have the correct Z height without having to fix anything after homing in the height at each tower. That surface is lets say 100mm across. Now in the real world it doesn't exist and due to manufacturing processes, this surface has a very slight curve to it. So now that it has a curve to it, its actually longer... lets say 100.5mm. Because it's still only 100mm from tower to tower, you're going to have a discrepancy in height in the middle due to the actual length of the surface being longer. Since everyones surface is different, we all have different values for our true horizontal radius. When I say true radius, I mean the radius of the surface as opposed to the distance from one edge to the other.Mac The Knife wrote:I find it odd that we have to come up with our own horizontal radius, with injected molded parts and all. I would think they'd all be the same for the Max.
I understand that part, I was questioning why there would be a difference from one kit to the next. As long as they are all the same version, with the same parts, why would the radius be different.
Never do anything you don't want to have to explain to the paramedics.
Re: Aurora's Rostock Max v2 build
its from adafruit.com (they give you one for free if you order a certain amount of stuff, or you can just buy one for 5 bucks lol)Eaglezsoar wrote:Aurora900, do you have a source for the PCB ruler?
https://www.adafruit.com/products/1554
Because when the bed/glass is made they're not perfect, manufacturers have tolerances, just like a 100ohm resistor never actually is exactly 100ohms, slight variations can't be avoided.I understand that part, I was questioning why there would be a difference from one kit to the next. As long as they are all the same version, with the same parts, why would the radius be different.
Re: Aurora's Rostock Max v2 build
As I suspected it was just a problem with adhesion. I put two layers of elmers purple on as the manual suggested, and the first layer stuck like.... I don't know what sticks a lot? Something that sticks a lot. Whatever... anyways its working great and the fan shroud is printing as we speak! I'll post the results when it finishes in about an hour and 15 minutes.
(I swear I could stare at this thing printing all day)
(Also, this may be the most satisfying thing I've ever done. I put so much time and effort into this and to see it in action is just amazing.)
(I swear I could stare at this thing printing all day)
(Also, this may be the most satisfying thing I've ever done. I put so much time and effort into this and to see it in action is just amazing.)
Re: Aurora's Rostock Max v2 build
(I swear I could stare at this thing printing all day)
(Also, this may be the most satisfying thing I've ever done. I put so much time and effort into this and to see it in action is just amazing.)[/quote]
Welcome to 3D printing . This is how I felt 8 months ago when I started and I am still fully engrossed. They are also a cool time machine because time accelerates when I'm doing my thing with the printer. I swear an hour or 2 will pass by in an instant!
Orion to Cartesian http://forum.seemecnc.com/viewtopic.php?f=59&t=7808" onclick="window.open(this.href);return false;
Re: Aurora's Rostock Max v2 build
So I'm noticing on the left side of the shroud where there's that overhang... It curled up a little and the layers dont look like they're slightly fanned out a bit and is pointed up a bit instead of flat. Anyone know what causes this and how to deal with it? The right side is nearly perfect in the same spot. In a couple other places theres a few little bits hanging out here and there, but other than that it looks good so far.
[img]http://staticexperiment.com/rostock/DSCN0230s.jpg[/img]
In blue you can see my primary concern... circled in red is one of those random little bits sticking out. Anyone have any ideas?
[img]http://staticexperiment.com/rostock/DSCN0230s.jpg[/img]
In blue you can see my primary concern... circled in red is one of those random little bits sticking out. Anyone have any ideas?