Still trying to calibrate the printer haha
Still trying to calibrate the printer haha
Almost a year and a half and still no luck. Switched to trick trucks, trick laser arms, fsrs, etc. Definitely had an issue with my trucks. The wheels were uneven. Trick Trucks made a huge difference. I still cant seem to get the bed aligned though. Attached is a picture of the heightmap of my bed. I have tried calibration, OpenDACT, you name it. Any suggestions? Only think I can think of is that maybe the Onyx is warped and flexing the glass.
- Attachments
-
Re: Still trying to calibrate the printer haha
What model printer?
What mods have you done?
How are the FSRs mounted?
Does it successfully complete Opendact?
Probably some more questions but can we get some answers to these ones...
What mods have you done?
How are the FSRs mounted?
Does it successfully complete Opendact?
Probably some more questions but can we get some answers to these ones...
Bob
Rostock Max V2, Ball Cup Arms, New Carriages, HE280, Dampers, PSU Breathing, Simplify 3D, GeckoTek3D, Raspberry Pi3. Duet soon... Kossel Mini still under construction.
Delta's are the way!
Rostock Max V2, Ball Cup Arms, New Carriages, HE280, Dampers, PSU Breathing, Simplify 3D, GeckoTek3D, Raspberry Pi3. Duet soon... Kossel Mini still under construction.
Delta's are the way!

Re: Still trying to calibrate the printer haha
and what print surface are you printing on?
I'm starting to see a pattern with issues potentially due to the print surface - of there is any flex in the adhesive or even a little gap you can't see can change the flex properties enough to throw off calibration. More on this as it relates to the V3 auto calibration issues soon!
I'm starting to see a pattern with issues potentially due to the print surface - of there is any flex in the adhesive or even a little gap you can't see can change the flex properties enough to throw off calibration. More on this as it relates to the V3 auto calibration issues soon!
Sublime Layers - my blog on Musings and Experiments in 3D Printing Technology and Art
Start Here:
A Strategy for Successful (and Great) Prints
Strategies for Resolving Print Artifacts
The Eclectic Angler
Re: Still trying to calibrate the printer haha
Rostock Max V2
Mods: Trick Laser Arms, Trick Trucks, FSR bed with your mounting bracket design for the bed feet.
FSR's are mounted inside the bracket and the brackets screwed to the wood surface.
It does not successfully complete in OpenDACT. It crashed on iteration 101.
I was using BuildTak but I peeled it off and tested on bare glass with the same result. The height map was taken on straight clean glass.
Unfortunately this has been an ongoing issue. I have never been able to get this printer to print properly since I assembled it over a year ago but I will say I feel that I am almost there. The trucks made a HUGE improvement. No more play and the V-Wheels move smoothly.
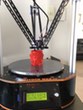
Attached is a sample print of the calibration circle. BEFORE I peeled off the BuildTak.
Mods: Trick Laser Arms, Trick Trucks, FSR bed with your mounting bracket design for the bed feet.
FSR's are mounted inside the bracket and the brackets screwed to the wood surface.
It does not successfully complete in OpenDACT. It crashed on iteration 101.
I was using BuildTak but I peeled it off and tested on bare glass with the same result. The height map was taken on straight clean glass.
Unfortunately this has been an ongoing issue. I have never been able to get this printer to print properly since I assembled it over a year ago but I will say I feel that I am almost there. The trucks made a HUGE improvement. No more play and the V-Wheels move smoothly.
Attached is a sample print of the calibration circle. BEFORE I peeled off the BuildTak.
- Attachments
-
Re: Still trying to calibrate the printer haha
What sort of print head?
What sort of filament?
It is a shame that you had taken thebuildtak off. Looks like it was maybe a little bit too high and possibly too high to get a good result with opendact.
I would do a manual configuration like you would for a new printer and try opendact again, it is worth the effort...
Put some glue stick on the glass and see how it goes printing after that...
Bob
Rostock Max V2, Ball Cup Arms, New Carriages, HE280, Dampers, PSU Breathing, Simplify 3D, GeckoTek3D, Raspberry Pi3. Duet soon... Kossel Mini still under construction.
Delta's are the way!
Rostock Max V2, Ball Cup Arms, New Carriages, HE280, Dampers, PSU Breathing, Simplify 3D, GeckoTek3D, Raspberry Pi3. Duet soon... Kossel Mini still under construction.
Delta's are the way!
-
DeltaCon
- Printmaster!
- Posts: 616
- Joined: Sat Nov 14, 2015 5:01 am
- Location: Wessem, The Netherlands
- Contact:
Re: Still trying to calibrate the printer haha
How was this picture of the bed heighthmap made? It shows deviation in height, but now how much. Since everything is not 100% flat it could be that we are talking about 0.001mm and it could be considered excellently flat...
The onxy warping the glass bed is unlikely because the glass is a lot stiffer than the onyx pcb. If you are using FSR's the bed is already resting on 3 points so there can not be any overconstrains. How many clamps are you using to fix the glass to the onyx? Try doubling that, to force the glass to be pressed to the onyx. Try to calibrate with a cold bed to see if heating makes things worse. Try also turning the glass and turning the glass over to see if the deviation follows a certain point on the bed. If so, that would mean that the glass is warped indeed. Is it the original borosilicate? You could try to find a round mirror of 30cm to see if that makes things better. Mirror glass is usually reasonably flat, but less thick so the influence of a warped onyx would be bigger though. But you can find out if it is the glass at least.
The onxy warping the glass bed is unlikely because the glass is a lot stiffer than the onyx pcb. If you are using FSR's the bed is already resting on 3 points so there can not be any overconstrains. How many clamps are you using to fix the glass to the onyx? Try doubling that, to force the glass to be pressed to the onyx. Try to calibrate with a cold bed to see if heating makes things worse. Try also turning the glass and turning the glass over to see if the deviation follows a certain point on the bed. If so, that would mean that the glass is warped indeed. Is it the original borosilicate? You could try to find a round mirror of 30cm to see if that makes things better. Mirror glass is usually reasonably flat, but less thick so the influence of a warped onyx would be bigger though. But you can find out if it is the glass at least.
I am DeltaCon, I have a delta, my name is Con, I am definitely PRO delta! 
Rostock V2 / E3D Volcano / FSR kit / Duet 0.6
PS.: Sorry for the avatar, that's my other hobby!
Rostock V2 / E3D Volcano / FSR kit / Duet 0.6
PS.: Sorry for the avatar, that's my other hobby!
Re: Still trying to calibrate the printer haha
crocky wrote:What sort of print head?
What sort of filament?
It is a shame that you had taken thebuildtak off. Looks like it was maybe a little bit too high and possibly too high to get a good result with opendact.
I would do a manual configuration like you would for a new printer and try opendact again, it is worth the effort...
Put some glue stick on the glass and see how it goes printing after that...
I forgot to mention the print head. It's the E3D V6. I have more Buildtak but the one sheet was so messed up that I peeled it off to make sure it wasn't the issue.
Re: Still trying to calibrate the printer haha
Given the pattern in your height map, this looks more like a mechanical build issue than plate warping. Out of curiosity, are the FSRs located at the red hotspots on the perimeter? the dc42 (Duet) firmware lets you compensate for bed flex at each probe point and that would eliminate this issue.
Meanwhile, find a 2' builder's square and a 12" precision metal ruler and do this:
First use the ruler to test the flatness of the glass. You can do this cold and hot to eliminate warping at temperature as a culprit.
Next, attach your bed as you normally would and then verify that all 3 towers are perpendicular like this:
The short square arm should pass though the center of the build plate as shown. Press the short arm against the glass and then push it up to the tower. It should have no perceptible gap top to bottom. Let us know what you find.
This tests for tower lean but not sideways lean. Once you have the lean adjusted you can carefully measure edge-to-edge of a pair of towers at the top and bottom all the way around. If you are unlucky this might not tell you anything and all 3 towers could be leaning sideways the same amount. That is unlikely so you will probably find a suspect tower or two if that's the case. Fix them if so.
Many people do not verify that their towers are indeed perpendicular and not leaning and just assume all is ok. A 5 minute check will rule this out. You might be surprised how far off it is. It is easy to fix by loosening a few screws, pushing and pulling into alignment and then tightening everything up.
Meanwhile, find a 2' builder's square and a 12" precision metal ruler and do this:
First use the ruler to test the flatness of the glass. You can do this cold and hot to eliminate warping at temperature as a culprit.
Next, attach your bed as you normally would and then verify that all 3 towers are perpendicular like this:
This tests for tower lean but not sideways lean. Once you have the lean adjusted you can carefully measure edge-to-edge of a pair of towers at the top and bottom all the way around. If you are unlucky this might not tell you anything and all 3 towers could be leaning sideways the same amount. That is unlikely so you will probably find a suspect tower or two if that's the case. Fix them if so.
Many people do not verify that their towers are indeed perpendicular and not leaning and just assume all is ok. A 5 minute check will rule this out. You might be surprised how far off it is. It is easy to fix by loosening a few screws, pushing and pulling into alignment and then tightening everything up.
Sublime Layers - my blog on Musings and Experiments in 3D Printing Technology and Art
Start Here:
A Strategy for Successful (and Great) Prints
Strategies for Resolving Print Artifacts
The Eclectic Angler
Re: Still trying to calibrate the printer haha
do what mhackney says to do, you will survive and it will be printing better by the time your finished..
Bob
Rostock Max V2, Ball Cup Arms, New Carriages, HE280, Dampers, PSU Breathing, Simplify 3D, GeckoTek3D, Raspberry Pi3. Duet soon... Kossel Mini still under construction.
Delta's are the way!
Rostock Max V2, Ball Cup Arms, New Carriages, HE280, Dampers, PSU Breathing, Simplify 3D, GeckoTek3D, Raspberry Pi3. Duet soon... Kossel Mini still under construction.
Delta's are the way!
Re: Still trying to calibrate the printer haha
Ok think I found something. So I have been using a smaller square to square my towers. I went a bought a larger square as instructed. Anyhow It is square on the bottom, however my Y and Z towers appear to be out of square on top. If I use a smaller square(I have tried more then one.) it shows in square but about 18" or so it starts to go out off square. Any suggestions? I tried loosing up the nuts that hold the towers together, pulling or pushing the tower into alignment and then tightening the nuts. Unfortunately that didn't seem to quite help. Helped a very meager amount but it still is not square. Only other things I could think of is trying to square the bed to the tower by shimming the bed or maybe try some type of jig that connect between towers with thread screw, then tighten or loosen a nut that pushes or pulls the tower into alignment. At least I feel like I am finally getting close LOL.
Re: Still trying to calibrate the printer haha
The only reliable way to really square up the towers, and keep them that way, is to install a big X of wire between the X and Z towers, and also the Z and Y towers. Each wire should have a turnbuckle on it.
By tensioning the turnbuckles in various ways you can pull any lean out of the towers. You need to ensure that the effector doesn't hit the wires when it's at the edge of the build plate.
You can see the turnbuckles near the top of this printer. Of course before tensioning these turnbuckles you need to ensure that the distance between towers is the same (within 0.05mm) on all six extrusions.
- Attachments
-

Re: Still trying to calibrate the printer haha
The cables you show in the photo are ... interesting. Love that spool holder too.
Re: Still trying to calibrate the printer haha
Ok I like the idea with the cable and turnbuckle. Problem is how do you accomplish that with the stock wooden frame in way and not interfere with the trucks.