Page 1 of 1
calibration issue
Posted: Wed Jan 29, 2014 3:56 pm
by aneco
Hi,
I finished my rostock build and made a few prints which were looking quite oke. I started to calibrate the extruder.
The first step calibrating the e-stepper; heat the extruder and feed 5 cm ABS and measure the actual length en change the e-steps, feed again until the actual movement is also 5 cm. value after calibration is 95.33.
The next step was printing the calibration cube as in this thread
http://forum.seemecnc.com/viewtopic.php?f=54&t=1163
I printed the cube with extudtion multiplier 1 and measured the wall thickness. I had to set the multiplier to 0.618 (which is very low) and printed the bude again. The wall thickness is now exatcly 0.55mm. See pictures below, so fas so good.
- 20140129_213714.jpg (31.26 KiB) Viewed 11168 times
However the bottom layer is not solid, see picture below
If I Set the multiplier to 1.1 then the bottom layer is quite solid but then the wall thickness is 0.95mm.
How can I solve this issue?
Regards,
Frank
Re: calibration issue
Posted: Wed Jan 29, 2014 5:53 pm
by MSURunner
I would check to see what your height measurement is. If the part is to be 10 mm tall and you are measuring 10.5, to me that would be indicative of your z-height being off. You can get a bottom that looks exactly like what you have there with even a perfectly calibrated extruder if your z-zero is too tall as the material doesn't get "squished" out to the correct width. The second thing would be to double check that you have the correct x/y sizing. If you're printer thinks it's moving over .55 mm but actually moving over .7 mm then you would again get the same print properties. I think this calibration has merit, but I also like to print off the hollow cube/pyramid as it has a large flat that should be flat a couple mm up. That distance helps to eliminate the error of z-height as the printer is able to essentially turn the first couple layers into bridges and "finish" the upper layers as they should look.
Re: calibration issue
Posted: Fri Jan 31, 2014 1:50 pm
by aneco
I checked the measures of the printed box and it is 10.17x19.57x19,6 mm. I also printed a box with a multiplier of 1.1 and the bottom looks better. The size of that box is 9,83x20.08x19.98. I also checked the calibration of the z-axis (with hetead bed and hot end @ print temperature) and all towers and center are oke. z = 0 and paper is squized a llitle bit between heated bed and hot end, but can still be moved around.
Any suggestions?
Re: calibration issue
Posted: Sat Feb 01, 2014 3:46 pm
by Cleveralias
That bottom layer almost looks like a raft rather than a solid layer. You might want to confirm in your slicer whether you have a raft enabled. If that's not it and you're using Slic3r, what is your setting for the first layer extrusion width?
Re: calibration issue
Posted: Sun Feb 02, 2014 1:20 pm
by aneco
Hi Cleveralias,
I am using Slic3r version 0.9.10b. I see only a raft parameter at the support material and it is 0 layers. Where can I find the settling for the first layer extrusion width?
But the main issue is the wall thickness when I print a calibration box. I have to set the multiplier to 0.618. This results in a raft bottom layer.
Re: calibration issue
Posted: Mon Feb 03, 2014 11:29 am
by MSURunner
It's in the "Advanced" tab of the Print Settings under Configure Slic3r.
Re: calibration issue
Posted: Mon Feb 03, 2014 3:00 pm
by aneco
They are alle zero, see screen print and also the extruder settings
Re: calibration issue
Posted: Mon Feb 03, 2014 3:39 pm
by Eaglezsoar
Your nozzle is .5 All of those zeroes on the top screen would normally be set to .55
Re: calibration issue
Posted: Mon Feb 03, 2014 6:22 pm
by Cleveralias
When you leave the extrusion width set to 0, Slic3r will choose a width it thinks is appropriate on it's own. You got the wall to measure 0.55 but the problem is you don't know what thickness the slicer was going for. Leaving the extrusion widths set to 0 might be fine if you're trying a normal print, but in order to perform the calibration you're going for you have to request the width explicitly.
You should set all the extrusion width boxes to 0.55 for this exercise (assuming you have a 0.5 nozzle), put your flow multiplier back to 1 and start over.
Re: calibration issue
Posted: Tue Feb 04, 2014 3:25 pm
by aneco
Hi Guys,
Yeahhh that was the solution. I printed the box with the parameters all set to 0.55 and the multiplier to 1. The wall thicknes is now 0.61 and the sixe of the box is 19.93x19.98x10.08 mm. Also the bottom layers looks much better.
Thank you all:) I will continue the calibartion and will let you know the results
Re: calibration issue
Posted: Thu Feb 06, 2014 1:55 pm
by aneco
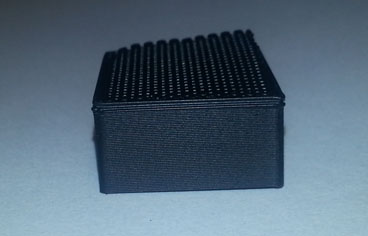
Ok here are the results after calibration; Multiplier is 0.917. The wall thickness is 0.55mm and the size of the box is 19,93 x 19.93 x 10.08 mm. Below 2 pictures of the printed box after calibration. Seems to me quite well. what is your opinion?
Re: calibration issue
Posted: Thu Feb 06, 2014 2:07 pm
by GBIADS
Those look great! Good job!
Re: calibration issue
Posted: Thu Feb 06, 2014 2:13 pm
by mhackney
Very nice indeed.
Re: calibration issue
Posted: Thu Feb 06, 2014 2:37 pm
by Eaglezsoar
It appears you have your calibration set well. Good job!