I've recently switched to Cura, to cure (sic) problems I was having with fuzzy stringing. It worked, and I've settled some initial issues I had with Cura, too.
Call me a perfectionist, but I'm looking now to get an absolutely smooth surface finish. The one remaining issue with my Cura prints, is that they have multiple raised ridges, and little indented lines, all over the surface. These look like they must be 'Z stitch' lines, particularly the indented ones (my Z stitch lines have usually been indented up to now).
I don't understand why I'm getting so many of them though. I've had much better surface finish in the past. At some points on the vertically-oriented cylinders I've been printing, I can see as many as four raised ridges in parallel, with numerous ripples and indented lines running alongside them.
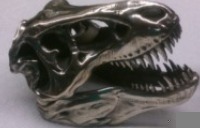
As you'll see from the attached photo, these lines are definitely Z-stitch type lines. But does anyone know why I'm getting so many of them, or why they are raised like this?
Multiple extra Z stitch-type ridges
-
donaldlindsay
- Printmaster!
- Posts: 51
- Joined: Thu Apr 03, 2014 11:25 am
Multiple extra Z stitch-type ridges
- Attachments
-
Re: Multiple extra Z stitch-type ridges
was it sliced in cura? if so what version?
http://www.youtube.com/user/aonemarine" onclick="window.open(this.href);return false;
Lost pla castings? see me
Lost pla castings? see me
-
donaldlindsay
- Printmaster!
- Posts: 51
- Joined: Thu Apr 03, 2014 11:25 am
Re: Multiple extra Z stitch-type ridges
Hi David,
yes, it was sliced in Cura. The version is 14.07, which I think is the latest version.
Has anyone else been having this problem with Cura?
yes, it was sliced in Cura. The version is 14.07, which I think is the latest version.
Has anyone else been having this problem with Cura?
-
jeffhuber
- Printmaster!
- Posts: 146
- Joined: Sun May 25, 2014 11:04 pm
- Location: San Francisco
- Contact:
Re: Multiple extra Z stitch-type ridges
I get weird lines like this from Cura too. I use Cura to do Joris single walled models. Joris is where the Z height is raised continuously. Does that sound familiar?
Rostock max v2 with e3d v6
-
donaldlindsay
- Printmaster!
- Posts: 51
- Joined: Thu Apr 03, 2014 11:25 am
Re: Multiple extra Z stitch-type ridges
Yes, I've seen the Joris option but not used it yet. These models are cylindrical tubes about an inch wide more or less, the walls are 3mm thick. The artefacts consist of a little line wiped partway round the circumference of the tube, finishing in a raised dot.
Both line and dot have the appearance of a tiny bead of excess plastic spilling over towards the end of a layer, and their repetition along the Z axis tends to reinforce this impression.
I think maybe I'm extruding a tiny bit too much plastic? Either that or the nozzle is 'sticky' and collecting a little bit of plastic off the print as it travels?
Any thoughts?
-
donaldlindsay
- Printmaster!
- Posts: 51
- Joined: Thu Apr 03, 2014 11:25 am
Re: Multiple extra Z stitch-type ridges
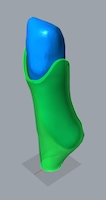
Here's a better photo that shows both 'lines' and 'dots' as well as their arrangement along the Z axis (tube is printed standing vertically).
The photo also shows that these marks do not just appear on one side of the piece but in several places.
Incidentally you'll also see that the section in the foreground is printed at 0.05mm layer height, while the section in the background is at 0.3mm. Both show a good finish in areas unaffected by this issue.
- Attachments
-
-
donaldlindsay
- Printmaster!
- Posts: 51
- Joined: Thu Apr 03, 2014 11:25 am
Retraction
So, I'm going to try reducing my retraction to 1mm at 100mm/s. Not sure if that'll work, but it's worth a go.
I'm having trouble finding anything online that resembles this problem, but I'm going to keep trying!
I'm having trouble finding anything online that resembles this problem, but I'm going to keep trying!
-
donaldlindsay
- Printmaster!
- Posts: 51
- Joined: Thu Apr 03, 2014 11:25 am
Re: Multiple extra Z stitch-type ridges
Hasn't worked. Back to 4.5mm retraction.
-
Polygonhell
- ULTIMATE 3D JEDI
- Posts: 2417
- Joined: Mon Mar 26, 2012 1:44 pm
- Location: Redmond WA
Re: Multiple extra Z stitch-type ridges
It looks like you have randomized start points turned on, looks like it's only one start point per layer, but they are not always in the same place. I don't remember if Cura has the option to turn this off, it's one of those options that seems like a good idea until you see the result, I've always liked he fact KISSlicer puts the seam in a predictable location.
Printer blog http://3dprinterhell.blogspot.com/
-
donaldlindsay
- Printmaster!
- Posts: 51
- Joined: Thu Apr 03, 2014 11:25 am
Re: Multiple extra Z stitch-type ridges
Possibly. The only thing is it appears there are enough of these blobs to make up about 4 seams.
Maybe it is that, though. You know what, I think I'll just try KISS!
I've used everything but!
Maybe it is that, though. You know what, I think I'll just try KISS!
I've used everything but!
-
donaldlindsay
- Printmaster!
- Posts: 51
- Joined: Thu Apr 03, 2014 11:25 am
Re: Multiple extra Z stitch-type ridges
Ok, I've tested the piece using KISSlicer. The little issue from Cura is gone, but unfortunately the bridging isn't good enough...
Good finish, but the bridging's bad! Can't have it all, it seems. I'll have to persevere with Cura, or go back to Slic3r
Good finish, but the bridging's bad! Can't have it all, it seems. I'll have to persevere with Cura, or go back to Slic3r
-
donaldlindsay
- Printmaster!
- Posts: 51
- Joined: Thu Apr 03, 2014 11:25 am
solutions
Ok, in case anyone comes to this thread with the same problem.
From the Ultimaker forum, I found the following solutions to this problem - Cura spreads the Z seam/scar/stitch whatever you want to call it, around wherever it needs to. To make it less visible, you can lower the print speed to 20mm/s or less. Printing smaller layers also helps, despite greatly increasing the print time but also obviously the quality of the finished piece.
Lowering the temperature may also help, by increasing the viscosity. This may also increase the pressure in the nozzle though, which could actually make the blobs worse too.
Finally, increasing the Z speed is also thought to help.
Now to try and get all this to work. Pity about KISS's bridging problem, it solved the z seam problem in one go.