Bed Heat
The best bed temperature I've ever used for PLA is ambient room temperature plus ~5-10° C. I usually use 40°. If I was printing in a garage in the summertime, I might go up to 45° or so, but no higher. The goal is to make the bottom of the object slightly warmer than the air. Without this heat, the bottom of the object cools before the rest of it, and it will contract. If the contraction is great enough, one or more edges may peel off the print surface. HOWEVER, I would not go much higher than this. At 50-60° C, the temperature differential will encourage upper edge curling, especially on objects that have any kind of overhang or narrow features.
Retraction and Melt Creep
PLA is susceptible to a phenomenon called melt creep. This happens when the zone where the PLA is melted begins to creep up inside the hot end. At the top of this zone, the PLA is in a viscous semi-molten state. If semi-molten PLA expands into a tiny fissure in the hot end (for example, where one part of it is screwed in and joins another), it can lodge in there and jam the hot end. Semi-molten PLA also increases friction by pressing on the inside of the hot end as it expands.
Whatever hot end you use, you must use a cooling fan to remove heat from the hot end's heat sink area. If you don't do this, melt creep is certain. Also, if your hot end didn't come preassembled, make sure you put it together using the exact instructions that came with it. In the past I tried thread locker and wrapping PTFE tape around the nozzle threads of my E3D. Neither helped and the PTFE tape, which had been beneficial on another hot end I used to use, made the E3D perform worse.
Your retraction settings play a part in PLA jamming. Depending on the hot end, if your retracts are too long, they will encourage melt creep by heat soaking the upper reaches of the hot end and giving the semi-molten PLA more of a chance to snag on things. Use the shortest retracts possible. I also recommend that you try NOT using the wipe setting, if your slicer has it. This tends to drag the top layer around, and if you're printing anything delicate, it will make it look terrible. However, some hot ends might have nozzles that work better with that feature so you may as well try it both ways.
Finally, if you have an older E3D (like version 4 or 5), I recommend that you upgrade to version 6 right away. These hot ends are polished better on the inside, and I can feel the difference in lower feed pressures. They just don't jam that easily. So far I haven't found a filament that would reliably jam unless there was some other problem, like kinks in the filament. Version 6 is also better at retracts. I get almost no stringing whatsoever with 2.8mm retracts.
First Layer Adhesion
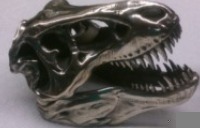
Getting your first layer adhesion figured out can make the difference between being able to print only kitschy knick-knacks, and being able to print fully functioning snap-together machinery and highly intricate sculptures. The trick is to get enough stickiness for the part you're printing. Some parts, such as this tiny planetary gear set, may print with lots of little dots and tiny arcs on the first layer that aren't supported by anything else until well after they're already deposited. If there's not enough stickiness, those features won't stay in place and the hot end will drag them all over the first layer.
Rafts.
Everything else in this section (except "mouse ears") is an actual physical adhesive, but rafts are a setting you turn on in your slicer. The idea is that the printer draws a crosshatch grid under the part, and then the part is printed on top of the grid. When the print is done, the raft is peeled off the print surface and then unceremoniously ripped free of the part.
- Pros: Pretty good at preventing the corners of your object from lifting off the print surface. For some large-footprint parts that would be difficult to remove otherwise, rafts are pretty easy to remove.
- Cons: Easily removed from the print surface, but potentially very annoying to remove from the part. Can leave blemishes on the underside. Consumes extra plastic. Edge curl can be combated without using rafts in most cases.
- Verdict: Pass. In almost every case, there are better solutions. Rafts are mostly used on other printers with crappy print surfaces. We have heated glass!
Similar to rafts. The idea is that you put little discs on any sharp edge of your objects in the CAD software.
- Pros: Works like a raft.
- Cons: You have to trim them off the model when it's done printing. If you upload your object for others to print, they have to deal with the mouse ears whether or not they have the same adhesion problem you do.
- Verdict: Pass. Mouse ears are like building a raft into the object itself. No one can "turn them off," even if they're completely unnecessary. There are better solutions.
Very convenient to put on, you just put soapy water on the print surface and lay the strips down. The soapy water makes it very easy to reposition the tape, and any air/water bubbles trapped under the surface of the tape can be easily chased out with the edge of a credit card. Because the strips are wide, you only need three of them, and won't spend all day trying to perfectly line up ten 1" wide strips.
- Pros: You don't have to deal with sticky adhesives.
- Cons: Requires significant bed heat to work, which comes with the caveat that it will increase the likelihood of edge curling. Prone to gouging from the print nozzle, as well as from stresses during part removal. If you're printing anything with lots of little dots on the first layer, like the aforementioned planetary gears, the Kapton won't be grabby enough to hold onto the dots and you'll get a huge mess.
- Verdict: Pass. Too high-maintenance.
These are about $12 for a 30-pack, which is enough to last for a year even if you print every single day. Lay down a thin coating of it by "drawing" a bunch of lines in some direction, and then another coating with the lines at a right angle, so you get a crosshatch. Wait a moment for it to start to dry; it should be sticky but not runny, and it shouldn't smudge easily. 40° bed heat will help it dry faster. After you remove your print, scrape down the remaining glue (a thumbnail or metal edge works well for this) so the remnants are flat, and then you can lay down some more glue in the same crosshatch pattern. After you've done this a few times you'll need to wash the build plate in warm soapy water, which will only take a few minutes as the glue is water-soluble.
- Pros: C-H-E-A-P! You could spend fifty bucks buying this stuff and have enough to last until everyone has a flying car. Quite effective for objects with a somewhat regular (round or squarish) profile.
- Cons: Not very good for parts that have an exotic footprint, like the aforementioned gears. If your part's first layer requires printing little dots of plastic on the first layer, the glue will probably not be enough to hold the dots in place. If you let it dry for too long, it won't hold the part very well.
- Verdict: Most parts will not have any trouble sticking to the build surface with this stuff. I use it by default.
This stuff is cheap, a few bucks at the store. One bottle is enough to last for quite a few prints.
- Pros: Not quite as cheap as Elmer's, but one can should be enough for about a month of daily printing. Works best with bed heat, which will help evaporate the liquid portion of the hairspray. What's left is perfectly sticky. If you're printing gears or other things with little plastic dots and arcs on the first layer, Elmer's may not cut it - but if you let it dry just enough, Aqua-Net will do it every time. As with Elmer's, you will need to clean your build plate daily with warm, soapy water.
- Cons: Stinky. Tends to get all over the printer and whatever's nearby. Could leave traces of decidedly non-hypoallergenic chemicals on the object, although washing with soapy water should take care of that for the most part. If you let it dry for too long, it may not hold very well.
- Verdict: For printing highly detailed mechanical stuff, or anything else with first layer adhesion issues, this is the stuff!
Sounds like some kind of fancy industrial formula, but it's sold as a spray-on glue for photo albums. A little smelly when applied, but the stink seems to vanish immediately. Coats the bed in tiny droplets resembling a white powder, which makes the filament stand out more. Slightly more difficult to clean off the glass than Elmer's or Aqua-Net, but the extra 30 seconds you spend will pay off exponentially if this is the adhesive you need. (It appears to be completely water-soluble.)
- Pros: You don't have to wait for it to dry, nor do you have to hurry up and start printing before it dries completely. You can start your print one second or an hour after the coat has been applied, and it'll work just as well either way. It's VERY grippy. If you have an object with lots of unsupported dots on the first layer and Elmer's/Aqua-Net isn't good enough, or if you just don't want to bother trying to get the application and drying time right, this will work with basically no effort.
- Cons: Marginally more difficult to clean off the glass. Like Aqua-Net, it tends to coat things near the print surface. Seems to have more horizontal grip than vertical - so while it's great for tiny features, it's not as good as preventing edge lifting. For highly regular shapes, this may not be an issue.
- Verdict: Buy it and keep it on hand. I got a can half a year ago, and never found cause to use it until just recently. However, when you have something that needs this stuff in particular, you'll be glad you have it.
I usually use Elmer's because it works on almost everything I print. When the object has some fancy details on the first layer, like little dots of plastic that the slicer puts down before anything else, I will use either 3M General Purpose 45, or Aqua-Net on top of a couple crosshatched layers of Elmer's.
Tips
- You can try increasing your tower heights in software by a twentieth or a tenth of a millimeter. On Smoothieware this is done by typing M665 Z310.9 (for example). This will make the printer "mash" the first layer, fattening it and thereby increasing the surface area it has to contact the build surface. However, this can also have the effect of fattening the first few layers, creating a flanging effect. I don't worry about this most of the time because I don't have the printer mash the filament all that much. It might be a bad idea if you're printing stuff where tolerances matter a lot, like mechanical parts.
- If you have printed something with a huge footprint and you're having trouble separating it from the printer, try running hot water over the glass print surface for a few minutes. This will cause both the plastic and the glass to expand, making them easier to separate. You can also run water on the back of the glass to transfer more heat to the center of the object. Sooner or later, your adhesive will begin to dissolve in the hot water.
Part Cooling
This is not necessary on all prints. If you're printing something with a relatively simple shape - something without overhangs, narrow unsupported features, narrow outcroppings, etc. - you don't need this. However, if you're printing something that does have those attributes, it's a good idea. I've tried several different solutions, including downdraft "box" fans and redirected fan duct air. Part cooling is important to have when you need it, but it can be so, so tricky, because:
- You want enough cool air to rapidly cool the top of your part.
- You DON'T want to cool the hot end, which is a fraction of a millimeter away from what you're cooling, AT ALL. Cooling the hot end drives up the duty cycle, which increases melt creep and can "boil" the filament so that it comes out rough and bubbly. Melt creep can easily jam the hot end, especially when there are a lot of retracts.
The reason those fan ducts are good is that they focus the air right where it's needed. Some solutions just blast cool air all over the place. This overtaxes the hot end's heating element, wastes electricity, and potentially causes jams and filament boiling. Some people have had good luck using regular room air fans positioned a few feet away. Others use downdraft fans, but the fans are really tiny so they don't punish the hot end too much. Whatever solution you use, make sure it doesn't wash your hot end in cool air.
It's a good idea to print out this overhang test, both with and without part cooling enabled. Usually you'll find that layers do OK up to about 50-60 degrees without cooling, but then you start seeing a bunch of slop on the underside and at higher angles there will be significant top edge curling. KISSlicer (and presumably others) have a place to put in the max overhang angle before the slicer will print supports. With part cooling you should be able to easily get 70 degrees of overhang, if not greater. I managed to do that with a fan duct that recycles hot end cooling air, which is less effective than using a separate fan.